Tagged: embossing

Watercolor For the Birds

for the birds friend card angle Here’s the details on the card I thought I had posted in July, but Oops! I hadn’t.

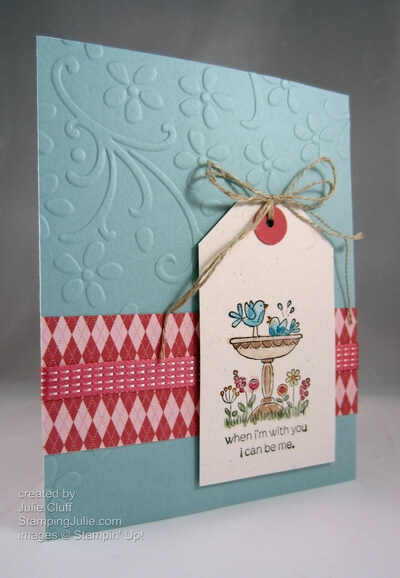
This For The Birds watercolored tag card was inspired by the card on page 35 in the catalog.  I changed the colors and simplified it a bit.  Most of the work on this card is the watercoloring, which is actually quite simply done with Aqua Painters and Reinkers.

Watch the how to watercolor with reinkers tutorial here.

for the birds friend card detail

Use StazOn ink to keep your stamped outline from smearing when you paint it.  And as you paint don’t be perfect.  Leave some white spots, go over the lines, color some areas darker – this all adds to the charm of watercolor.

 To create the circle reinforcement at the top of the tag, punch the small hole first and then punch out the 1/2″ circle centering the hole.  And to cut the corners on the tag, consider using the diagonal scoring plate to score one corner then turn the tag over and score the other corner.  Use the score lines as a guide to evenly snip off the corners and create the tag.

for the birds friend card I love these cute birds!  And anyone would be thrilled if you created this cute little friendship card just for them!

Enjoy! Julie

for the birds stamp set Card Recipe:
Stamps: For the Birds w-#126405, c-#126407
Ink: Black StazOn  #101406
Paper: Naturals White card stock #102316, Baha Breeze card stock #111352, Patio Party Designer Series Paper #126916
Extras: 1/2″ Circle Punch #119869, Primrose Petals Stitched Satin Ribbon #126844, Linen Thread #104199, Elegant Bouquet Embossing Folder #115964, Big Shot Die-Cutting Machine # 113439
 
Thoughts & Prayers get well soon card

Speedy Recovery Card

Thoughts & Prayers get well soon card A friend had out-patient shoulder surgery this week.  She has been in pain for quite a while, so she was excited to have this surgery in hopes of some relief.  I made this card to cheer her up and give her something pretty to look at while she is resting.

The flowers on this card are made with the flowers punched out with the Boho Blossoms Punch and the technique described in this tutorial below.

paper flowers how to

 Paper Flowers Tutorial PDF

I punched five each of the different-sized blossoms from Regal Rose card stock, spritzed them with water, and layered them to create the three flowers.  I then adhered each to a matching Bravo Burgandy blossom base.

Thoughts & Prayers get well paper flowers

 The leaves were punched out of Summer Starfruit card stock with the Bird Builder Punch, the stems trimmed and  glued behind the flower base.

Thoughts & Prayers get well label

To create the greeting label, I started with a Whisper White card stock, and repeatedly stamped the doily  from the Delicate Doilies stamp set with Regal Rose ink stamped off once for a lighter application.  The greeting is from the Thoughts & Prayers stamp set stamped with a StazOn ink pad.

Thoughts & Prayers get well framelit

After I did all my stamping, I positioned the Labels Collection Framelit to surround the greeting, ‘taped’ it down with post-it notes to keep it in place, and ran it through my Big Shot Die-Cutting Machine.  I also die cut a second label out of Regal Rose card stock of the larger-sized framelit for layering.

Thoughts & Prayers get well card polka dot background

To finish the card I embossed Whisper White card stock with the Perfect Polka Dot embossing folder, layered on Bravo Burgandy card stock, added ribbon and assembled the card.

This card reminds me of my friend’s gentle southern charm!  I hope she likes it.

Enjoy!  Julie

Shop 24/7 in My Online Store!

Card Recipe:
Stamps: Thoughts & Prayers w-#113252 c-#127805, Delicate Doilies w-#122590 c-#122592
Ink: Regal Rose #126947, Black Stazon #101406
Paper: Whisper White #100730, Regal Rose #105130, Bravo Burgundy #105123, Summer Starfruit #126839
Extras: Big Shot #113439, Labels Collection Framelits #125598, Boho Blossoms Punch #119858, Perfect Polka Dots Folder #117355, Organza Ribbon #114319, Brights Brads #119740, Little Leaves Sizzlits #114511


sweet essentials ribbon flower birthday card angle

Cotton Ribbon Flower Birthday Card

sweet essentials ribbon flower birthday card angle

The Stampin’ Up! exclusive magazine for demonstrators is a wonderful source of inspiration.  This past month it featured an article on stamping on ribbon using the new 7/8” Cotton Ribbon and the Border Banter stamp set, both on page 20 of the new Holiday Catalog.  In the catalog you’ll see a candy box tied with the festive green stamped ribbon.  Very playful and lovely!

My card uses the same layout and basic features of the stamped card found in the magazine.  To create the ribbon flower, the ribbon is first stamped with Primrose Petals ink and ruffled in the middle and hot glued to a cardstock circle.  Once the base of the flower was complete, I threaded a white twine bow into the clear Vintage Button and adhered that to the flower with glue dots. sweet essentials ribbon flower birthday card close up

The ‘make a wish’ greeting was also stamped on ribbon; this time using Black StazOn ink.  A strip of Crochet Trim was affixed to the back of the ribbon and then the flag end was trimmed out with Craft Scissors.  The Craft Scissors are wonderful and cut through ribbon and paper like butter! sweet essentials ribbon flower birthday card sentiment

A quick word about Craft Scissors and other tools – I used to think I was no good at baking cookies until I invested in long-lasting quality baking tools, like a baking stone and a cooling rack.  When I started using the quality tools my experience with baking was transformed.  Every batch was successful!  Craft Scissors and other high quality Stampin’ Up! tools are invaluable in transforming your crafting experience into fabulous success!

The leaves are Little Leave Sizzlits cut outs.  Using the tip of the Bone Folder, I creased the center of the leaves for a more natural look.  sweet essentials ribbon flower birthday card leaves

And finally, probably my favorite part of this card, the background!  This background was featured in video #1 in the recent article 5 new Stampin’ Up! How-To Videos !    Starting with the Vintage Wallpaper Embossing Folder, I used a brayer to roll ink on one side of the open folder.  Then I sandwiched the cardstock in the folder and gently rubbed the inked folder over the Primrose Petals paper.  That’s it.  Instead of embossing the card front I just used the folder to ‘stamp’ the paper creating this lovely background!  Watch the video if you’re still trying to figure out what I did!

Try the new ‘stamping with an embossing folder’ technique. Order your cotton ribbon today and start stamping!

Enjoy!  Julie

Shop 24/7 in My Online Store!

sweet essentials ribbon flower birthday card Card Recipe:
Stamps: Sweet Essentials w-#126455 c-#126457, Delicate Doilies w-#122590 c-#122592
Ink: Primrose Petals #126858, Black Stazon #101406
Cardstock:  Primrose Petals #126841, Summer Starfruit #126839
Extras: Vintage Faceted Designer Buttons #127555, Natural Cotton Ribbon #127844, Crochet Trim 118481, White Baker’s Twine #124262, Little Leaves Sizzlits #114511, Brayer #102395, Craft Scissors 108360, Vintage Wallpaper Folder #120175
for the birds friend card angle

For the Birds “I can be me”

for the birds friend card angle

Have you seen this card?  Seriously, I need your help.  I thought I shared this card last month, but I can’t find the post.  Let me know if you haven’t seen it and I’ll post the details!!!  Or maybe I’m just going crazy.   :/

Love these little birds!

Enjoy! Julie

Summer Silhouettes Kindness Thank You Card angle

Summer Silhouettes Thank You Card

Summer Silhouettes Kindness Thank You Card angle I enjoyed making this Summer Silhouettes Thank You card using many techniques including embossing, using watermark ink, stamping outside the lines and outlining.

Let me explain each technique.

1. Embossing – I stamped the flower centers on the background and the main flowers with white craft ink and heat embossed with white embossing powder so they would show against the darker flowers.

2. Using Watermark Ink – Versamark ink will give you a watermark affect on any color cardstock.  In this case, I used Versamark ink to stamp the lattice pattern in the background.

Summer Silhouettes Kindness Thank You Card detail

3. Stamping Outside the Lines – I stamped the leaves on a piece of Whisper White cardstock that was 2″ x 4-1/4″.  Then I trimmed it down to 1-1/2″ with a paper trimmer all the way to the edge of the leaves and snipped around the leaves so they hung outside the border of the paper.  It’s a cool effect, which works great for leaves, flowers and trees.

4.  Outlining – The main flowers and leaves are outlined with the fine tip of a Stampin’ Write marker.  If you look closely you’ll see that the outline is free handed and not complete.  I love the look!  What do you thing?

Summer Silhouettes Kindness Thank You Card

Have you tried these techniques before?  Which is your favorite technique or which would you like to try?  Leave a comment below.

Enjoy!  Julie

Card Recipe:
Stamps: Summer Silhouettes w-#126445 c-#126447, Blooming with Kindness w-#126420 c-#126422
Ink: Wisteria Wonder #126985, Lucky Limeade #126984, Elegant Eggplant #126989, Whisper White Craft #101731, Versamark #102283
Paper: Wisteria Wonder #122922, Whisper White #100730, Elegant Eggplant #105126
Extras:  White Emboss Powder #109132, Heat Tool #129053, Paper Snips #103579, Stampin’ Dimensionals #104430, Regals Stampin’ Write Markers #119701
Stampin' Up! Summer Silhouettes Stamp Set