Tagged: card making techniques

Chalk Talk Thank You

A Chalk Talk Thank You and Missed Opportunities

Chalk Talk Thank You

What happens when you create, and create, and you take pictures and you don’t share them?

This…

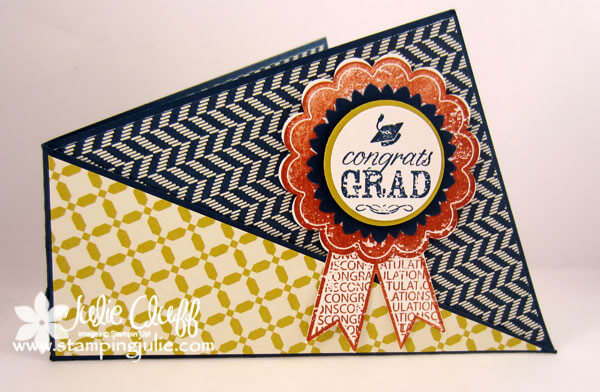
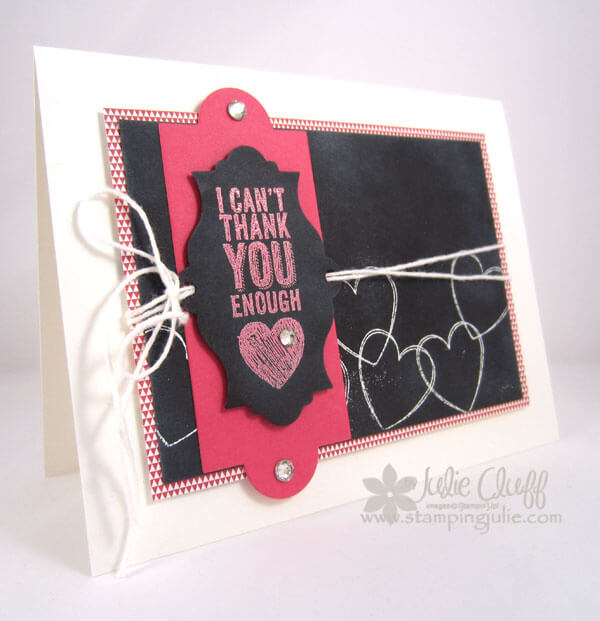
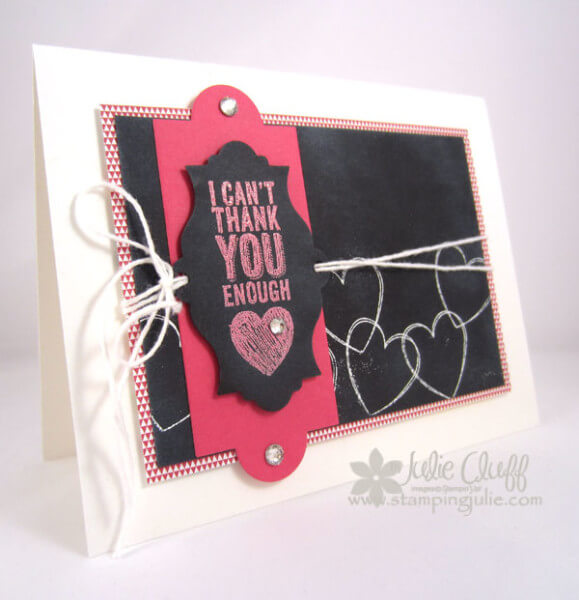
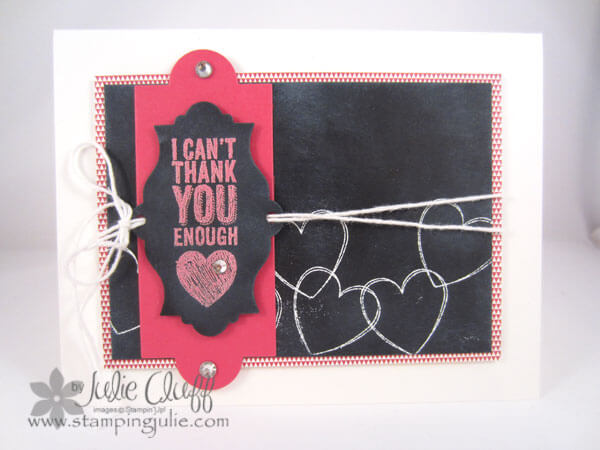
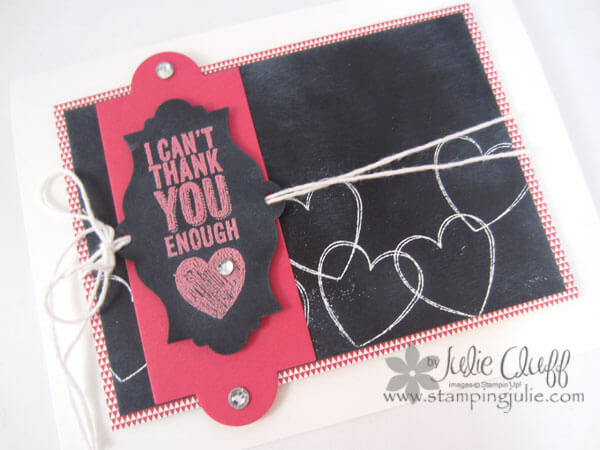
      … a Chalk Talk thank you card that includes great stuff that you can’t get anymore.

Big bummer!

All is not lost…lots of great stuff on this card that is still available…but it could be gone too eventually.

Moral of the story?

          …I’ll leave that up to you.

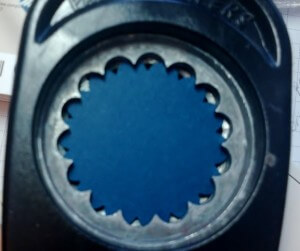
I love the Apothecary framelits I used to trim the layers of the tag.  And…BONUS…they’re still available!

Using only one color with a couple of neutrals is an easy way to get a unified look.  Score!

Coordinating pattern paper, cardstock and embossing powder in Stampin’ Up! Melon Mambo – it’s like Color Coordination for Dummies.

Chalk Talk Thank You detail

Black always adds so much style and sophistication to a card even if it is a chalkboard.  I’m a fan of black.  I disagree that Orange is the New Black.  Sorry, Netflix.

I still love the chalkboard look.   How about you?  You can easily achieve this chalkboard technique by heat embossing on black cardstock.   Then rub white craft ink randomly across the black cardstock with a sponge for that chalky, just erased look.

Chalk Talk Thank You card front

Apparently, Stampin’ Up! does not feel the need to consult me before making product retirement decisions.

What’s up with that?

I can guarantee you that if they had asked me, I would have said you can’t retire these sweet open hearts from Hearts A Flutter or the Melon Mambo embossing powder until after I’ve walked on the moon.

Which is NEVER!

But the good news, I guess, is that amazing stamp sets and accessories retire so we can have more amazing stamp sets and accessories.

And we don’t all have to have back surgery from carrying around a catalog that weighs 500 pounds.

Chalk Talk Thank You close up

And more good news – the bakers twine is now available in seven new colors and the new thick baker’s twine is available in five colors.  Seven plus five equals twelve new options.  Check it out here.

(All supplies are Stampin’ Up! and can be ordered through my online store.  Thank you!  I love my customers!  <3 )
Stamps: Chalk Talk wood-mount #130631 or clear-mount #130634
Ink: Versamark pad #102283, white craft pad #101731
Paper: Whisper White cardstock #100730, Black cardstock #121045
Extras: Big Shot Die-cutting Machine #113439, Apothecary Framelits #127003, White Baker’s Twine #124262, Rhinestones #119246, White Embossing Powder #, Dimensionals #104430
 

Quick Links:

Enjoy!  Julie

Blended Bloom cherry cobbler blendabilities

Blendabilities LOVE and How Perfectionism Can Ruin Your Creativity


Blended Bloom cherry cobbler blendabilities

Maybe you’ve noticed I’ve been absent from this space for far too long!!!  And I’ve missed it.  A lot.  I love having a reason to get up and create everyday.  And I’ve missed you.   You’re amazing, and you keep coming back, and you continue to order from me.  Thank you!!

So what’s with the title?  Perfectionism is the reason I’ve been absent.  Now I could say it is grandbabies and moving and school and volunteer work and, and, and, but truthfully, it’s perfectionism.  See, if I couldn’t do blog everyday, with all the bells and whistles I wanted to add, then I just couldn’t do it.  Which is ri-di-cu-lous!

In fact, right now I want to change everything about my website.  And I mean everything!  I want a different layout, a different color scheme and a different header, etc., etc.  But I’m going to embrace the here and now, and remember Rome wasn’t built in a day, for heaven’s sake. I’m sure you would rather for me to post three or four imperfect blog posts every week on my imperfect blog than just disappear.  Am I right?  Well, I hope I’m right, because that is my new No-More-Perfectionism Manifesto.

How has perfectionism stopped you this year?  Join me and embrace your imperfections and enjoy your creativity!!  Don’t let perfectionism ruin your creativity!

Blended Bloom cherry cobbler blendabilities flower detail

I am in love!!!  Yes, it’s true!  My new, true loves are the Stampin’ Up! Blendabilities markers!!!  Oh     My     Goodness!!!!!!!!  Seriously, folks, FUN, FUN, FUN!  I love coloring.  Ask my grandkids. I can color Ariel, Barbie and Scooby Doo like nobody’s business.  So give me a new tool for coloring and I’m in heaven.  Love, love, love!

But patience is NOT my strong suit.  If you look closely at the flower above you’ll notice that it is not perfectly blended.  (Yep, there’s that perfect word again.)  If you’ve used alcohol-based markers, like Copics before or you’ve seen a demonstration, you know that working in small areas is ideal because it allows the color to blend together while it’s still damp or something very scientific like that.  But I, on the other hand, do not like the idea of using four different markers on one petal before moving on to the next one.  People, that’s seriously time consuming!

blendabilities markers cherry cobbler

Each color comes in a three pack.  Brilliant!  No blending guess work.  My approach on this flower was to start with the darkest color of the Cherry Cobbler assortment, coloring in the shadows of the petals.  Then I used the medium Cherry Cobbler marker and pulled the darker color out a little further.  And finally coloring with the lightest shade, I blend out to the petal edges.  I love the look of white spaces in watercoloring so I left some small white spaces.  I then went in with the lightest Pumpkin Pie shade and blended into the white spaces for some additional color interest and depth.

Blended Bloom cherry cobbler blendabilities card front

I used the Daffodil Delight Blendabilities markers for the flower center.  I then added a few of the tiniest pearls.  Be sure to use the Memento stamp pad with your blendabilities.  The Memento stamp pad and Whisper White card stock are a perfect pair for “blendabiliting”. Yep, I made that up.  “Blendabiliting.”  I think I will be doing a lot of that.   I hope you like my very first blendabilities project. There are many more to come!

Blended Bloom cherry cobbler blendabilities ribbon detail

This card also features other great, new products: the Something to Say stamp set, the Moonlight Designer Series Paper stack and the Hello Honey Stitched Satin Ribbon.

(All supplies are Stampin’ Up! and can be ordered through my online store.  Thank you!  I love my customers!  <3 )Stamps: Blended Bloom wood-mount #135906,  Something to Say wood-mount #134177 or clear-mount #134180
Ink: Momento Stamp Pad #132708
Paper: Whisper White cardstock #100730, So Safron cardstock #126957, Moonlight Designer Series Paper stack #133701
Extras: Big Shot Die-cutting Machine #113439, cuddlebug embossing folder (the Lovely Lace ef #133737 would make a great substitute), Hello Honey Stitched Satin Ribbon #133671, Corner Punch #135346, Dimensionals #104430
 

 Quick Links:

Enjoy!  Julie

MDS Comfort Cafe Birthday Card

Digital Tuesday – A MDS Happy Birthday

MDS Comfort Cafe Birthday Card

This is the fabulous card my sister gave to me for my birthday.  She designed these 5″ x 7″ birthday cards in MDS and then sent them straight from the software to Stampin’ Up! to be printed.  The printed cards are really nice and they come with envelopes too.

She used the Comfort Café digital dsp for the background on the front, the back and the inside.  She added a Crumb Cake band across the middle front, a Very Vanilla decorative label punch and a Night of Navy happy birthday stamp from the Engraved Greetings digital stamp brush set.

MDS Comfort Cafe Birthday Card

After adding the background to the back she included a Night of Navy filled punch with her initials to personalize her creation.

MDS Comfort Cafe Birthday Card

She kept it simple on the inside with more dsp at the top and a ‘make it a good one’ greeting.

Make a few of your own birthday cards and order them today so you’ll always have what you need on hand.

Products used on this card:
MDS software
Comfort Café Designer Series Paper – Digital Download #127203
Engraved Greetings Stamp Brush Set – Digital Download #124567
Get it Done Kit – Digital Download #129924

CHECK OUT THIS WEEK’S new digital downloads and this month’s digital freebie.

Enjoy!  Julie

Glittery Watercolor Friend Card

just believe watercolor glitter card stampingjulie.com

I really like watercolor cards  with unexpected color splashes so I thought I would experiment with the technique and I ended up with the inky fingers to prove it!  I used Shimmery White cardstock and the Just Believe stamp set for this experiment.

just believe watercolor glitter card stampingjulie.com

I stamped the label with Midnight Muse and embossed it with clear embossing powder.  Then I stamped ‘friends’ with Primrose Petals.  After trimming out the label I layered it on a Silver Glimmer paper label.  I used Primrose Petals and Silver Glimmer cardstock to create and layer the butterflies from the Beautiful Wings Embosslits die.

just believe watercolor glitter card stampingjulie.com I squirted the background cardstock with water before splattering Primrose Petals, Midnight Muse and Always Artichoke reinkers which allowed the ink to spread.  I put a few dabs of Silver Sparkle Dazzling Details glitter adhesive and spread it with my finger on the background.  I also added a couple of dots of the glitter to the butterflies and the flowers on the label.  Finally, I added a few rhinestones.

Here’s the card recipe:
(All supplies are Stampin’ Up! Click on the product link to visit the online store for pictures, details & ordering.)
Stamps:   Just Believe wood-mount #116948 or clear-mount #120453*
Ink: Primrose Petals #126858, Midnight Muse #126860, Always Artichoke #126972
Paper: Shimmery White cardstock #101910, Midnight Muse #126843, Primrose Petals #126841,  Silver Glimmer Paper #124005
Extras: Big Shot #113439, Beautiful Wings Embosslits #118138, Silver Sparkle Dazzling Details #127845, Decorative Label Punch #120907, Clear Embossing Powder #109130, Heat Tool #129053, Rhinestones #119246, Dimensionals #104430
* retiring, available until June 3rd.
just believe stamp set

Click here for the retiring Stampin’ Up! stamps list. Click here for the retiring accessories list (with updates on sold out product). Order your favorites now!

Save even more by adding Clearance Rack items to your order!

Have you tried the watercolor splattered look?  What do you think?

Enjoy!  Julie

Masculine Graduation Twist Card

Blue-Banner-masculine graduation twist card

This masculine graduation twist card’s unique fold is perfect for giving a gift card with it’s built-in pockets.   This card made with the Blue Ribbon stamp set looks complicated but it is really quite simple.  Below I’ve written some simple instructions with tips for getting it right!

Blue-Banner-ma3
I used a piece of Midnight Muse cardstock cut to 4-1/4″ x 11″ then scored it diagonally from corner to corner, scored and folded in half.  That’s it!  That makes the card base.  Below you see I put in a business card to show you how you would use this with a gift card.

Blue-Banner-ma4

Now to embellish the card I cut a piece of Comfort Café Designer Series Paper to 4″ x 10-1/2″.  Then cut your paper diagonally from corner to corner, flip the right hand piece over and match up the diagonal cut and cut these pieces in half where the pieces intersect.  That’s the important part, lining up the pieces on the diagonal cut with the same patterns facing each other before cutting down the middle otherwise your dsp pieces will not line up right on the card.

Blue-Banner-ma5

scallop circle punched sunburst

To decorate the front I layered the ‘congrats’ ribbon with matching Cajun Craze, Midnight Muse and Summer Starfruit, a color combination inspired by the Comfort Café dsp.  Since this is an masculine card with masculine colors I chose to feed the Midnight Muse scallop back into the punch and punch it again into the scallop to make more of a star burst type pattern instead of a scallop as shown in the picture above.

Blue-Banner-masculine-twist

Here’s the card recipe:
(All supplies are Stampin’ Up! Click on the product link to visit the online store for pictures, details & ordering.)
Stamps:  Blue Ribbon wood-mount #125979 or clear-mount  #125981, Itty Bitty Banners wood-mount #126255 or clear-mount #126257
Ink: Cajun Craze #126965, Midnight Muse #126860
Paper: Whisper White cardstock #100730, Midnight Muse #126843
Extras:  2-3/8″ Scallop Circle punch #118874, 1-3/4″ Scallop Circle punch #119854, 1-1/4″  Circle punch #119861, 1-3/8″  Circle punch #119860,  Dimensionals #104430
 

Enjoy!  Julie