Tagged: die cut

Thoughts & Prayers get well soon card

Speedy Recovery Card

Thoughts & Prayers get well soon card A friend had out-patient shoulder surgery this week.  She has been in pain for quite a while, so she was excited to have this surgery in hopes of some relief.  I made this card to cheer her up and give her something pretty to look at while she is resting.

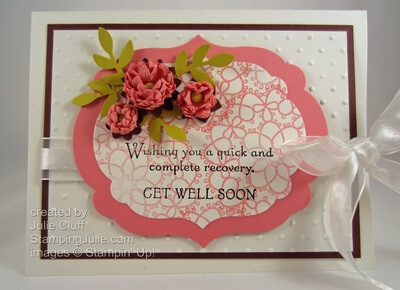
The flowers on this card are made with the flowers punched out with the Boho Blossoms Punch and the technique described in this tutorial below.

paper flowers how to

 Paper Flowers Tutorial PDF

I punched five each of the different-sized blossoms from Regal Rose card stock, spritzed them with water, and layered them to create the three flowers.  I then adhered each to a matching Bravo Burgandy blossom base.

Thoughts & Prayers get well paper flowers

 The leaves were punched out of Summer Starfruit card stock with the Bird Builder Punch, the stems trimmed and  glued behind the flower base.

Thoughts & Prayers get well label

To create the greeting label, I started with a Whisper White card stock, and repeatedly stamped the doily  from the Delicate Doilies stamp set with Regal Rose ink stamped off once for a lighter application.  The greeting is from the Thoughts & Prayers stamp set stamped with a StazOn ink pad.

Thoughts & Prayers get well framelit

After I did all my stamping, I positioned the Labels Collection Framelit to surround the greeting, ‘taped’ it down with post-it notes to keep it in place, and ran it through my Big Shot Die-Cutting Machine.  I also die cut a second label out of Regal Rose card stock of the larger-sized framelit for layering.

Thoughts & Prayers get well card polka dot background

To finish the card I embossed Whisper White card stock with the Perfect Polka Dot embossing folder, layered on Bravo Burgandy card stock, added ribbon and assembled the card.

This card reminds me of my friend’s gentle southern charm!  I hope she likes it.

Enjoy!  Julie

Shop 24/7 in My Online Store!

Card Recipe:
Stamps: Thoughts & Prayers w-#113252 c-#127805, Delicate Doilies w-#122590 c-#122592
Ink: Regal Rose #126947, Black Stazon #101406
Paper: Whisper White #100730, Regal Rose #105130, Bravo Burgundy #105123, Summer Starfruit #126839
Extras: Big Shot #113439, Labels Collection Framelits #125598, Boho Blossoms Punch #119858, Perfect Polka Dots Folder #117355, Organza Ribbon #114319, Brights Brads #119740, Little Leaves Sizzlits #114511


sweet essentials ribbon flower birthday card angle

Cotton Ribbon Flower Birthday Card

sweet essentials ribbon flower birthday card angle

The Stampin’ Up! exclusive magazine for demonstrators is a wonderful source of inspiration.  This past month it featured an article on stamping on ribbon using the new 7/8” Cotton Ribbon and the Border Banter stamp set, both on page 20 of the new Holiday Catalog.  In the catalog you’ll see a candy box tied with the festive green stamped ribbon.  Very playful and lovely!

My card uses the same layout and basic features of the stamped card found in the magazine.  To create the ribbon flower, the ribbon is first stamped with Primrose Petals ink and ruffled in the middle and hot glued to a cardstock circle.  Once the base of the flower was complete, I threaded a white twine bow into the clear Vintage Button and adhered that to the flower with glue dots. sweet essentials ribbon flower birthday card close up

The ‘make a wish’ greeting was also stamped on ribbon; this time using Black StazOn ink.  A strip of Crochet Trim was affixed to the back of the ribbon and then the flag end was trimmed out with Craft Scissors.  The Craft Scissors are wonderful and cut through ribbon and paper like butter! sweet essentials ribbon flower birthday card sentiment

A quick word about Craft Scissors and other tools – I used to think I was no good at baking cookies until I invested in long-lasting quality baking tools, like a baking stone and a cooling rack.  When I started using the quality tools my experience with baking was transformed.  Every batch was successful!  Craft Scissors and other high quality Stampin’ Up! tools are invaluable in transforming your crafting experience into fabulous success!

The leaves are Little Leave Sizzlits cut outs.  Using the tip of the Bone Folder, I creased the center of the leaves for a more natural look.  sweet essentials ribbon flower birthday card leaves

And finally, probably my favorite part of this card, the background!  This background was featured in video #1 in the recent article 5 new Stampin’ Up! How-To Videos !    Starting with the Vintage Wallpaper Embossing Folder, I used a brayer to roll ink on one side of the open folder.  Then I sandwiched the cardstock in the folder and gently rubbed the inked folder over the Primrose Petals paper.  That’s it.  Instead of embossing the card front I just used the folder to ‘stamp’ the paper creating this lovely background!  Watch the video if you’re still trying to figure out what I did!

Try the new ‘stamping with an embossing folder’ technique. Order your cotton ribbon today and start stamping!

Enjoy!  Julie

Shop 24/7 in My Online Store!

sweet essentials ribbon flower birthday card Card Recipe:
Stamps: Sweet Essentials w-#126455 c-#126457, Delicate Doilies w-#122590 c-#122592
Ink: Primrose Petals #126858, Black Stazon #101406
Cardstock:  Primrose Petals #126841, Summer Starfruit #126839
Extras: Vintage Faceted Designer Buttons #127555, Natural Cotton Ribbon #127844, Crochet Trim 118481, White Baker’s Twine #124262, Little Leaves Sizzlits #114511, Brayer #102395, Craft Scissors 108360, Vintage Wallpaper Folder #120175
angry bird die-cut purse

Angry Bird Die Cut Purse & Video Tutorial

angry bird die-cut purse

Time to turn the Petite Purse into an angry bird.  Don’t you think?  This little angry bird inspired treat box is amazingly easy to make with the Petite Purse Bigz Die and punches.

 And I made a video tutorial on making this fun little piece.  You can view it here.

This little ditty would make a great birthday party favor or a cute little birthday or thank you treat.

angry bird purse close up

Order your stamping supplies here! 

Enjoy, Julie

Project Recipe:
Paper:  Real Red #, Daffodil Delight #, Basic Black #, Whisper White #100730
Die: Petite Purse Bigz Die #125606, 3-1/2″ Circle Die # 121811
Punches: 3/4″ Circle #119873,  1/2″ Circle #119869, Cupcake Builder #121807, Large Oval #119855, Bird Builder #117191, 1″ Square 124094
Adhesive: Multipurpose Liquid Glue #110755, Sticky Strip #104294, Glue Dots #103683, Stampin’ Dimensionals #104430
Extra: Big Shot Die-Cutting Machine #113439, Bone Folder #102300, Paper Snips #103579
world treasures greeting card

Stampin’ Up! World Treasures Peacock Greeting Card

world treasures greeting card

I created this World Treasures peacock greeting card and when I got done I just wasn’t sure if I liked it.  It was late, so I left my stamping corner and went to bed. The next morning I entered my stamping corner and was welcomed by this beautiful peacock and fell in love! Really how can you go wrong with this exotic creature!

world treasures greeting card peacock detail

I stamped the peacock twice in Rich Razzleberry and once in Primrose Petals.  I die cut one of the Rich Razzleberry images with the Big Shot Die-cutting Machine and the largest framelit from the Apothecary Accents Framelits Dies set.  That became my main focal point.  I then trimmed out the inner fan of the Primrose Petals image with Paper Snips and trimmed out the peacock body of the other Rich Razzleberry piece and layered those with Stampin’ dimensionals after coloring some of the feathers with Stampin’ Write markers.

world treasures greeting card peacock

Sometimes when you stamp a solid image like this peacock body you can get a little splotching.  I whipped out my blender pen and picked up a little ink from the stamp pad and blended in the Rich Razzleberry for great coverage!

world treasures greeting card close up And is it possible to decorate this fabulous bird without bling?  I think NOT!!  A row of rhinestones does the trick and really is absolutely stunning in person.

The International Bazaar Designer Series Paper is all the rage in the background!  This pattern paper is a powerful design with a lot of Pop!, but having lots of white space around the peacock allows it to work and gives this World Treasures Greeting Card a very rich feel.

The Apothecary Accents Framelits Dies, the International Bazaar Designer Series Paper, Basic Rhinestones Jewels Accents, and the World Treasure Stamp Set are all part of the International Bazaar Product Suite found here.

Enjoy, Julie

world treasures peacock greeting card angle

Card Recipe:
Stamps: World Treasures w-#126765 c-#126767
Ink: Rich Razzleberry #126950, Primrose Petals #126858
Paper: International Bazaar Designer Series Paper #126920, Whisper White #100730, Pacific Point #111350
Extras: Apothecary Accents Framelits Dies #127003, Big Shot Die-Cutting Machine #113439, Basic Rhinestones Jewels Accents #119246, Brights Stampin’ Write Markers #119702, Stampin’ Dimensionals #104430, Daffodil Delight Ribbon #126872, Paper Snips#103579
stampin' up! world treasure stamp set
pretty postage wonderful you birthday card

Stampin’ Up! Happy Birthday Wonderful You Card

pretty postage wonderful you birthday card

A little Catalog magic inspired this Pretty Postage birthday card!  The card on the bottom of page 178 was the specific inspiration.  I changed the stamps and the colors slightly and I was excited to use the little silver mini brads for the first time.  Love those little things – so cute!

pretty postage birthday card close up

The circles on the blue tag are stamped Marina Mist ink on Marina Mist card stock, color on color, with a circle stamp from the Circle Circus stamp set.

The birthday cake was colored with Stampin’ Write Markers and then stamped and punched out with the Postage Punch.  When I color a stamp with markers I like to start with the lightest color first to keep the markers clean.  With this card it was easiest to color the candles flames first as they are so tiny and it would have been really hard to color them just right after everything else was colored in.

pretty postage birthday card angle

The flag ends of the large Early Espress banner and the Certainly Celery banner were cut with the corner of a Square Punch.

Do you need a 2012-13 Catalog for inspiration?  Email me now with your U. S. address and I’ll one in the mail to you.

Card Recipe:
Stamps: Pretty Postage w-#123095 c-#123097, Friendly Phrases w-#126149 c-#126151, Circle Circus w-#115778 c-#127784
Ink:  Marina Mist #126962, Early Espresso #126974
Paper: Polka Dot Parade #126902, Whisper White #100730, Early Espresso #119686, Marina Mist #119682, Certainly Celery #105125
Extras:  Subtles Stampin’ Write Markers #119700, Brights Stampin’ Write Markers #119702, Postage Punch #122344, Apothecary Framelits #127003, Square Punch #119877, Big Shot Die-Cutting Machine #113439
 

Enjoy!  Julie