Tagged: clean & simple

Wacky Wishes Birthday

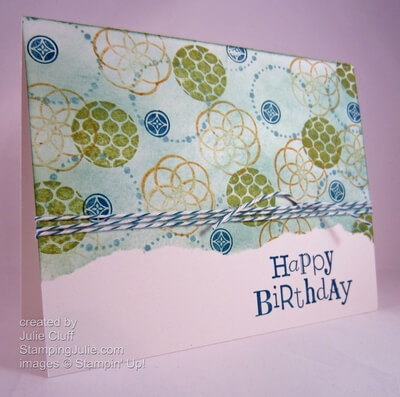
A Wacky Wishes Happy Birthday

Wacky Wishes Birthday Yesterday we celebrated our son Dallin’s birthday.  I created this one-layer, clean & simple collage card with Stampin’ Up! stamps from Circle Circus  and Wacky Wishes to wish him a happy, happy birthday!  We celebrated at P F Chang’s, his birthday dinner choice.  (Pictures will be added to facebook later today.)

So how did I create this one-layer card?  First I tore a piece of paper to act as a mask.  I placed the torn mask to cover the bottom third of the card and sponged the top third with Baja Breeze ink.  Then, leaving the mask in place, I stamped various circles from in Baja Breeze, Lucky Limeade, More Mustard, and Island Indigo.  The creative color palette came from the Color Coach!

Wacky Wishes Birthday detail Finally I lifted the mask and stamped ‘Happy Birthday’ from the Wacky Wishes stamp set in Island Indigo.   Then I wrapped Island Indigo Bakers Twine around the card three times and tied it in a knot.  I really wanted to tie it in a bow but decided the knot would be more masculine.

THE WACKY WISHES STAMP SET IS A STAMPIN’ REWARD SET. What does that mean?  When you host a party you can receive hostess benefits including exclusive hostess sets that are specially priced.  BUT you don’t have to host a conventional party to receive these rewards.  Any time your order reaches $150 or more in product you can select at least $25 worth of FREE product including exclusive hostess sets.  Click here to view Stampin’ Rewards.

Wacky Wishes Birthday with envelope

I like to make the envelope extra special so the recipient can anticipate what’s inside.  By slipping a piece of scrap paper under the flap I was able to stamp this circle in Lucky Limeade to imitate the design on the card.  I find that stamping on the flap is always an easy envelope solution.

Being a 21-year-old young man, he ripped into the envelope like TNT and all the pretty decorating was demolished, but it’s the thought that counts, right?

personal stamp mom On the back of his card I stamped my personalized stamp with Lucky Limeade and then added some mom personlization with a Lucky Limeade marker.

DIGITAL DOWNLOADS 50% OFF AND FREE DOWNLOADS AVAILABLE NOW UNTIL NOV. 5TH.  Click here to order.

Click Here to Order your Stampin’ Supplies!

Click Here for Fun, Easy Digital Scrapbooking! 

Like us on Facebook

Follow on Twitter

Enjoy,  Julie

Wacky Wishes Birthday close up with envy

Card Recipe: 
Stamps:  Circle Circus w-#115778 c-#127784, Wacky Wishes (stampin’ reward) w-#126410 c-#126412
Ink: Baja Breeze #126960, Lucky Limeade #126984, More Mustard #126964, Island Indigo #126986
Paper:   Whisper White #100730
Extras: Stampin’ Sponges #101610, Island Indigo Bakers Twine #125575
Carry On Birthday Cupcake Card

Keep Calm & Eat a Cupcake

Carry On Birthday Cupcake Card I love playful birthday cards!  This card was designed by my sister during our stamping marathon last month.  She used a different stamp set to make hers and I chose this little cupcake from the Stampin’ Up! Carry On stamp set – love it!  And did you know you can get this stamp set FREE as a Stampin’ Reward with a $150 order.

Carry On Birthday Cupcake Card detail Layering stamped images is a great way to increase interest in your designs.  I really love the crisp look of this fun cupcake and the ‘eat a cupcake’ font.  And the Flourish Designer Frame highlights the message with style!

Trendy Chevron embossing and lively polka dots from the Polka Dot Parade Designer Series paper is just perfect for a great birthday wish.  I love using Stampin’ Up! coordinated line of ribbons, ink and papers which makes designing great projects super easy.

Carry On Birthday Cupcake Card above Order Stampin’ Up! Products Here 24/7 (and don’t forget to check out the dozens of new items added to the clearance rack.)

View the Stampin’ Up! Holiday Catalog here

Like us on Facebook

Follow on Twitter

Enjoy! Julie

Carry On Birthday Cupcake Card 2 Card Recipe:
Stamps: Carry On (Stampin’ Rewards) w-# 126645 c-# 126647
Ink:  Basic Gray #126981, Baja Breeze #126960
Paper: Polka Dot Parade Designer Series Paper #126902, Basic Gray #121044, Baja Breeze #111352, Whisper White #100730
Extras: Flourish Designer Frame #127835, Mini Brads #122941, Big Shot Die-cutting Machine #113439, Chevron Emboss Folder #127749, Gray Ribbon #126879
nature walk for you card

Stampin’ Up! Nature Walk Collage Greeting

nature walk for you card

I have always loved the collage style but it doesn’t come naturally to me.  The Nature Walk stamp set makes collage stamping easy and using clear-mount stamps makes it even easier.  I mounted the bee, butterfly and number stamp on one block and stamped them in More Mustard.

I stamped the bird egg images with Sahara Sand and the floral image with Old Olive.  Finally I stamped the bird cage with Midnight Muse and added a wire hanger with a straight edge and the fine tip Midnight Muse marker.

nature walk for you card bird cage

I created the ‘For You’ tag with the Layered Labels stamp set stamped in Old Olive and die-cut with the Apothecary  Accents Framelits.  I stamped it again with Midnight Muse and punched with the large oval punch and layered it all with Stampin’ Dimensionals.  The final touch was knotted on with stitched Midnight Muse ribbon.

nature walk for you card detail

I was going for a simple, sophisticated collage greeting card.  I hope I hit the mark!  What do you think?

Order Stampin’ Up! Products Here 24/7 (and don’t forget to check out the dozens of new items added to the clearance rack.)

View the Stampin’ Up! Holiday Catalog here

Like us on Facebook

Follow on Twitter

Enjoy!  Julie

nature walk for you card 2
 
Card Recipe:
Stamps:  Nature Walk w-#121925 c-#121997, Layered Labels w-#127070 c-#127072
Ink: More Mustard #126964, Old Olive #126953, Midnight Muse #126860, Sahara Sand #126976
Paper: Whisper White #100730, Sahara Sand #121043
Extras: Apothecary Accents Framelits #127003, Big Shot Die-cutting Machine #113439, Large Oval Punch #119855, Stitched Satin Ribbon #126847
Stampin' Up! summer silhouettes congratulations card angle

Getting Started: Card Making – The Basics

Stampin' Up! summer silhouettes congratulations card angle No one is born knowing how to make their own cards.  It’s true!!  I remember when I was first introduced to the idea of rubber stamping and card making.  I would ask how to do it and the answer I would get would be something like this:  Cut your paper in half and fold it.

That sounds simple enough, but is that all there is to it? I would always be left with all these unanswered questions: Cut the paper where? How do I design it?  How do I layer? How do I mail it when I’m done?!?

Do these questions sound familiar to you?

Here are some basics to unleash your inner creative diva and impress your friends and family while making them feel special too!

 The dimensions of a standard homemade greeting card are 4-1/4″ x 5-1/2″ and it fits in an invitation-size envelope.  Stampin’ Up! offers beautiful envelopes  and they are easy to stamp on too!

To create the standard greeting card, cut your 8-1/2″ x 11″ cardstock on the 11″ side at 5-1/2″, then fold it in half.  Half of 8-1/2″ is 4-1/4″ so that will give you a card measuring 4-1/4″ x 5-1/2″.  There are variations on greeting card sizes and cuts but this is the best place to start.

Now start adding.  Here are some ideas.

1. Leave the background clean or stamp a random pattern all over the background similar to what you see in the card below.  (Make sure you stamp off the edges for a natural look.)

2. Stamp your focal point image, cut it out square and layer it by adding cardstock behind it that is slightly bigger.  Add 1/8″, 1/4″ or 1/2″ to the size of the square depending on the size frame you want.  For example, if you want a narrow border and your piece is 2″ x 2″, cut your layer 2-1/8″ x 2-1/8″.

3. Use punches for quick, layered elements. Like this circle inside the scallop circle.  Punches are great for layering and you will see me use them a ton. Betsy's Blossoms sunny birthday card angle

4. Add a greeting by stamping on a separate scrap of cardstock, cutting it out and adhering it, OR by stamping directly on the background cardstock.   On the card above the greeting was added as a banner.  On the card below the sentiment was stamped directly on the background.

5. Use a good adhesive.  I highly recommend SNAIL adhesive.   Add enough adhesive to keep your card together but do not cover the entire surface!  Usually 1/2″ to 1″ (depending on the size of your piece) in each corner is sufficient.  I used inadequate glue one time for my son’s birthday invitations and they fell apart – yikes!  owl occasions birthday wish angle

6. Keep it simple and fun, and your design work will keep expanding.   My first cards were simply folded cardstock with a greeting stamped in the middle.  Seriously!  I’m not kidding.  When my son was born I grabbed some cardstock, quickly cut it, folded it,  stamped a thank you message on the front and that’s what I sent as a thank you card.

This owl card looks involved and complicated, but it really is just starting with the basics –  folded cardstock – and adding layers and embellishments.  Experiment and  most of all have fun!!!

Click Here to Order your Stampin’ Supplies

 Click Here for Fun, Easy Digital Scrapbooking! 

 Enjoy!  Julie

summer silhouette cas birthday

Watercolor Block Stamping

summer silhouette cas birthday

A single layer birthday card with no embellishments, unless you count glitter.  🙂  I’ve been wanting to try the watercolor block technique.  This entails coloring on an acrylic block and stamping with the block.  It’s a little trickier than I originally thought and it took me a few tries to get an effect I liked.

I used the Summer Starfruit, Tangerine Tango and Tempting Turquoise markers to scribble freely on an acrylic block.  Then I lightly spritzed the block with water before stamping on the Whisper White card stock.  It’s very important to spritz it lightly.  I sprayed it from about a foot away and only once.  Anymore water than that makes it too wet and the colors run and get messy.

summer silhouette cas birthday detail

I stamped the Summer Silhouette images over the color blocks with Black StazOn ink.  When I stamped the lower images, I masked the bottom so the stems would not extend below the color blocks.

Using a two-way glue pen I tapped a little glue on the flower blooms to add Dazzling Diamonds Glitter.  Can you see the glitter in the picture below?  Glitter is so hard to photograph.  🙁

summer silhouette cas birthday glitter Announcing a Merry Christmas from Stampin’ Up!  Recieve FREE product with purchase in time to create your Christmas ornaments and cards!

Christmas stamp bundle sale

Here’s two Christmas special offers during October!

  • When you purchase the Ornament Keepsake stamp set & the Candlelight Christmas designer paper, you’ll receive the Festive Paper piercing pack for FREE!

Stampin' Up! Ornament Keepsakes promotion

FREE Festive paper piercing pack

  • Or when you purchase the Ornament Keepsake Bundle with the Candlelight Designer paper you’ll receive the Festive Paper piercing pack for FREE


Stampin' Up! Ornament Keepsakes Bundle promotion

FREE Festive paper piercing pack

 Click here to order your Christmas special.

Enjoy!  Julie

summer silhouette cas birthday close up

Card recipe:
Stamps:  Sweet Essential w-#126455 c-#126457, Summer Silhouettes w-#126445 c-#126447
Ink: Black StazOn Stamp Pad #101406
Extras: Two-Way Glue Pen #100425, Dazzling Diamonds Glitter #102023, In Color Markers #126856,  Brights Markers #119702