Tagged: cards

clean & simple just believe thank you card

Stampin’ Up! Clean & Simple Thank You

clean & simple just believe thank you card

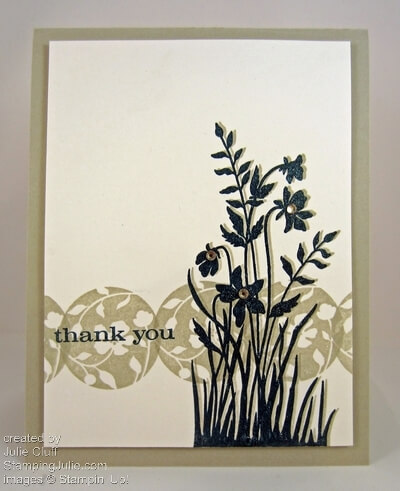
I stamped this simple Thank You card with Stampin’ Up!’s Just Believe stamp set.  The secret ingredient to create this shadow card is the Stamp-A-Ma-Jig which allows you to stamp precisely where you want to.

I started by stamping the center circle in Sahara Sand ink, then, using the Stamp-A-Ma-Jig, I lined up the circles on either side.

clean & simple just believe thank you card close up

I stamped the flowers in Sahara Sand ink first.  Then I inked up the stamp again first with Versamark ink and then with Midnight Muse before stamping slightly to the left of the first using the Stamp-A-Ma-Jig to create the shadow.

I use the Versamark ink first so that I can emboss the image with clear embossing powder.  The Versamark ink keeps the ink wet long enough for the embossing powder to stick so it can then be heated for that great classy, embossed look.

just believe thank you card detail

In this picture above you can really see the embossing.  After I embossed the flowers, I used a Blender Pen and a little Midnight Muse ink from the pad to just touch up a couple of tiny spots where my stamped ink didn’t cover fully.  The blender pen and ink provided great, complete coverage.

And did you notice the rhinestones?  <3    Love, love, love!  I hadn’t planned to use rhinestones, but I couldn’t help it.  I’ve been thinking I need to start “Rhinestones Anonymous”.  I want to put them on everything!!  And when I discovered that using the tip of the Piercing Tool to pick the Rhinestones up and place them right where I want them – well, it just fed my addiction!

just believe thank you card angle

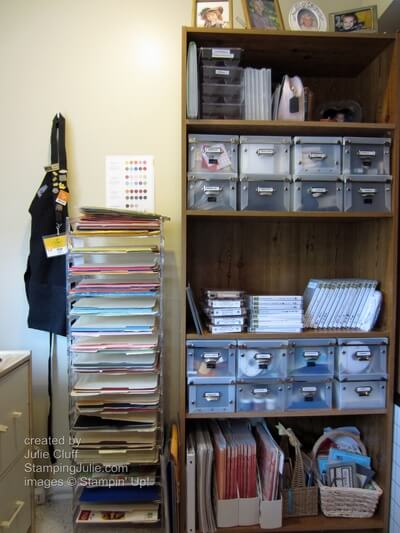
Also, head on over to Facebook and let me know what you think of my craft room organization.  While you’re there, don’t forget to ‘Like’ us and follow along for more craft room storage ideas and other tidbits!

Card Recipe:
Stamps: Just Believe w-#116948 c-#120453
Ink: Versamark #102283, Midnight Muse #126860, Sahara Sand #126976
Paper: Whisper White #100730, Sahara Sand #121043
Extras: Stamp-A-Ma-Jig #101049, Stampin’ Dimensionals #104430, Clear Emboss Powder #109130, Rhinestones Basic Jewels  #119246

  Order your versamark pad and clear embossing powder today so you can add that little extra to your projects.  I hope you enjoyed this clean and simple Just Believe thank you card.

Enjoy, Julie

Video: Watercoloring Greeting Cards

In this video, I’ll demonstrate painting with the aquapainter brushes and the ink pads.  (Click here to view video.)  I love watercoloring!  It’s a sure way of feeling like a true artist and making something extra special for someone you love!

for the birds thinking of you card

Here’s the watercolored detailsFor the card recipe visit here.  And stay tune for the video on creating the scallop ‘window.’

for the birds thinking of you card detail

Today is the first day of the Stampin’ Up! Holiday Catalog .  If you don’t have your copy and your in the US, send me an email and I’ll get one to you.

Enjoy, Julie

craft room storage and organization

Craft Room Storage & Organization

craft room storage and organization

When it comes to craft & stamping room organization, I am ALL about having things at my finger tips.  I don’t want to waste time digging around trying to find what I need or filing through complicated systems getting my supplies out for a project.  Keeping things accessible makes it easier to clean up also.  (The picture above is of the right side of my U-shaped crafting area, the center of which is my desk.)

Everyone has a little different philosophy.  Some people need everything out of sight, but I’m in my happy place if my crafty stuff is visible and organized.  On my Stamping Julie facebook page I’ve been posting specific pictures with storage solutions, so I won’t duplicate that here, but I do want to talk about strategies.

stamping office

Last year I moved from my home in Texas with this great office (see all my stamp sets in the cabinets!) to Kentucky.  We have an office in our KY home also, but my husband is using it for his work, so I’ve taken over a room in the basement with a beautiful view of the rolling hills in our neighborhood!

The challenge was to move from having built-in cabinets to setting up a similar storage solution without them.  I decided I would use what I have, shelves, dressers, etc. and eventually I would install some cabinetry in my new space.

So here’s my organization strategy:

  1. Determine what you use all the time:  ink, paper, stamps, adhesive, etc., and place those things on your desk or right next to you in your primary space.
  2. Determine what you use second most often: favorite embellishments and tools, and place those in your secondary space, close, but not as close as your primary space.  Shelves or drawers or containers nearby.
  3. Determine what you use least, other embellishments, extra supplies and tools.  These item can go in less accessible storage areas.  Top or bottom drawers or shelves.
  4. Determine what you don’t use at all and eliminate it!!!  No, seriously, if you haven’t used it in six months give it or sell it to someone who will use it.  Keep only the stuff you need, use or love!!!
  5. Contain everything!  Everything should have a place and be contained in a box, on a shelf, in a drawer, in a container.
  6. Every few months reassess!  Take a good look at the items in your primary and secondary spaces and determine if they still deserve their place.

For many years, I crafted without a dedicated space.   I kept my supplies in covered tubs and when I was ready to create, I transported the crate from my closet to the dining room table.

I wish I had a picture of my 17 yo son’s room.  I’ve tried to teach him space and organization principles to no avail.  He has a game wheel, that he has had for two years and he has NEVER used, that sits on the floor in his otherwise clean room in a box!  I say, “Get rid of it.  You don’t use it, you don’t need it! And it is taking up prime space!  At the very least put it on the very top shelf of the closet.”  Of course, after my little lesson in organization and space planning, the game wheel has been moved to the top of his closet – NOT!

Visit Stamping Julie on Facebook and let me know about your craft spaces and organization problems and solutions.  Here’s to your success with organizing your craft and stamping space!!

Enjoy, Julie

Stampin’ Up! Reason to Smile – Going, Going, Gone

The fabulous Reason to Smile Stamp Set is only available during the month of July, so if you blink, you’ll miss it!

Featured StampingJulie Reason To Smile Samples:  (Click on the picture to go to the original post with supply lists and project descriptions.)

1. Butterfly Thank You Card

reason to smile thank you card with butterfly

2. Thank You Bling Flower Card

reason to smile thank you card

3. Birthday Wish Tag Card

reason to smile birthday card

4. Butterfly Art Friendship Card

Reason to Smile Butterfly Art Card

5. Simple Greeting Card

reason to smile you're the best practice card

Samples from Stampin’ Up!:

1. Scrapbook Page

stampin' up! reason to smile scrapbook page

2. Birthday Gift  Bag

reason to smile happy birthday gift bag

3.  Dream Card

reason to smile dream card

Order your Reason To Smile Stamp Set today while it’s still available.  Only $5 with a $50 product purchase.

Reason To Smile $5 stamp set - July 2012 ONLY!

Order your Reason to Smile Stamp Set today and start creating!

Enjoy!  Julie