Tricky Treats plaid halloween bat 2

Stampin’ Up! Tricky Treats Happy Halloween

Tricky Treats plaid halloween bat 2

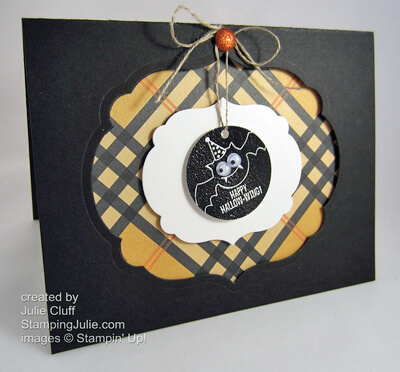
Remember the old song, “What a difference a day makes.  twenty-four little hours…” I found myself humming, “What a difference an eye makes…” today as I created this cute bat tag.

Tricky Treats hallow-wing missing eyes

The finishing touch on this little bat was adding the adhesive-backed googly eyes.  What a difference?  It took it from cute to adorable!  You’re friends will love this cute little guy with his googly eyes, and this little greeting card is quick to create.

To create this card I started with a Basic Black cardstock base. I centered my Labels Collection Framelit on the front, secured it with post it notes and ran it through the Big Shot Die-Cutting Machine.  I backed it with plaid Howlstooth and Scaringbone Designer Series Paper.  I used a smaller label framelit to cut out the center piece.  Everything was adhered with Stampin’ Dimensionals.

Tricky Treats plaid halloween bat details

I stamped the bat tag from the Tricky Treats stamp set with Basic Black Craft ink and embossed it with Black Emboss Powder, after sprinking it with a just a touch of Iridescent Ice Emboss Powder for a hint of glitter.  Be careful not to mix the embossing powders.

The bat tag was punched with a circle punch and was added to the center with a dimensional and then tied to a Tangerine Tango Glimmer at the top with Linen Thread.

Tricky Treats plaid halloween bat

An added bonus when backing the label cut-out on front is the fun pattern that shows on the interior.  A Happy Halloween sentiment from the Seasonal Sayings Stamp Set was stamped in the middle with Tangerine Tango ink.

Tricky Treats plaid halloween bat interior

SIGN UP FOR A LIVE OR VIRTUAL STAMP CAMP TODAY! Check out live events and virtual events  at the tabs above.  These events will help you refine your stamping skills and teach you new techniques and projects as you bring joy to your family and friends through your creations.

Enjoy!  Julie

Tricky Treats plaid halloween bat close up

Card Recipe:
Stamps: Tricky Treats w-#126325 c-#126327,  Seasonal Sayings w-#128006 c-#128009
Ink: Tangerine Tango #111841, Basic Black Craft #102192
Paper: Howlstooth & Scaringbone Designer Series Paper #126906, Basic Black #121045, Whisper White #100730
Extras: Labels Collection Framelits #125598, Big Shot Die-Cutting Machine #113439, 1-3/8″ Circle Punch #119850, Brights Glimmer Brads #121006, Linen Thread #104199, Stampin’ Dimensionals #104430, Black Emboss Powder #109133, Iridescent Ice Emboss Powder #101930, Googlies #127539
oct stamp camp

Stamping Julie Live and Virtual Events

oct stamp camp Are you excited about the holidays?  Are you wanting new creative ideas and how-to’s to make your holidays extra special for you and your family?  Your friends and family will drool over your handmade creations.  You’ll feel special and so will they! 

Do you live near Louisville, KY?  Then join me for my October 25th Stamp Camp.  Details below.  And view more events by clicking the Events tab above.

If you don’t live close or can’t make it on the 25th, don’t despair!  You can still get all the creative ideas and how-to’s!  Join me for a virtual stamp camp delivered directly TO YOU on October 20th .  Enjoy 30 minutes of exclusive video tutorials with lifetime access, which include step-by-step instructions to make all three projects PLUS additional project ideas, AND a PDF file with full color pictures and step-by-step directions  with complete cutting measurements.

Two ways to get the virtual stamp camp

Option 1 – In the US Only! Purchase $35 or more in Stampin’ Up! product from my store by October 20th and receive the videos and PDF file as a FREE bonus.  Place your order and then click here  or leave a comment below with your email address to claim your FREE bonus!

Option 2 – Available to ALL! Order video demonstrations and PDF file for only $8.  This is great for everyone looking for creative inspiration, including stamping demonstrators who need ideas for their own events!  Click ‘Buy Now’ button and order now.


WHAT OTHERS ARE SAYING ABOUT STAMPING JULIE VIRTUAL EVENTS:

“So cute, and great tutorial! Thanks so much for sharing!” – Kat R.

“Julie has always been a great inspiration, especially when it comes to card design.  Very helpful in teaching different techinques.” – Debbie M.

“I am fairly new to Stampin’ Up!, and your cards and ideas help me in my demonstrations.  So, thank you so much for your help.” – Cindy H.

oct stamp camp

Girls Night Out Stamp Camp

Thursday, Oct. 25, 2012 7:00 pm

Rubber stamping with Julie Cluff

Make 3 projects!

$10 class fee or FREE with product purchase that night

Door prizes & light refreshments!

Sign Up Now:

(Limited to 10 stampers, so make your reservation early)

Questions? or Need directions:  Email me or call number above

Most people enjoy bringing their own class kit.**

**Class Kit: Paper Trimmer, Scissors, Adhesive, bone folder or scoring blade. (if you don’t have some of these supplies, no problem, there will be some available for sharing.)

WHAT OTHERS ARE SAYING ABOUT STAMPING JULIE EVENTS:

“YIPPEE! Thanks for hosting another great camp!” – Karen W.

“I have to admit I was a bit intimidated by the prospect of making those beautiful cards, but I had so much fun!” – Cathy P.

“Mary and I had a great time last nite and we look forward to the next stamp camp.” – Vicki R.

Easy Digital Scrapbooking

The summer just ended and if you’re like most people you have wonderful photo memories sitting in storage on your camera or computer.  And I know it’s bothering you because you can’t share those memories in a meaningful way when they are in digital prison!  And the holidays are upon us, which means more photos, and more memories to be recorded.

I have a solution for you!  Using My Digital Studio software makes creating wonderful photobook keepsakes easy in 4 quick steps!!  I promise, by the end of the evening your printed summer scrapbook could be ordered and on its way!  

1. Download MDS2+.   Full digital design software PLUS $500 of digital content.

2. Choose a designer template.

3. Drop in your favorite pictures.

4. Order your book right from the software.   And enjoy new lower prices on printing.

See my video tutorials here & here and more samples here & here.  And I’m just a phone call away to help you with every step!  (cell # 832 dash 515 dash 4632.  Sorry for the encripted  number but it keeps me from getting too many robo calls. 🙂  )

Act now, because just thinking about it won’t get those memories recorded and if you wait too long you’ll forget all the special moments you shared with family and friends this summer.  And by acting now you’ll be ready to record your Holiday memories too!

Last week I introduced you to my friend Krystal.  She loves scrapbooking with My Digital Studio and here’s a cute page she made to announce the upcoming birth and name of her daughter.  (Her adorable baby girl was born just 2 months ago.)

my digital studio scrapbook page

I love the festive feel of this page with the bright polka dot paper, rick rack, and the playful pictures of her son with the balloons.   Thanks for sharing this fun page, Krystal!

Start designing in My Digital Studio 2 today!  Download your copy here now.

Click here to check out this week’s digital downloads.

Prices Slashed on Photobooks, Cards, & More Forever! Make beautiful photobooks for less!! View price chart here.

Here’s the latest digital downloads.  Click on the picture to view details.

Neon Notes Digital Kit – Love this neon kit!  #132264

neon notes digital kit

Year End Review Infographic Postcard Template – “the coolest way to send your year end news!” #131522

year end review infographic postcard digital template

Any Witch Way Digital Template – “An adorable paper doll witch decoration that moves!”  #132266

any witch way digital template

Quick Wit Costumes Digital Templates – ” a quick, punny Halloween costume—use to make iron-on transfers and voila, Halloween costumes solved”  #132267

quick wit halloween costumes digital template

Everyday Digital Woodcuts  – “A collection of wood cut elements for a quick and easy way to add a new look to your projects” #132191

everyday wood cuts digital

Click Here to Order your Stampin’ Supplies

Click Here for Fun, Easy Digital Scrapbooking! 

Enjoy, Julie

Stampin' Up! summer silhouettes congratulations card angle

Getting Started: Card Making – The Basics

Stampin' Up! summer silhouettes congratulations card angle No one is born knowing how to make their own cards.  It’s true!!  I remember when I was first introduced to the idea of rubber stamping and card making.  I would ask how to do it and the answer I would get would be something like this:  Cut your paper in half and fold it.

That sounds simple enough, but is that all there is to it? I would always be left with all these unanswered questions: Cut the paper where? How do I design it?  How do I layer? How do I mail it when I’m done?!?

Do these questions sound familiar to you?

Here are some basics to unleash your inner creative diva and impress your friends and family while making them feel special too!

 The dimensions of a standard homemade greeting card are 4-1/4″ x 5-1/2″ and it fits in an invitation-size envelope.  Stampin’ Up! offers beautiful envelopes  and they are easy to stamp on too!

To create the standard greeting card, cut your 8-1/2″ x 11″ cardstock on the 11″ side at 5-1/2″, then fold it in half.  Half of 8-1/2″ is 4-1/4″ so that will give you a card measuring 4-1/4″ x 5-1/2″.  There are variations on greeting card sizes and cuts but this is the best place to start.

Now start adding.  Here are some ideas.

1. Leave the background clean or stamp a random pattern all over the background similar to what you see in the card below.  (Make sure you stamp off the edges for a natural look.)

2. Stamp your focal point image, cut it out square and layer it by adding cardstock behind it that is slightly bigger.  Add 1/8″, 1/4″ or 1/2″ to the size of the square depending on the size frame you want.  For example, if you want a narrow border and your piece is 2″ x 2″, cut your layer 2-1/8″ x 2-1/8″.

3. Use punches for quick, layered elements. Like this circle inside the scallop circle.  Punches are great for layering and you will see me use them a ton. Betsy's Blossoms sunny birthday card angle

4. Add a greeting by stamping on a separate scrap of cardstock, cutting it out and adhering it, OR by stamping directly on the background cardstock.   On the card above the greeting was added as a banner.  On the card below the sentiment was stamped directly on the background.

5. Use a good adhesive.  I highly recommend SNAIL adhesive.   Add enough adhesive to keep your card together but do not cover the entire surface!  Usually 1/2″ to 1″ (depending on the size of your piece) in each corner is sufficient.  I used inadequate glue one time for my son’s birthday invitations and they fell apart – yikes!  owl occasions birthday wish angle

6. Keep it simple and fun, and your design work will keep expanding.   My first cards were simply folded cardstock with a greeting stamped in the middle.  Seriously!  I’m not kidding.  When my son was born I grabbed some cardstock, quickly cut it, folded it,  stamped a thank you message on the front and that’s what I sent as a thank you card.

This owl card looks involved and complicated, but it really is just starting with the basics –  folded cardstock – and adding layers and embellishments.  Experiment and  most of all have fun!!!

Click Here to Order your Stampin’ Supplies

 Click Here for Fun, Easy Digital Scrapbooking! 

 Enjoy!  Julie