Tagged: greeting card

nature walk for you card

Stampin’ Up! Nature Walk Collage Greeting

nature walk for you card

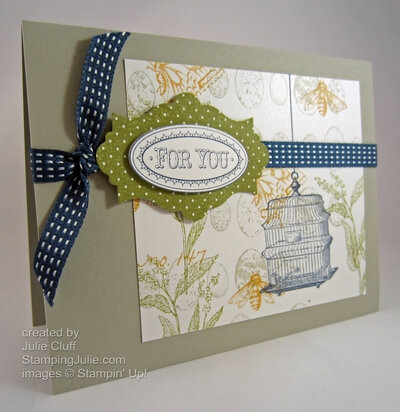
I have always loved the collage style but it doesn’t come naturally to me.  The Nature Walk stamp set makes collage stamping easy and using clear-mount stamps makes it even easier.  I mounted the bee, butterfly and number stamp on one block and stamped them in More Mustard.

I stamped the bird egg images with Sahara Sand and the floral image with Old Olive.  Finally I stamped the bird cage with Midnight Muse and added a wire hanger with a straight edge and the fine tip Midnight Muse marker.

nature walk for you card bird cage

I created the ‘For You’ tag with the Layered Labels stamp set stamped in Old Olive and die-cut with the Apothecary  Accents Framelits.  I stamped it again with Midnight Muse and punched with the large oval punch and layered it all with Stampin’ Dimensionals.  The final touch was knotted on with stitched Midnight Muse ribbon.

nature walk for you card detail

I was going for a simple, sophisticated collage greeting card.  I hope I hit the mark!  What do you think?

Order Stampin’ Up! Products Here 24/7 (and don’t forget to check out the dozens of new items added to the clearance rack.)

View the Stampin’ Up! Holiday Catalog here

Like us on Facebook

Follow on Twitter

Enjoy!  Julie

nature walk for you card 2
 
Card Recipe:
Stamps:  Nature Walk w-#121925 c-#121997, Layered Labels w-#127070 c-#127072
Ink: More Mustard #126964, Old Olive #126953, Midnight Muse #126860, Sahara Sand #126976
Paper: Whisper White #100730, Sahara Sand #121043
Extras: Apothecary Accents Framelits #127003, Big Shot Die-cutting Machine #113439, Large Oval Punch #119855, Stitched Satin Ribbon #126847
Stampin' Up! summer silhouettes congratulations card angle

Getting Started: Card Making – The Basics

Stampin' Up! summer silhouettes congratulations card angle No one is born knowing how to make their own cards.  It’s true!!  I remember when I was first introduced to the idea of rubber stamping and card making.  I would ask how to do it and the answer I would get would be something like this:  Cut your paper in half and fold it.

That sounds simple enough, but is that all there is to it? I would always be left with all these unanswered questions: Cut the paper where? How do I design it?  How do I layer? How do I mail it when I’m done?!?

Do these questions sound familiar to you?

Here are some basics to unleash your inner creative diva and impress your friends and family while making them feel special too!

 The dimensions of a standard homemade greeting card are 4-1/4″ x 5-1/2″ and it fits in an invitation-size envelope.  Stampin’ Up! offers beautiful envelopes  and they are easy to stamp on too!

To create the standard greeting card, cut your 8-1/2″ x 11″ cardstock on the 11″ side at 5-1/2″, then fold it in half.  Half of 8-1/2″ is 4-1/4″ so that will give you a card measuring 4-1/4″ x 5-1/2″.  There are variations on greeting card sizes and cuts but this is the best place to start.

Now start adding.  Here are some ideas.

1. Leave the background clean or stamp a random pattern all over the background similar to what you see in the card below.  (Make sure you stamp off the edges for a natural look.)

2. Stamp your focal point image, cut it out square and layer it by adding cardstock behind it that is slightly bigger.  Add 1/8″, 1/4″ or 1/2″ to the size of the square depending on the size frame you want.  For example, if you want a narrow border and your piece is 2″ x 2″, cut your layer 2-1/8″ x 2-1/8″.

3. Use punches for quick, layered elements. Like this circle inside the scallop circle.  Punches are great for layering and you will see me use them a ton. Betsy's Blossoms sunny birthday card angle

4. Add a greeting by stamping on a separate scrap of cardstock, cutting it out and adhering it, OR by stamping directly on the background cardstock.   On the card above the greeting was added as a banner.  On the card below the sentiment was stamped directly on the background.

5. Use a good adhesive.  I highly recommend SNAIL adhesive.   Add enough adhesive to keep your card together but do not cover the entire surface!  Usually 1/2″ to 1″ (depending on the size of your piece) in each corner is sufficient.  I used inadequate glue one time for my son’s birthday invitations and they fell apart – yikes!  owl occasions birthday wish angle

6. Keep it simple and fun, and your design work will keep expanding.   My first cards were simply folded cardstock with a greeting stamped in the middle.  Seriously!  I’m not kidding.  When my son was born I grabbed some cardstock, quickly cut it, folded it,  stamped a thank you message on the front and that’s what I sent as a thank you card.

This owl card looks involved and complicated, but it really is just starting with the basics –  folded cardstock – and adding layers and embellishments.  Experiment and  most of all have fun!!!

Click Here to Order your Stampin’ Supplies

 Click Here for Fun, Easy Digital Scrapbooking! 

 Enjoy!  Julie

field flower love card angle

Stampin’ Up! Field Flower Love

field flower love card angle “Navy Pacific Sand” – the Splitcoaststampers Color Challenge!  I used a few interesting techniques on this Field Flowers love card including brayering the embossing folder and creating faux washi tape.

I started by stamping the stems in Sahara Sand, then in Night of Navy which creates a bit of shadow.  The flower outlines were then stamped in Night of Navy with Sahara Sand shading.  I then cut this with the largest framelit from the Apothecary Accents framelits set.

I used Pacific Point to sponge the interior of the flower and the edges of the panel, then a lighter sponge throughout.  Then I used Dazzling Details to add some heavy glitter to the center of the flowers.

field flower love card detail

Before embossing the Sahara Sand card front, I brayered Sahara Sand on the embossing folder so when I ran it through the Big Shot it creates a contrasting shadow.  The Apothecary flower panel was attached to the card front.

The faux washi tape was created with scotch tape and International Bazaar Designer Series Paper.  This is a technique I learned at the Stampin’ Up! Chattanooga Regional event.  I taped a section of pattern paper then ‘washed off’ the back of the pattern paper until it appears clear.

field flower love card washi tape

The Stitched Satin Midnight Muse Ribbon is on special this month and is free with a $40 order.  This ribbon is so great feeling and so easy to work with!  You’ll love it!  This ribbon is available in all the latest In Colors.

Order your Satin Ribbon FREE this month with a $40 product purchase.

Order Stampin’ Up! Products Here 24/7

View the Stampin’ Up! Holiday Catalog here

Like us on Facebook

Follow on Twitter

Enjoy! Julie

field flower love card

Card Recipe: 
Stamps: Field Flowers w-#122760 c-#122762
Ink: Night of Navy #126970, Pacific Point #126951, Sahara Sand #126976
Paper: Whisper White #100730, Sahara Sand #121043, International Bazaar Designer Series Paper #126920
Extras: Big Shot Die-Cutting Machine #113439, Beautiful Wings Embosslit #118138, Apothecary Accents Framelits #127003, Chevron Embossing Folder #127749, Brayer #102395, Rhinestone Basic Jewels #119246, Dazzling Details #124117, Stampin’ Sponges #101610, Midnight Muse Stitched Satin Ribbon #126847
moving forward flower pots thinking of you angle

Stampin’ Up! Moving Forward Flower Baskets

moving forward flower pots thinking of you angle This cheery friendship card was inspired by a card from the Stampin’ Up! demonstrator magazine (get your copy when you join today for only $99) and features the Ronald McDonald House Charities Stamp Set, Moving Forward, as shown on the inside back cover of the Stampin’ Up! catalog.  When you purchase this set, $3 will be donated to charity.

    Moving Forward stamp set

The petite basket is actually from the cute bicycle image.  Using a Early Espresso Marker, I colored and stamped only the basket three times.  Using the same method I stamped ‘Thinking of You’.  And lastly using markers again, I colored the flowers and stamped them in the baskets.  This video demonstrates how to stamp with markers.

Once the images are stamped, I centered a Collection Labels framelit over it, secured it with post it notes and ran it through the Big Shot Die-Cutting Machine.  The tiniest Basic Jewels Pearls were added to the flower centers.

moving forward flower pots thinking of you close up

 The card base is 6″x6″ square of Pumpkin Pie card stock, folded in half to produce a 3″x6″ card.  Matching Polka Dot Parade paper was trimmed into a flag banner.  View Monday’s video to see how to easily create a flag end with a square punch.  Or view it here.

Primrose Petals Stitched Satin Ribbon was added down the right side and tied with bakers twine before the label was adhered with Stampin’ Dimensionals.   The Stitched Satin Ribbon is yummy.  Great colors, great look and fabulous to work with.  It’s super soft and pliable!  Love it!  And there’s no limit.  A free spool for EVERY $40 in ordered product.

Order your Satin Ribbon FREE this month with a $40 product purchase.

View the Stampin’ Up! Holiday Catalog here

Order Stampin’ Up! Products Here 24/7

Like us on Facebook

Follow on Twitter

Enjoy, Julie

Card recipe:
Stamps: Moving Forward w-#126320 c-#126322
Markers: Brights (Melon Mambo, Regal Rose, Old Olive, Pumpkin Pie) #119702, Early Espresso #119680
Paper: Pumpkin Pie #105117, Whisper White #100730, Polka Dot Parade Designer Series Paper #126902
Extras: Big Shot Die-Cutting Machine #113439, Labels Collection Framelits #125598, Basic Jewels Pearls #119247, Primrose Petals Stitched Satin Ribbon #126844, Lucky Limeade Bakers Twine #125572

Perfectly Preserved Just For You Card

perfectly preserved just for you card Featuring some of the unique new products in the Stampin’ Up! Holiday Catalog, this card is a keeper in In Colors introduced last year.  These cute pears are stamped in Calypso Coral, Lucky Limeade and Island Indigo, and very quickly die cut with the Cannery Set Framelits.  Even the simple banner has a matching framelit, Bitty Banners Framelits.

This card also features Core’dination card stock, Orchard Harvest Designer Series Paper, and Woodgrain Embossing Folder, all of which are exclusive to the Holiday Catalog.

Perfectly Preserved Bundle Buying coordinated products from the catalog in bundles saves you money!  Save 15% when you purchase the Perfectly Preserved Stamp Set and Cannery Set Framelits in Perfectly Preserved Bundle.  There are seven traditional crafting bundles and two digital bundles all listed inside the front cover of the holiday catalog.

The complete list of supplies for this card can be found here.

View the Stampin’ Up! Holiday Catalog here

 Order Stampin’ Up! Products Here 24/7


Enjoy!  Julie