Tagged: birthday card

you're amazing birthday balloon card

You’re Amazing Birthday Balloon

you're amazing birthday balloon card

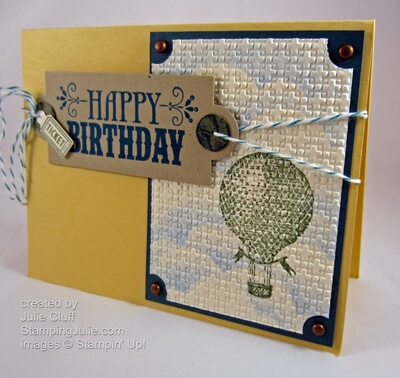
This beautiful card was designed and made by my Stampin’-guru sister Kari.  She started with the hot-air balloon from You’re Amazing stamp set and stamped it with Always Artichoke on sponged Bashful Blue clouds on Whisper White card stock.  Embossing the balloon with the Square Lattice Embossing Folder was brilliant!

you're amazing birthday balloon card balloon The corners were quarter punched with a circle punch and then the piece was adhered to a Not Quite Navy mat with added brads in the corners.

Happy Birthday was stamped with Pacific Point on Crumb Cake cardstock.  Pacific Point is bright but stamped on the darker Crumb Cake it blends nicely with Not Quite Navy.  She then ran ‘happy birthday’ through the Big Shot with the Apothecary Labels framelit and added reinforcements with a 1/2″ punched Always Artichoke circles.

you're amazing birthday balloon card ticket The cute ticket fits perfectly in the Jewelry Tag punch.  And tied on with a loopy bakers twine bow, the ticket makes a great addition.

12 weeks of christmas

Don’t miss out on the final weeks of Christmas projects delivered right to your email inbox.  Each week I’ll send you a Christmas project to your inbox: tags, bags, gifts and cards!  If you aren’t on my mailing list, join now so you don’t miss anything!

Excited about the Holidays?  Me too.  I have prepared great events to help you make your holiday season fabulous!  Visit the Events tab and Virtual Events tab for all the details and registration!

Order Stampin’ Up! Products Here 24/7

View the Stampin’ Up! Holiday Catalog here

Like us on Facebook

Follow on Twitter

Enjoy!  Julie

you're amazing birthday balloon card 2 Card Recipe: 
Stamps: You’re Amazing w-#126720 c-#126722
Ink: Pacific Point #126951, Bashful Blue #126961, Always Artichoke #126972
Paper:  Not Quite Navy #101722, So Saffron #105118, Crumb Cake #120953, Whisper White #100730
Extras: Big Shot Die-Cutting Machine #113439, Apothecary Label Framelits #127003, Jewelry Tag Punch #117190, Bakers Twine #125575, 1/2″ Circle Punch #119869, Square Lattice Embossing Folder #119976
embellished events cake with glitter detail

Stampin’ Up! Stamp Coloring How-to Video

embellished events cake with glitter detail

Yesterday I showed you this birthday card I made with the Embellished Events stamp set.  You can see that post here.  I love all the color and in the video below I’ll show you how I color the stamp to get this effect.  Plus I’ll show you how I use the paper-piercing tool to place the adhesive-backed pearls.  Also, I’ll show you how I add glitter to the flames.

Click here to watch the video! or watch it here: http://youtu.be/4175ncvEch0

You will love the Dazzling Diamonds Glitter.  It’s easy to apply anywhere and adds great sparkle to any project.  As you notice in the video, I like to store the glitter in a old Tupperware container, which makes application even that much easier!  Follow me on facebook for more ideas.

DO YOU NEED SOME CREATIVE IDEAS TO MAKE YOUR HOLIDAY SEASON EXTRA SPECIAL?  Sign up now for the October Virtual Stamp camp for new, fun Halloween, Thanksgiving and Christmas ideas.  You’ll receive exclusive 30 minutes of video tutorials with complete instructions for three cards PLUS additional ideas to expand on those projects.  These videos will be longer and more detailed than the videos I feature on the blog.  You’ll also receive specific written instructions for each project.  Stamping demonstrators are welcome too!  Offer ending soon.  Click here now for more details and to register.

Enjoy!  Julie

Embellished Events celebrate birthday card

Stampin’ Up! Embellished Events Birthday

Embellished Events celebrate birthday card

A colorful birthday cake from Embellish Events stamp set is a great way to celebrate a friend’s birthday.  Using markers to color in the cake layers adds fun color and adding pearls makes it extra special!  The Embellish Events set is a versatile set that will take you through many seasons and special events.

Video tutorial added.  Click here to view it.

I used the Rich Razzleberry, More Mustard, Midnight Muse and Soft Suede to color in the cake stamp then stamped it on Very Vanilla cardstock.  I like to use the point of my Paper-Piercing Tool to add the adhesive-backed Basic Jewel Pearls.

Embellished Events birthday cake detail

I used the Stamp-a-ma-jig to stamp celebrate three times along the bottom of the More Mustard cardstock.  After stamping the message I embossed this piece with the Elegant Lines Folder in the Big Shot Die-Cutting Machine, and finally, added a couple of pearls.  I highlighted  the stamped sentiment by tieing Victoria Crochet Lace just above it.

Embellished Events celebrate detail

ARE YOU READY FOR THE HOLIDAYS?  Do you need some creative ideas to make this year extra special?  Sign up now for the October Virtual Stamp camp and receive exclusive 30 minutes of video tutorials with complete instructions for three cards PLUS additional ideas to expand on those projects.  These videos will be longer and more detailed than the videos I feature on the blog.  You’ll also receive specific written instructions for each project.  Stamping demonstrators are welcome too!  Offer ending soon.  Click here now for more details and to register.

Enjoy, Julie

Embellished Events celebrate card

Card Recipe:
Stamps:  Embellished Events w-# 126495 c-# 126497
Ink:  Rich Razzleberry #126950
Cardstock: Very Vanilla #101650, Rich Razzleberry #115316, More Mustard #100946, Midnight Muse #126843
Extras: Basic Jewel Pearls #119247,  Stamp-a-ma-jig #101049,  Elegant Lines Emboss Folder #119277, Big Shot Die-Cutting Machine  #113439, Victoria Crochet Trim #118481, Many Marvelous Markers #119806
embellished events
Stampin' Up! summer silhouettes congratulations card angle

Getting Started: Card Making – The Basics

Stampin' Up! summer silhouettes congratulations card angle No one is born knowing how to make their own cards.  It’s true!!  I remember when I was first introduced to the idea of rubber stamping and card making.  I would ask how to do it and the answer I would get would be something like this:  Cut your paper in half and fold it.

That sounds simple enough, but is that all there is to it? I would always be left with all these unanswered questions: Cut the paper where? How do I design it?  How do I layer? How do I mail it when I’m done?!?

Do these questions sound familiar to you?

Here are some basics to unleash your inner creative diva and impress your friends and family while making them feel special too!

 The dimensions of a standard homemade greeting card are 4-1/4″ x 5-1/2″ and it fits in an invitation-size envelope.  Stampin’ Up! offers beautiful envelopes  and they are easy to stamp on too!

To create the standard greeting card, cut your 8-1/2″ x 11″ cardstock on the 11″ side at 5-1/2″, then fold it in half.  Half of 8-1/2″ is 4-1/4″ so that will give you a card measuring 4-1/4″ x 5-1/2″.  There are variations on greeting card sizes and cuts but this is the best place to start.

Now start adding.  Here are some ideas.

1. Leave the background clean or stamp a random pattern all over the background similar to what you see in the card below.  (Make sure you stamp off the edges for a natural look.)

2. Stamp your focal point image, cut it out square and layer it by adding cardstock behind it that is slightly bigger.  Add 1/8″, 1/4″ or 1/2″ to the size of the square depending on the size frame you want.  For example, if you want a narrow border and your piece is 2″ x 2″, cut your layer 2-1/8″ x 2-1/8″.

3. Use punches for quick, layered elements. Like this circle inside the scallop circle.  Punches are great for layering and you will see me use them a ton. Betsy's Blossoms sunny birthday card angle

4. Add a greeting by stamping on a separate scrap of cardstock, cutting it out and adhering it, OR by stamping directly on the background cardstock.   On the card above the greeting was added as a banner.  On the card below the sentiment was stamped directly on the background.

5. Use a good adhesive.  I highly recommend SNAIL adhesive.   Add enough adhesive to keep your card together but do not cover the entire surface!  Usually 1/2″ to 1″ (depending on the size of your piece) in each corner is sufficient.  I used inadequate glue one time for my son’s birthday invitations and they fell apart – yikes!  owl occasions birthday wish angle

6. Keep it simple and fun, and your design work will keep expanding.   My first cards were simply folded cardstock with a greeting stamped in the middle.  Seriously!  I’m not kidding.  When my son was born I grabbed some cardstock, quickly cut it, folded it,  stamped a thank you message on the front and that’s what I sent as a thank you card.

This owl card looks involved and complicated, but it really is just starting with the basics –  folded cardstock – and adding layers and embellishments.  Experiment and  most of all have fun!!!

Click Here to Order your Stampin’ Supplies

 Click Here for Fun, Easy Digital Scrapbooking! 

 Enjoy!  Julie

Betsy's Blossoms sunny birthday card angle

Sunny Make a Wish Birthday Card

Betsy's Blossoms sunny birthday card angle

The colors of this a bright, happy birthday card are drawn from the International Bazaar designer series paper:  Rich Razzleberry, Daffodil Delight, Tangerine Tango and Bashful Blue. Designer paper is great inspiration for any project.

Betsy's Blossoms sunny birthday card flat

The 2-3/8″ scallop punch,  1-3/4″ circle punch and 1″ square punch make this card easy work.  This would be a great card to reproduce quickly to always have a stash of birthday cards on hand.

The large Daffodil Delight circle center is embossed with the Perfect Polka Dots Folder and then touched with 2-way glue before  shaking a bit of Dazzling Diamonds glitter over for a little sunny sparkle.  Did you see how I store and use glitter on Facebook?  I like to show storage ideas on facebook.  Look through my fb photo album.

Betsy's Blossoms sunny birthday card glitter blossom

The background was stamped Bashful Blue Ink on Bashful Blue Cardstock with a small flower from the Betsy’s Blossoms stamp set.  The Make a Wish banner was stamped in Rich Razzleberry from the Sweet Essentials stamp set.  And a Tangerine Tango glimmer brad was added for extra bling!  To view a video tutorial on creating a banner, click here.

Order Stampin’ Up! Products Here 24/7

View the Stampin’ Up! Holiday Catalog here

Like us on Facebook

Follow on Twitter

 Enjoy!  Julie

Betsy's Blossoms sunny birthday card Card Recipe:
Stamps:  Sweet Essentials w-#126455 c-#126457, Betsy’s Blossoms w-#126004 c-#126006
Ink: Rich Razzleberry #126950, Bashful Blue #126961
Paper: Bashful Blue #105120, Tangerine Tango #111349, Rich Razzleberry #115316, Daffodil Delight #119683, International Bazaar Designer Series Paper #126920
Extras: Perfect Polka Dots Emboss Folder #117335, Big Shot Die-Cutting Machine #113439, 2-3/8″ scallop punch #118874,  1-3/4″ circle punch #119850, 1″ square punch  #124094