Tagged: tools

New Catalog Tour and Resources You Are Going to Love!

Check out this video and the great tips on features and savings in the new catalog.   And below are some wonderful resources you are going to love!  I promise!

If you’ve seen my craft room tour   you know that I store my cardstock in file folders on stacked paper trays.  On the wall above the stack I keep a chart of the color collections for a reference.  Each color collection is stored in three trays and the colors are alphabetized within the collection.  The chart on the wall helps me to quickly locate the folder I’m looking for.  So the first two resources include a new color chart (with bonus hex and RGB codes) and folder labels.

1.  This new color chart includes the HTML (hex codes) and RGB color codes for the new color collections.  This is the new chart that will go up on my wall above my cardstock storage.

2013-14 Stampin' Up! Color Collection Chart
2013-14 Stampin’ Up! Color Collection Chart
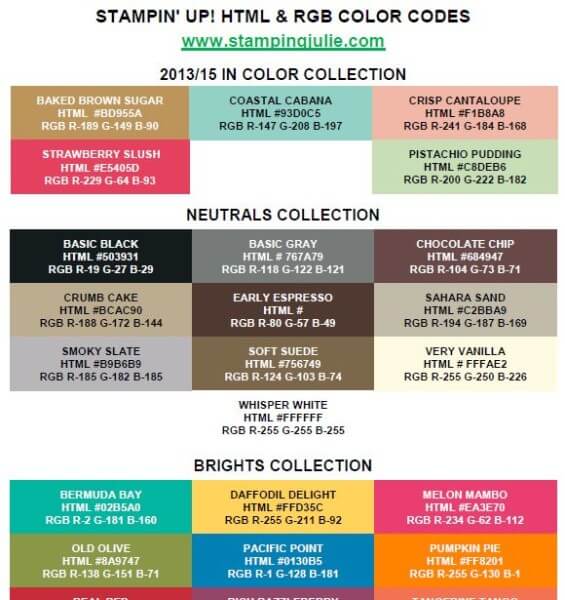
with Hex Codes & RGB Codes

 2013-14 RGB HTML Color Codes Chart pdf file

2.  New 2013-14 color collection labels for the for your cardstock files.
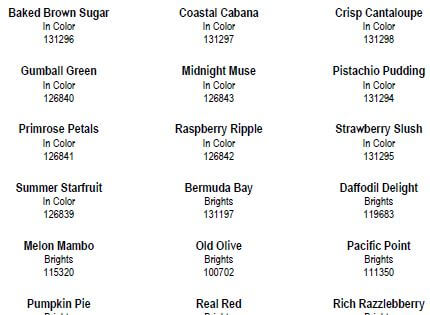
2013-14 Stampin' Up! Cardstock Color Collection Labels
2013-14 Stampin’ Up! Cardstock Color Collection Labels
with Product Codes

2013-14 Stampin’ Up! Cardstock Color Collection Labels pdf file

2013-14 Stampin’ Up! Cardstock Color Collection Labels word doc

3.  Wouldn’t you just love an index of the accessories in the new catalog?!  Here it is!

2013-14 Stampin' Up! Catalog Accessories Index
2013-14 Stampin’ Up! Catalog Accessories Index

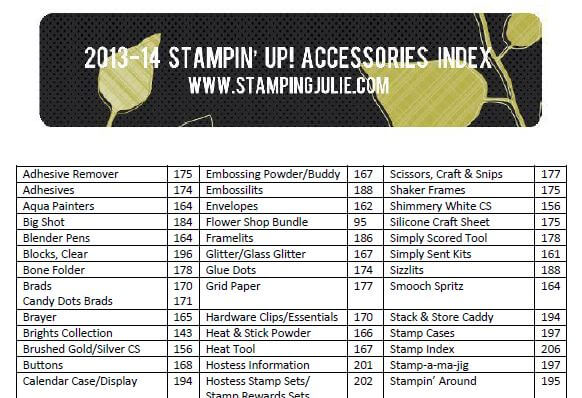
 2013-14 Stampin’ Up! Catalog Accessories Index pdf file

One of the advantages of being a part of my Stampin’ Up! family is having access to wonderful resources like these that you can use and share.  Thank you, Gail Emmons, and my SU friends for sharing these fabulous creations with me.  Would you love more ideas, resources, free stamps, and discounts?  You can join the fun for just $99 and receive $125 in products with no shipping fees and gain immediate access to new ideas!

I’m super excited about some new crafting inspiration that I have received from my group that I will be sharing with you in the next couple of weeks.  Some of these new ideas will be exclusive to newsletter subscribers so if you are not already on that list, subscribe now.

I love the new catalog and the new color collections.  I hope these resources above help you get organized and enjoy your Stampin’ Up! crafting adventures even more!

Enjoy!  Julie

Wood-mount VS. Clear-mount and Why I Converted

clear-mount-stamps-w-glue2 Stampin’ Up! traditionally was a wood-mounted-stamp-producing company.  Their wood block stamps were and are the very best in the business with high-quality wood shaped for comfortable stamping.  What makes Stampin’ Up!’s stamps so very special is not the quality and shape of the wood but the high quality, deeply etched rubber for a fabulous stamped image every time.  And the wonderful artistry is unmatched in the stamping world!

bloomin' marvelous block stamping

The exceptional experience and art produced by using Stampin’ Up! stamps is the same whether you use wood-mounted stamps or clear-mounted stamps because the deeply etched rubber and artwork is the same on both.

Summer Silhouettes Stamp Set

I was stamping with a new stamper recently and I realized that when you are new you don’t know what wood-mount and clear-mount stamps are.  Wood-mount stamps are permanently mounted to a wood block and stored in a plastic case.  Clear-mount stamps are stored separately from the block and are specially made to cling to an acrylic block.  So you will attach your stamp to an acrylic block each time you use it.

Collage Curios bee mine card acrylic block

Collage Curios bee mine card block

I was a die-hard wood-mount fan.  I loved the convenience of having the stamps mounted on a wood block.

So what made me convert to clear-mount? 

  • cost: after the initial investment of purchasing a few acrylic blocks, I save money ordering the less expensive clear-mount stamps, which means I get to buy more stamps!
  • storage space: clear-mount stamps are come in a DVD case for easy storage that takes up very little space on my shelf (which also means I can have more!)
  • positioning: because the rubber is mounted on a clear block it’s easy to see where you’re stamping
  • versatility: I can include more than one stamp on a block and stamp all at the same time (great for stamping words or collages)
  • clear-block: yep, that’s right, the Stampin’ Up! clear acrylic blocks are AWESOME and have the same comfortable shape as the wood blocks
  • clear-block storage: I discovered if I would leave the handful of my clear blocks I use all the time right on my stamping desk it was quick and easy to get to stamping right away

Here’s some more on acrylic blocks including samples and videos:

summer silhouette cas birthday close up

What is your choice in stamps, clear-mount or wood-mount?  Whether you choose clear-mount or wood-mount, order your favorite retiring stamps today before they are no longer available.  Only 10 days remain to order from the retiring list or the spring catalog.

Enjoy! Julie

Clear Mount Stamp Set Sticker Solution

clear mount stamps with 2-way glue I’ve been meaning to share this tip with you for a few weeks.  Here’s a picture I took a month ago shortly after adding 2-way glue to the stickers on my Stampin’ Up! clear-mount stamps. Maybe you have noticed too that the cling on the stamps is not as strong with sticker on.

And maybe you have wondered what 2-way means on the 2-way glue.  Well, 2-way glue is a permanent adhesive when you adhere glitter (my favorite use for this glue) while the glue is wet but if you apply it and let it dry, it acts much like a sticky note and the bond is temporary.

clear mount stamps with 2-way glue

So if you love using the stickers on your Stampin’ Up! clear-mount stamps and wishing for more cling, rub some 2-way glue on the stickers and let it dry completely and you can have your stickers and your cling too!!

Enjoy! Julie

nature walk for you card

How to Use Clear-mount Stamps & Video

If you took advantage of the Stampin’ Up! stamp set sale last Monday, you may have a lot of clear-mount sets to ‘assemble’.  I love the uniform size and easy storage of clear-mount stamps in their dvd-style cases.  Clear-mount stamps offer greater stamping visability without giving up rubber stamp quality!  And Stampin’ Up!’s acrylic blocks are wonderful to use.  They have ‘handles’ on the sides similar to the wood blocks for comfort stamping.  And you can add more than one stamp to a block to customize your stamping as I did on this collage card.

nature walk for you card

When you recieve the clear-mount stamp sets,  you’ll receive a rubber sheet with the precut stamps and an optional label sheet.  You can attach the rubber stamps directly to your acrylic block and start stamping.  Or you can place the specially-formulated label stickers which allows you to see the image orientation as you stamp.

Click here to enjoy this video that I created last month to help you ‘assemble’ your clear-mount stamps. or http://youtu.be/0VV_0HyIEoQ

TODAY IS THE LAST DAY to get 50% off on Digital Kits and FREE downloads.   Don’t miss out!  Download all 3 FREE downloads that can be used in My Digital Studio or other programs.

Click Here to Order your Stampin’ Supplies!

Click Here for Fun, Easy Digital Scrapbooking! 

Enjoy! Julie

Don’t Make These Mistakes!

big shot platform warning Mistake #1 – See that warning.  “This is not a cutting surface!”  Now see the shapes cut into the surface!  Well, this is why I don’t recommend stamping late at night!!  The really stupid part is I did it twice.  So when your cutting with framelits make sure you sandwich it between your cutting plates.

big shot platform mistake

The good news is it’s still usable, just messy looking now.

Mistake #2 – I reinked my Baha Breeze stamp pad  with the Marina Mist reinker!  I thought I had the Marina Mist stamp pad out, but I didn’t.  I’ve never done that before.

Now, occasionally someone at a stamp camp will accidentally tap a stamp that was previously inked with dark ink on a light stamp pad.  The best way to clean up the stamp pad is to wipe it with paper towels and then reink the pad.  So that’s what I did  with my Baja Breeze stamp pad.  I soaked up as much of the Marina Mist ink as I could with paper towels and then reinked the pad with Baja Breeze reinker.

Reinking a stamp pad

It’s always a good idea to buy the reinker with your stamp pad.  You never have to worry about having enough ink on your stamp pad and they are great for watercoloring and lots of other techniques.

Enjoy, Julie