Tagged: punches

Lucky-Framable-St-Patricks-Day-Card

Digital Tuesday: A St. Patrick’s Day Card

Lucky-Framable-St-Patricks-Day-Card 4 Remember the My Digital Studio
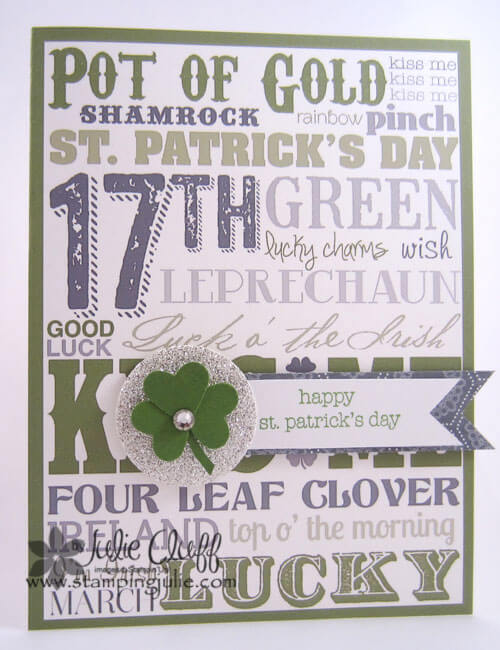
 Lucky Framable digital download that came out last year?  Well, here it is as a St. Patrick’s Day card.  The card background looks a little brown and gray in the picture but it’s actually a green that matches the clover.  Somehow the photo picked up the colors differently.  🙁

Below I have a video tutorial on how to create a 4-1/4″ x 5-1/2″ card with a digital 8-1/2″ x 11″ framable template.  And next week’s Digital Tuesday post and video will be a totally cool and inexpensive personalized wedding gift!  Be sure and check back next week.

And every Tuesday you can expect new digital downloads.   Click here to check out the very latest!

Lucky-Framable-St-Patricks-Day-Card detail 2

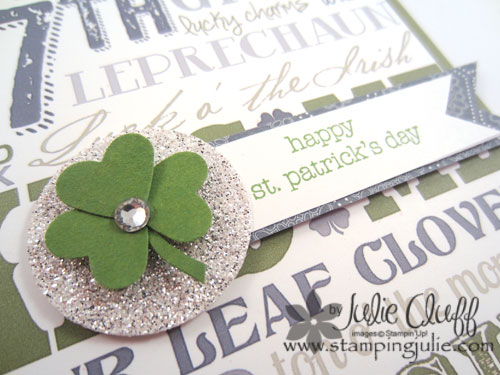
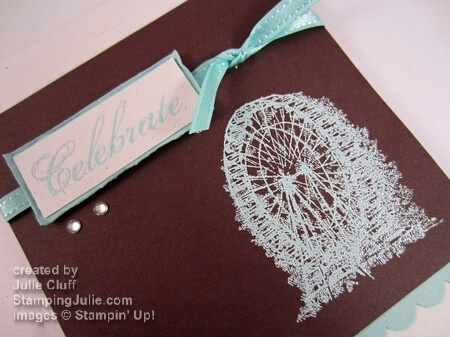
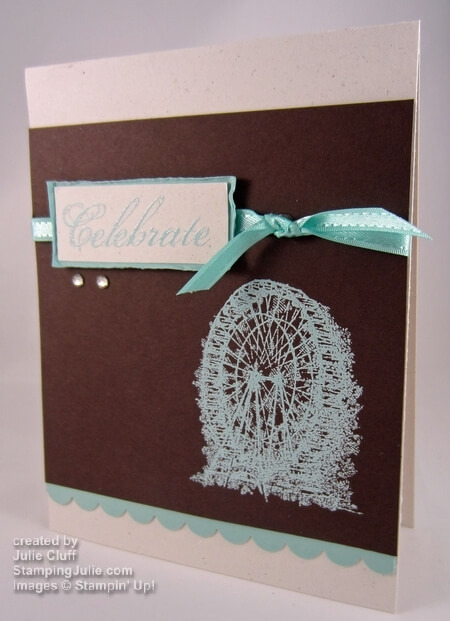
After I printed the cards I added the clover with the “happy patrick’s day” flag.  Happy Patrick’s Day was stamped with the Teeny Tiny Wishes stamp set. The clover was made with the heart punch and a clipped-out stem and topped with a rhinestone.  Backing the clover with a 1-1/4″ glimmer silver circle makes it sparkly and fun.  And the sentiment flag was matted with a slightly larger flag of Twitterpated Designer Series Paper .

Lucky-Framable-St-Patricks-Day-Card 3 
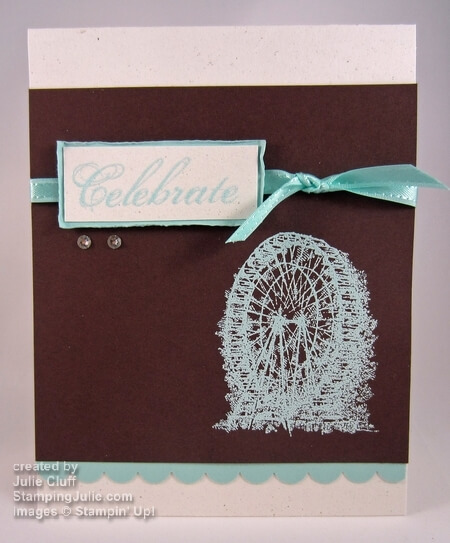
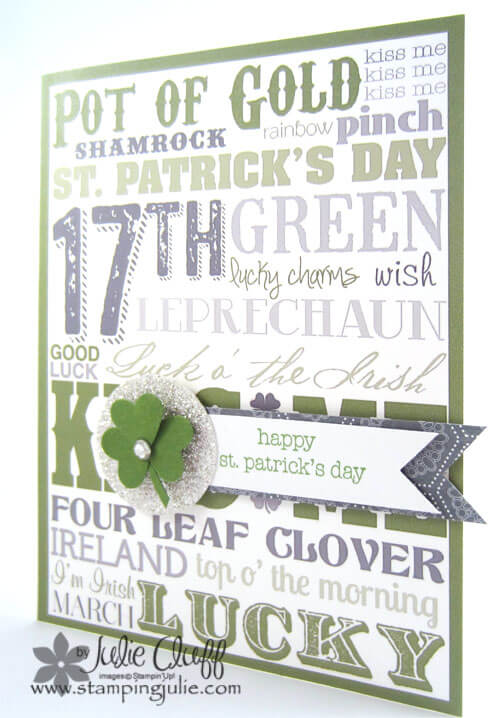
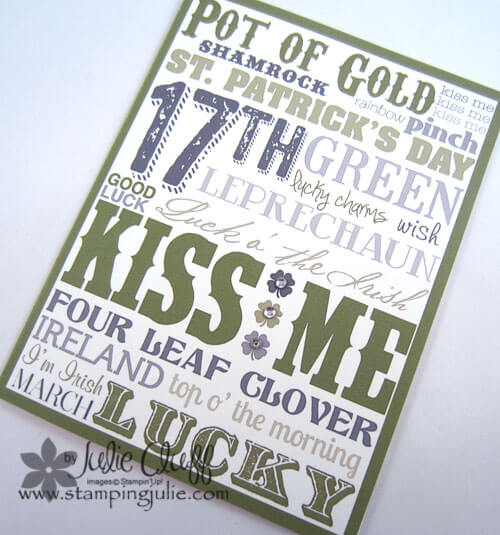
This second copy is just the printed Lucky framable card with three little rhinestones for just a little added bling.  🙂

Lucky-Framable-St-Patricks-Day-Card detail

In this My Digital Studio video you’ll learn how to use guide lines to design, how to group elements, and how to resize and mat  grouped elements.

To view new downloads, click here.

Did you know that you can receive FREE Sale-a-bration goodies when you order digital products too?  You can!  You can even combine digital products with other Stampin’ Up! products to earn your stampin’ rewards!

DO YOU STILL NEED DIGITAL SCRAPBOOKING SOFTWARE?  Click here to view the My Digital Studio options – including a 30-day FREE trial offer.

Enjoy!  Julie

stampin up blue ribbon congratulations card

Family Sunday: A Stampin’ Up! Blue Ribbon Congratulations

stampin up blue ribbon congratulations card Recently we’ve had some great things to celebrate in our family: son James earned the Eagle Scout rank in Boy Scouts, son Dallin called home to report his great grades in college so far this semester, son-in-law Joel recieved an award at work and niece’s husband Weston took first place in an interviewing contest at the university.  So I got busy making some masculine congratulation cards, which is quick and easy to do using the Stampin’ Up! Blue Ribbon stamp set!

james eagle scout project november 2012 james eagle scout project november 2012

dallin off to college january 2013

Kristin Joel Siena dec 2012

 weston rachel oct 2012

Yay!  Congrats everyone for a job well done!

Here’s some more pics of the Blue Ribbon cards.

stampin up blue ribbon congratulations card  The Large Scallop, 1-1/4″ Circle and 1-3/8″ Circle punches make this project super fast.

stampin up blue ribbon congratulations card

The card base is Sahara Sand and the ‘blue ribbon’ is Stampin’ Up! color’s Midnight Muse, Sahara Sand and Cajun Craze.

Stampin' Up! Blue Ribbon Stamp set
Stampin’ Up! Blue Ribbon Stamp Set
clear-mount #125981 or wood-mount #125979

Enjoy!  Julie

feeling sentimental ferris wheel stamp

Feeling Sentimental Ferris Wheel Stamp

feeling sentimental ferris wheel stamp

The stamp images in the Stampin’ Up! Sale-a-bration Feeling Sentimental set are to die for!  I love the intricate, antique line drawings of a ferris wheel, phone booth and an old-time bicycle.  On this card, I decided to go light on dark with a couple of neutrals and Pool Party as my main color.  The latest Spring catalog and the Sale-a-bration products feature a lot of accessories for Pool Party, which I love.

feeling sentimental ferris wheel stamp

I started with a Natural White cardstock.  Natural White is a little heavier than Whisper White and has a very slight speckled or grainy look to it.  It seemed perfect for a crisp, vintage look.   I stamped the ferris wheel in Versamark on Early Espresso cardstock, then embossed it with Pool Party embossing powder.  ‘Celebrate’ is embossed with Pool Party also.

feeling sentimental ferris wheel stamp

And the Pool Party ribbon from the SAB Sycamore Street Ribbon & Button Pack is perfect.  This ribbon is wonderful.  It ties so easily and is not bulky on your projects.  You can get this ribbon with two other shades plus three colors of buttons in the pack.

Here’s the card recipe:
(All supplies from Stampin’ Up! Click on the link to visit my store for product pictures, details & ordering.)
SAB: Feeling Sentimental Stamp Set w-# c-#, Sycamore Street ribbon & button pack #130812
Ink: VersaMark #102283
Paper: Pool Party cardstock #122924, Early Espresso cardstock #119686, Natural White cardstock#102316
Extras: Scallop Edge Border Punch #119882, Rhinestones #119246, Pool Party Embossing Powder #129398, Heat Tool #129053
 
feeling sentimental ferris wheel stamp
 

SALE-A-BRATION IS THE PERFECT TIME TO STOCK UP ON PUNCHES!  Punches are great tools that make your papercrafting so much easier and make you look like a pro!  Earn free SAB product with a $50 order.

This is the first of several Feeling Sentimental cards I’ve created to share with you.

Enjoy!  Julie

Clean and Simple Secret Garden Flower Dies Stamping

bloomin' marvelous secret garden card

More clean and simple collage stamping in this greeting card created with the Stampin’ Up! Secret Garden stamp and flowers die bundle and the FREE Bloomin’ Marvelous set available during Sale-a-bration with a $50 product purchase.

I stamped this on yummy Shimmery White cardstock.  It’s hard to photograph but if you look closely, you can see the shimmer!  And using the framelit dies made masking and layering these flowers super easy.  (You can watch the video below to see how!)

bloomin' marvelous secret garden card flag

I tried stamping the black sentiment directly over the flowers, but it didn’t show up the way I liked so I stamped it on a piece of vellum to layer over the top.  Using the vellum allowed the thought to stand out more without completely covering the flower design.  A perfect solution!

Here is the Card Recipe:
(All supplies from Stampin’ Up! Click on the link to visit my store for product pictures, details & ordering.)
SAB: Bloomin’ Marvelous wood-mount #129651 clear-mount #129654
Stamps: Secret Garden stamp and framelit die bundle wood-mount #129141 clear-mount #129144,
Ink: Baja Breeze #126960, Elegant Eggplant #126969, Melon Mambo #126948, Black StazOn #101406
Cardstock: Shimmery White #101910, Vellum #101856, Melon Mambo #115320
Extras: Itty Bitty Shapes Punch Pack #118309,  Pearls #119247, Pink Pirouette Taffeta Ribbon #122981, Glue Dots #103683

And here’s the video to show you how to quickly make this card using the flower framelit dies to mask!

A SPECIAL OFFER FROM JULIE CLUFF @ STAMPINGJULIE.COM:  I’m excited to offer a FREE online class to anyone placing a qualifying Sale-a-bration order in January!  So that means in addition to receiving FREE Sale-a-bration goodies , you’ll also receive this exclusive online Heart Box class.

hearts a flutter heart box

Click here to place your Sale-a-bration order today.

I hope you enjoyed this clean and simple Bloomin’ Marvelous Secret Garden card and tutorial on masking with the flowers die from the Secret Garden bundle.

Enjoy!  Julie

Blissful Bird Wedding Card

      Ciao Baby! Blissful Bird Wedding Card make a card

I love this Stampin’ Up! Blissful Bird stamp that coordinates with the Bird Builder punch, but I hadn’t used it yet.  So I combined it here with Ciao, Baby! and the fun Sale-a-bration Petite Curly Label punch to make this wedding card.  And, by the way, I love Ciao, Baby! Not only the stamp set – I just love saying the name!  Ciao, Baby!

Ciao Blissful Bird Wedding Card close up

I used the Tea for Two Designer Series Paper as an inspiration for the colors.  I stamped the Blissful Bird stamp twice – once in Pretty in Pink and once with Regal Rose – to create the bird.   I stamped it a third time with Lucky Limeade to punch out the branch.  I wanted a softer look so I stamped the Lucky Limeade off once before stamping and punching.

Ciao Blissful Bird Wedding Card detail

Love from the Ciao, Baby! stamp set was stamped with Pretty in Pink and punched out with the Petite Label Punch available for FREE with a qualifying Sale-a-bration order.  I stamped ‘bride & groom’ on Very Vanilla cardstock with the Sweet Essentials stamp set in Island Indigo.  Again, because I wanted a softer look I stamped if off once before stamping on the card.

Ciao Blissful Bird Wedding Card close up

The heart is punched from the Silver Glimmer paper.  (Learn how to get a free pack during Sale-a-bration.)  I love the little heart in the birds beak.  Don’t you?  I ran the So Saffron pattern paper from the Tea for Two dsp pack through the Big Shot in the new SAB Vine Street Embossing Folder (also available for FREE with a qualifying SAB order).

GET EXCITED!!!  STAMPIN’ UP!’S BEST SPECIAL OF THE YEAR, SALE-A-BRATION, IS HERE!  Earn a FREE Sale-A-Bration product with every $50 in merchandise you order.  CLICK HERE FOR MORE DETAILS.

CHECK OUT THE NEW SPRING CATALOG!

PLACE YOUR SAB ORDER TODAY!

Enjoy, Julie

Ciao Baby Blissful Bird Wedding Card make a card

Card Recipe:
(All supplies from Stampin’ Up! Click on the link to visit my store for product pictures & details.)
SAB: Vine Street Embossing Folder #130492, Petite Curly Label Punch #129405
Stamps: Blissful Bird wood-mount #126472, Ciao Baby! wood-mount #129645 clear-mount #129648, Sweet Essentials wood-mount #126455 clear-mount #126457
Ink: Island Indigo #126986, Regal Rose #126947, Lucky Limeade #126984, Pretty in Pink #126955
Paper:  Tea for Two Designer Series Paper #129311, Pretty in Pink cardstock #100459, Very Vanilla cardstock #101650
Extras: Bird Builder Punch #117191, Big Shot Die-cutting Machine #113439, Heart Punch #117193, Linen Thread #104199 
stampin' up! blissful bird make a card