Tagged: embossing

Perfectly Preserved Just For You Card

perfectly preserved just for you card Featuring some of the unique new products in the Stampin’ Up! Holiday Catalog, this card is a keeper in In Colors introduced last year.  These cute pears are stamped in Calypso Coral, Lucky Limeade and Island Indigo, and very quickly die cut with the Cannery Set Framelits.  Even the simple banner has a matching framelit, Bitty Banners Framelits.

This card also features Core’dination card stock, Orchard Harvest Designer Series Paper, and Woodgrain Embossing Folder, all of which are exclusive to the Holiday Catalog.

Perfectly Preserved Bundle Buying coordinated products from the catalog in bundles saves you money!  Save 15% when you purchase the Perfectly Preserved Stamp Set and Cannery Set Framelits in Perfectly Preserved Bundle.  There are seven traditional crafting bundles and two digital bundles all listed inside the front cover of the holiday catalog.

The complete list of supplies for this card can be found here.

View the Stampin’ Up! Holiday Catalog here

 Order Stampin’ Up! Products Here 24/7


Enjoy!  Julie

Teeny Tiny Wishes happy halloween witch hat card

Punch Art Witch’s Hat Halloween Card

Teeny Tiny Wishes happy halloween witch hat card

Remember the punch art hat tutorial ?  Here’s a new take with a witch’s hat for HalloweenClick here to view video tutorial.

First I created the iridescent textured black card stock by stamping the Circle Circus stamp with VersaMark ink repeatedly on black card stock and then heat embossing it with Iridescent Ice Embossing Powder.

Teeny Tiny Wishes happy halloween witch hat card detail

I used the embossed card stock to create this witch’s hat.  I punched the top of the hat with the Petite Pennants Builder Punch and the brim with the Extra-Large Oval Punch.  After  I punched the oval for the brim, I fed it back into the punch and trimmed off about 1/4″ from the bottom of the oval.  Don’t discard this trimming!  I used the trimmed edge to round the bottom of the pennant punch and finish the top of the hat.

After the hat was assembled, I finished the edges with a line of Dazzling Details glitter glue and added a thick band of glitter glue to the hat band.  The trim of glitter glue really added a lot to the finished hat.  The hat was adhered with Stampin’ Dimensionals for more pop!

Teeny Tiny Wishes happy halloween witch hat card close

I stamped the Happy Halloween greeting from Teeny Tiny Wishes and created the banner with the Bitty Banner Framelit.  Remember you can use post it notes to keep your framelit in place while you run it through the Big Shot Die-Cutting Machine. By curling the tag with the bone folder first I was able to adhere the ends to create dimension.  (Don’t curl the tag if you are mailing.)

The rick rack was cut from the International Bazaar Designer Series Paper with the Tasteful Trim Bigz XL Die.  You can’t tell from the pictures, but I ran the Rich Razzleberry trim across the top of the VersaMark pad and embossed it with Iridescent Ice ep.

Order your Halloween stamping supplies today!

Enjoy!  Julie

Teeny Tiny Wishes happy halloween witch hat card 2

Card Recipe:
Stamps: Circle Circus w-#115778 c-#127784, Teeny Tiny Wishes w-#115370 c-#127802
Ink: Rich Razzleberry #126950, VersaMark #102283
Paper: International Bazaar dsp #126920, Basic Black cs #121045, Whisper White cs# 100730
Extras:  Big Shot Die-Cutting Machine #113439, Bitty Banner Framelits #129267, Tasteful Trim Bigz XL Die #120893, Extra-Large Oval Punch #119859, Petite Pennants Builder Punch #122361, Iridescent Ice Embossing Powder #101930, Dazzling Details Glitter Glue #124117, Mini Brads #122941
Thoughts & Prayers just for you angle

Just For You Anniversary Card

Thoughts & Prayers just for you angle

It was this cute couple’s (my daughter and her husband) anniversary last month, so I created this Just For You card just for them!  Kristin has a blog  where she keeps us up-to-date on there doings and also posts her decorating, sewing, craft and reupolstering  projects.  They like to buy at garage sales, fix things up and resale for a profit.  It’s quite a gig.

kris & joel & siena happy anniversary

The card I created for them was inspired by the Shalom card at the top of page 23 in the Stampin’ Up! Holiday Catalog .  I kept this monochromatic card pretty simple but embossing the tree with Irridescent Ice Embossing Powder added some umph!  Inking up with the VersaMark Pad before inking with the Marina Mist Ink Pad keeps this tree damp long enough to add the embossing power.

Thoughts & Prayers just for you tree

And once again, I used my Big Shot Die-Cutting Machine to make it all happen.  The layered labels were quickly die cut with the Labels Collection Framelits for fast layering.  The white background was embossed with the Stripes Embossing Folder.

Thoughts & Prayers just for you card The Just for You sentiment was stamped on a strip of cardstock vellum and wrapped around and adhered to the striped base.

Enjoy!  Julie

Card Recipe:
Stamps: Thoughts & Prayers w-#113252 c-#127805
Ink: Marina Mist #126962, VersaMark #102283
Paper: Baja Breeze cs #111352, Marina Mist cs #119682, Whisper White  cs #100730, White Vellum cs #101856
Extras:  Big Shot Die-Cutting Machine #113439, Stripes Embossing Folder #123128, Labels Collection Framelits #125598, Irridescent Ice Embossing Powder #101930, Itty Bitty Shapes Punch Pack #118309, Mini Silver Brads #122941, Stampin’ Dimensionals #104430, SNAIL Adhesive #104332
Layered Labels red congratulations card angle

Stampin’ Up! Layered Labels Congratulations CAS

Layered Labels red congratulations card angle What is CAS?  It’s Clean And Simple.  Todays card is a CAS Congratulations card – not too fussy, not too much color or distraction, just cool and calm Baja Breeze and Marina Mist with a pop of vibrant Real Red to get your attention.

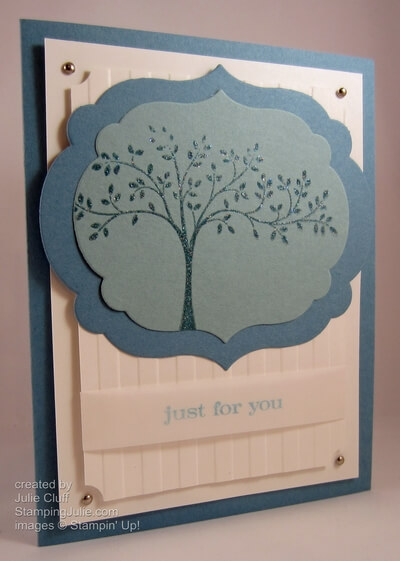
The background pattern paper was the starting point for this card so I used the coordinating neutral,  Very Vanilla card stock, cut 11″ x 5-1/2″ as the base (folded to 5-1/2″ x 5-1/2″) to match the Comfort Cafe dsp (designer series paper).  The papers in this dsp pack all have a subtle fabric print, so in keeping with that vibe I used the Square Lattice Embossing Folder after I cropped the Scallop Circle with the Big Shot Die-Cutting Machine.

Layered Labels red congratulations card details

I stamped Congratulations in Marina Mist then die cut it out with the Apothecary Accents Framelits.  (View yesterdays video that demonstrates the Apothecary Accents Framelit.)  I used another Apothecary Accents Framelit to trim out the Real Red Accent.  I cut the die cut in half and layered it behind the top and bottom of the Congratulations label, then attached the label with Stampin’ Dimensionals.

Finally, a Baja Breeze Seam Binding Ribbon bow was added topped using Glue Dots with a Real Red button and clear heart Bitty Button threaded with Linen Thread.

  Layered Labels red congratulations card matching envelope

I also made a matching envelope and with the Diagonal Scoring Plate this takes less than a minute to do.  (To view more information and a video on the diagonal scoring plate  click here.) To make this square envelope, cut your paper to 9″ square, score each side diagonally at 4-1/4″, trim out the small triangles where your score lines meet  and fold up.

Layered Labels red congratulations card envelope open You’ll notice I added button closure to the back with Linen Thread.  This is a fun feature if you are hand delivering your card, but not so practical for mailing.  🙂 To create this closure, attach the end of the Linen Thread to a Dimensional then to a button.  Adhere the button, thread side down on the envelope.  Then just place the other button on the other side with a Dimensionals.  Now wrap the thread around the buttons to close.

 Enjoy!  Julie

Layered Labels red congratulations card close up

Card Recipe:
Stamps:  Layered Labels w-#127070 c-#127072
Ink: Marina Mist #126962
Paper: Comfort Cafe DSP #126898, Real Red cs #100052, Very Vanilla cs #101650
Extras: Big Shot Die-Cutting Machine #113439, Apothecary Accents Framelits #127003, Scallop Circle Bigz Die #113468, Baja Breeze Seam Binding Ribbon #122331, Linen Thread #104199, Brights Designer Buttons #119747, Bitty Buttons #118761, Dimensionals #104430, Glue Dots #103683, Simply Scored Scoring Tool #122334, Simply Scored Diagonal Plate #125586
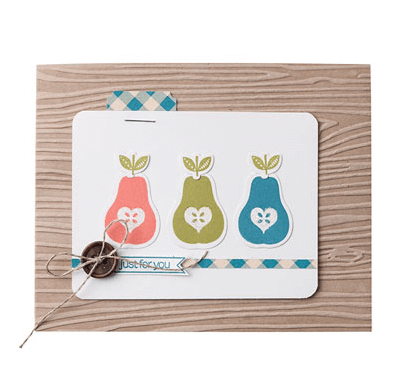
moving forward frog friendship card

Moving Forward Froggie Friend!

moving forward frog friendship card This little frog from Stampin’ Up! Moving Forward stamp set is just adorable!  I copied this card straight from the Stampin’ Up! demonstrator magazine.  The cute frog, the bright colors and the playful polka dot paper make this card super cheery!  I know a friend that could use a little cheering right now and I don’t know how anyone could keep from smiling looking at this hoppy frog.

To make the card base, first cut Island Indigo card stock and fold, then insert the front into the Chevron embossing folder and run through the Big Shot Die-Cutting Machine.

moving forward frog friendship card detail

The frog is stamped with Gumball Green stamp ink.  The bouncy swirls were stamped with Basic  Gray stamped off first to allow for a lighter color.  Also, the mini silver brads add just the right touch and keep the card clean and simple at the same time.

The tails of the mini silver brads are long and thin and on small strips of paper can stick out of the back, but they can be easily snipped shorter.

moving forward frog friendship card angle

When you become a Stampin’ Up! demonstrator you will receive the demonstrator magazine and receive this monthly inspirational publication.  Join today for just $99.

Enjoy,  Jule

Card Recipe:
Stamps: Moving Forward w-#126320 c-#126322
Ink: Basic Gray #126981, Gumball Green #126861
Paper: Polka Dot Parade Designer Series Paper #126902, Whisper White #100730, Real Red #102482, Island Indigo #122923
Extras: Chevron Embossing Folders #127749, Big Shot Die-Cutting Machine #113439, Mini Silver Brads #122941, Gumball Green Stitche Satin Ribbon #126848