Tagged: cards

perfectly preserved scentsational season card

Perfectly Preserved Scentsational Gingerbread Man

perfectly preserved scentsational season card

Only two days left of the Online Extravaganza! 20%-50% off of Stampin’ Up! goodies.  Click here now to view everything that’s on sale. 

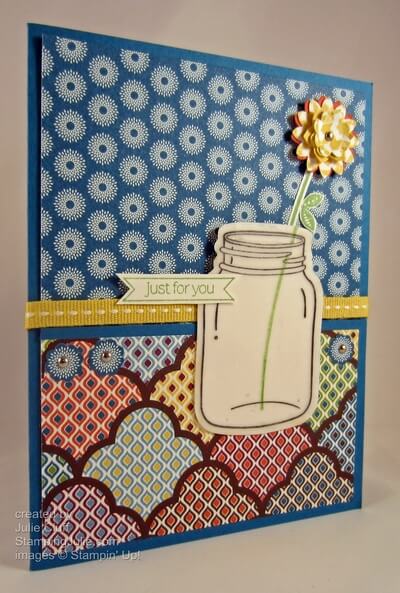
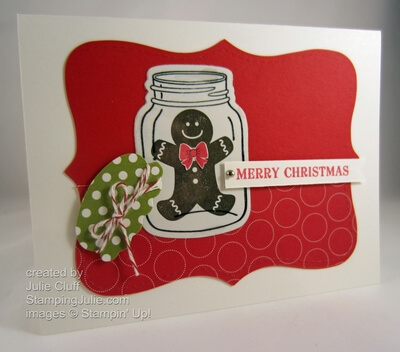
I could not resist combining these Christmas stamps from the Stampin’ Up! Holiday Catalog into one Merry Christmas card.  This little gingerbread man from the Scentsational Season stamp set fits perfectly in the Perfectly Preserved mason jar.

perfectly preserved scentsational season card close up

I stamped the gingerbread man in Early Espresso on Whisper White cardstock and cut it out with the mason jar Cannery Set Framelit Die.  His cute little bow tie is from the Joyous Celebrations stamp set with a little detail added with a black Stampin’ Write marker.  Then I stamped the jar with Black StazOn ink on a window sheet and layered that over the ‘gingerbread man’ jar.

The Old Olive lid was die cut out of the Polka Dot Parade Designer Series Paper with a baker’s twine tie.   The Top Note Die background is in Real Red cardstock with a layer of Real Red pattern paper from the same dsp paper pack.  Merry Christmas banner is from Owl Occasions stamp set.

I hope you all had a wonderful Thanksgiving weekend with lots of food, family and friends.  We enjoyed our weekend very much, catching up with family, playing games, going to a couple of shows and watching some football.

Enjoy!  Julie

perfectly preserved scentsational season card detail

Card Recipe:
Stamps:  Scentsational Season w-# 121026 c-# 121190 , Perfectly Preserved Bundle (includes Cannery Set Framelits Dies) w-# 129943 c-# 129944 , Owl Occasions w-# 128000 c-# 128003 , Joyous Celebrations w-# 128066 c-# 128069
Ink: Real Red #126949, Early Espresso #126974
Paper: Whisper White #100730, Real Red #102482, Polka Dot Parade Designer Series Paper #126902
Extras: Top Note Die #113463, Big Shot Die-cutting Machine #113439, Bakers Twine #123125, Mini Brads #122941
Perfectly Preserved just for you card

Perfectly Preserved Flower Card

Perfectly Preserved just for you card

I really love this mason jar stamp from the Stampin’ Up! Perfectly Preserved stamp set.  I especially love it stamped in StazOn ink on a Window Sheet.  And to make it even better, using the Cannery framelits to trim it out in a snap with the Big Shot Die-cutting Machine!

I stamped the stem in the jar on Whisper White and layered it under the die-cut window sheet.  Then I stamped another stem and trimmed it out, adding the leaves and the flower.  The flower was created with the Boho Blossoms punch.   I punched out several layers pierced the center with the Paper Piercing Tool and secured it with a mini Silver Brad.  I secured the flower to the card front with mini glue dots.

Perfectly Preserved just for you card flower

The International Bazaar Designer Series Paper creates a vibrant background paper.  Using the little flower from the Itty Bitty Shapes Punch Pack, I created three little blossoms with mini Silver Brad centers.  Daffodil Delight ribbon adds another splash of color and texture.

Perfectly Preserved just for you card detail

I found that using the multipurpose liquid glue was the best choice for adhering the window sheet and whisper white cardstock jar layers.  I quickly cut out the banner greeting  with the a Bitty Banners framelit.  I used a dimensional to pop the banner up.

ONLINE EXTRAVAGANZA STAMPIN’ UP! SUPER SALE happening now.  Click here for details.

Enjoy, Julie

Card Recipe:
Stamps:  Perfectly Preserved w-#126690 c-#126692
Ink: Black StazOn #101406, Wild Wasabi #126959
Paper:  International Bazaar Designer Series Paper #126920, Pacific Point cardstock #111350, Tangerine Tango cardstock #111349, Whisper White  cardstock #100730, Window Sheets #114323
Extras: Daffodil Delight ribbon #126872, Itty Bitty Shapes Punch Pack #118309, Boho Blossom Punch #119858, Mini Brads #122941, Cannery Framelits #127822, Bitty Banners Framelits #129267, Big Shot Die-cutting Machine #113439

Stampin’ Up! Apothecary Art Gift Card

Apothecary Art black & white Gift card

This simple little gift card has a classic black & white color scheme.  Measuring 3″ x 3″, I made this card quickly with my Big Shot Die-Cutting Machine.

I started by stamping the ‘for you’ label from Stampin’ Up! Apothecary Art stamp set in White Craft ink on Basic Black card stock and embossing it with white embossing powder.  Then I pulled out my super-hero Big Shot, cut out the label with the Labels Collection framelit and embossed the white background with the Fancy Fan Embossing folder.

Apothecary Art black & white Gift card inside

I used the framelit once again to trim out this piece for the inside of the card, giving me a clean spot for writing a happy message.

DIGITAL SCRAPBOOKING SALE!  FREE Digital Downloads plus 50% off Digital Kits Oct. 29 – Nov. 5th!  Click here for more details.

Order Stampin’ Up! Products Here 24/7 (and don’t forget to check out the dozens of new items added to the clearance rack.)

View the Stampin’ Up! Holiday Catalog here

Like us on Facebook

Follow on Twitter

Enjoy!  Julie

Apothecary Art black & white Gift card
Card Recipe:
Stamps: Apothecary Art w-#125525 c-#125527
Ink: White Craft #101731
Card stock: Whisper White #100730, Basic Black #121045
Extras: Big Shot Die-cutting Machine #113439, Labels Collection Framelits #125598, Fancy Fan Emboss Folder #127751, White Embossing Powder #109132, Stampin’ Dimensionals #104430
Wacky Wishes Birthday

A Wacky Wishes Happy Birthday

Wacky Wishes Birthday Yesterday we celebrated our son Dallin’s birthday.  I created this one-layer, clean & simple collage card with Stampin’ Up! stamps from Circle Circus  and Wacky Wishes to wish him a happy, happy birthday!  We celebrated at P F Chang’s, his birthday dinner choice.  (Pictures will be added to facebook later today.)

So how did I create this one-layer card?  First I tore a piece of paper to act as a mask.  I placed the torn mask to cover the bottom third of the card and sponged the top third with Baja Breeze ink.  Then, leaving the mask in place, I stamped various circles from in Baja Breeze, Lucky Limeade, More Mustard, and Island Indigo.  The creative color palette came from the Color Coach!

Wacky Wishes Birthday detail Finally I lifted the mask and stamped ‘Happy Birthday’ from the Wacky Wishes stamp set in Island Indigo.   Then I wrapped Island Indigo Bakers Twine around the card three times and tied it in a knot.  I really wanted to tie it in a bow but decided the knot would be more masculine.

THE WACKY WISHES STAMP SET IS A STAMPIN’ REWARD SET. What does that mean?  When you host a party you can receive hostess benefits including exclusive hostess sets that are specially priced.  BUT you don’t have to host a conventional party to receive these rewards.  Any time your order reaches $150 or more in product you can select at least $25 worth of FREE product including exclusive hostess sets.  Click here to view Stampin’ Rewards.

Wacky Wishes Birthday with envelope

I like to make the envelope extra special so the recipient can anticipate what’s inside.  By slipping a piece of scrap paper under the flap I was able to stamp this circle in Lucky Limeade to imitate the design on the card.  I find that stamping on the flap is always an easy envelope solution.

Being a 21-year-old young man, he ripped into the envelope like TNT and all the pretty decorating was demolished, but it’s the thought that counts, right?

personal stamp mom On the back of his card I stamped my personalized stamp with Lucky Limeade and then added some mom personlization with a Lucky Limeade marker.

DIGITAL DOWNLOADS 50% OFF AND FREE DOWNLOADS AVAILABLE NOW UNTIL NOV. 5TH.  Click here to order.

Click Here to Order your Stampin’ Supplies!

Click Here for Fun, Easy Digital Scrapbooking! 

Like us on Facebook

Follow on Twitter

Enjoy,  Julie

Wacky Wishes Birthday close up with envy

Card Recipe: 
Stamps:  Circle Circus w-#115778 c-#127784, Wacky Wishes (stampin’ reward) w-#126410 c-#126412
Ink: Baja Breeze #126960, Lucky Limeade #126984, More Mustard #126964, Island Indigo #126986
Paper:   Whisper White #100730
Extras: Stampin’ Sponges #101610, Island Indigo Bakers Twine #125575
Carry On Birthday Cupcake Card

Keep Calm & Eat a Cupcake

Carry On Birthday Cupcake Card I love playful birthday cards!  This card was designed by my sister during our stamping marathon last month.  She used a different stamp set to make hers and I chose this little cupcake from the Stampin’ Up! Carry On stamp set – love it!  And did you know you can get this stamp set FREE as a Stampin’ Reward with a $150 order.

Carry On Birthday Cupcake Card detail Layering stamped images is a great way to increase interest in your designs.  I really love the crisp look of this fun cupcake and the ‘eat a cupcake’ font.  And the Flourish Designer Frame highlights the message with style!

Trendy Chevron embossing and lively polka dots from the Polka Dot Parade Designer Series paper is just perfect for a great birthday wish.  I love using Stampin’ Up! coordinated line of ribbons, ink and papers which makes designing great projects super easy.

Carry On Birthday Cupcake Card above Order Stampin’ Up! Products Here 24/7 (and don’t forget to check out the dozens of new items added to the clearance rack.)

View the Stampin’ Up! Holiday Catalog here

Like us on Facebook

Follow on Twitter

Enjoy! Julie

Carry On Birthday Cupcake Card 2 Card Recipe:
Stamps: Carry On (Stampin’ Rewards) w-# 126645 c-# 126647
Ink:  Basic Gray #126981, Baja Breeze #126960
Paper: Polka Dot Parade Designer Series Paper #126902, Basic Gray #121044, Baja Breeze #111352, Whisper White #100730
Extras: Flourish Designer Frame #127835, Mini Brads #122941, Big Shot Die-cutting Machine #113439, Chevron Emboss Folder #127749, Gray Ribbon #126879