Category: Cards

Embellished Events celebrate birthday card

Stampin’ Up! Embellished Events Birthday

Embellished Events celebrate birthday card

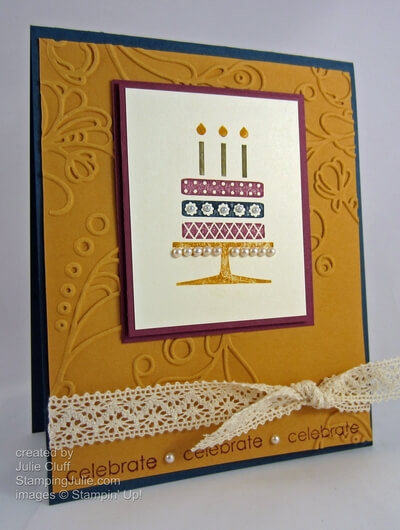
A colorful birthday cake from Embellish Events stamp set is a great way to celebrate a friend’s birthday.  Using markers to color in the cake layers adds fun color and adding pearls makes it extra special!  The Embellish Events set is a versatile set that will take you through many seasons and special events.

Video tutorial added.  Click here to view it.

I used the Rich Razzleberry, More Mustard, Midnight Muse and Soft Suede to color in the cake stamp then stamped it on Very Vanilla cardstock.  I like to use the point of my Paper-Piercing Tool to add the adhesive-backed Basic Jewel Pearls.

Embellished Events birthday cake detail

I used the Stamp-a-ma-jig to stamp celebrate three times along the bottom of the More Mustard cardstock.  After stamping the message I embossed this piece with the Elegant Lines Folder in the Big Shot Die-Cutting Machine, and finally, added a couple of pearls.  I highlighted  the stamped sentiment by tieing Victoria Crochet Lace just above it.

Embellished Events celebrate detail

ARE YOU READY FOR THE HOLIDAYS?  Do you need some creative ideas to make this year extra special?  Sign up now for the October Virtual Stamp camp and receive exclusive 30 minutes of video tutorials with complete instructions for three cards PLUS additional ideas to expand on those projects.  These videos will be longer and more detailed than the videos I feature on the blog.  You’ll also receive specific written instructions for each project.  Stamping demonstrators are welcome too!  Offer ending soon.  Click here now for more details and to register.

Enjoy, Julie

Embellished Events celebrate card

Card Recipe:
Stamps:  Embellished Events w-# 126495 c-# 126497
Ink:  Rich Razzleberry #126950
Cardstock: Very Vanilla #101650, Rich Razzleberry #115316, More Mustard #100946, Midnight Muse #126843
Extras: Basic Jewel Pearls #119247,  Stamp-a-ma-jig #101049,  Elegant Lines Emboss Folder #119277, Big Shot Die-Cutting Machine  #113439, Victoria Crochet Trim #118481, Many Marvelous Markers #119806
embellished events
Tricky Treats plaid halloween bat 2

Stampin’ Up! Tricky Treats Happy Halloween

Tricky Treats plaid halloween bat 2

Remember the old song, “What a difference a day makes.  twenty-four little hours…” I found myself humming, “What a difference an eye makes…” today as I created this cute bat tag.

Tricky Treats hallow-wing missing eyes

The finishing touch on this little bat was adding the adhesive-backed googly eyes.  What a difference?  It took it from cute to adorable!  You’re friends will love this cute little guy with his googly eyes, and this little greeting card is quick to create.

To create this card I started with a Basic Black cardstock base. I centered my Labels Collection Framelit on the front, secured it with post it notes and ran it through the Big Shot Die-Cutting Machine.  I backed it with plaid Howlstooth and Scaringbone Designer Series Paper.  I used a smaller label framelit to cut out the center piece.  Everything was adhered with Stampin’ Dimensionals.

Tricky Treats plaid halloween bat details

I stamped the bat tag from the Tricky Treats stamp set with Basic Black Craft ink and embossed it with Black Emboss Powder, after sprinking it with a just a touch of Iridescent Ice Emboss Powder for a hint of glitter.  Be careful not to mix the embossing powders.

The bat tag was punched with a circle punch and was added to the center with a dimensional and then tied to a Tangerine Tango Glimmer at the top with Linen Thread.

Tricky Treats plaid halloween bat

An added bonus when backing the label cut-out on front is the fun pattern that shows on the interior.  A Happy Halloween sentiment from the Seasonal Sayings Stamp Set was stamped in the middle with Tangerine Tango ink.

Tricky Treats plaid halloween bat interior

SIGN UP FOR A LIVE OR VIRTUAL STAMP CAMP TODAY! Check out live events and virtual events  at the tabs above.  These events will help you refine your stamping skills and teach you new techniques and projects as you bring joy to your family and friends through your creations.

Enjoy!  Julie

Tricky Treats plaid halloween bat close up

Card Recipe:
Stamps: Tricky Treats w-#126325 c-#126327,  Seasonal Sayings w-#128006 c-#128009
Ink: Tangerine Tango #111841, Basic Black Craft #102192
Paper: Howlstooth & Scaringbone Designer Series Paper #126906, Basic Black #121045, Whisper White #100730
Extras: Labels Collection Framelits #125598, Big Shot Die-Cutting Machine #113439, 1-3/8″ Circle Punch #119850, Brights Glimmer Brads #121006, Linen Thread #104199, Stampin’ Dimensionals #104430, Black Emboss Powder #109133, Iridescent Ice Emboss Powder #101930, Googlies #127539
oct stamp camp

Stamping Julie Live and Virtual Events

oct stamp camp Are you excited about the holidays?  Are you wanting new creative ideas and how-to’s to make your holidays extra special for you and your family?  Your friends and family will drool over your handmade creations.  You’ll feel special and so will they! 

Do you live near Louisville, KY?  Then join me for my October 25th Stamp Camp.  Details below.  And view more events by clicking the Events tab above.

If you don’t live close or can’t make it on the 25th, don’t despair!  You can still get all the creative ideas and how-to’s!  Join me for a virtual stamp camp delivered directly TO YOU on October 20th .  Enjoy 30 minutes of exclusive video tutorials with lifetime access, which include step-by-step instructions to make all three projects PLUS additional project ideas, AND a PDF file with full color pictures and step-by-step directions  with complete cutting measurements.

Two ways to get the virtual stamp camp

Option 1 – In the US Only! Purchase $35 or more in Stampin’ Up! product from my store by October 20th and receive the videos and PDF file as a FREE bonus.  Place your order and then click here  or leave a comment below with your email address to claim your FREE bonus!

Option 2 – Available to ALL! Order video demonstrations and PDF file for only $8.  This is great for everyone looking for creative inspiration, including stamping demonstrators who need ideas for their own events!  Click ‘Buy Now’ button and order now.


WHAT OTHERS ARE SAYING ABOUT STAMPING JULIE VIRTUAL EVENTS:

“So cute, and great tutorial! Thanks so much for sharing!” – Kat R.

“Julie has always been a great inspiration, especially when it comes to card design.  Very helpful in teaching different techinques.” – Debbie M.

“I am fairly new to Stampin’ Up!, and your cards and ideas help me in my demonstrations.  So, thank you so much for your help.” – Cindy H.

oct stamp camp

Girls Night Out Stamp Camp

Thursday, Oct. 25, 2012 7:00 pm

Rubber stamping with Julie Cluff

Make 3 projects!

$10 class fee or FREE with product purchase that night

Door prizes & light refreshments!

Sign Up Now:

(Limited to 10 stampers, so make your reservation early)

Questions? or Need directions:  Email me or call number above

Most people enjoy bringing their own class kit.**

**Class Kit: Paper Trimmer, Scissors, Adhesive, bone folder or scoring blade. (if you don’t have some of these supplies, no problem, there will be some available for sharing.)

WHAT OTHERS ARE SAYING ABOUT STAMPING JULIE EVENTS:

“YIPPEE! Thanks for hosting another great camp!” – Karen W.

“I have to admit I was a bit intimidated by the prospect of making those beautiful cards, but I had so much fun!” – Cathy P.

“Mary and I had a great time last nite and we look forward to the next stamp camp.” – Vicki R.

Stampin' Up! summer silhouettes congratulations card angle

Getting Started: Card Making – The Basics

Stampin' Up! summer silhouettes congratulations card angle No one is born knowing how to make their own cards.  It’s true!!  I remember when I was first introduced to the idea of rubber stamping and card making.  I would ask how to do it and the answer I would get would be something like this:  Cut your paper in half and fold it.

That sounds simple enough, but is that all there is to it? I would always be left with all these unanswered questions: Cut the paper where? How do I design it?  How do I layer? How do I mail it when I’m done?!?

Do these questions sound familiar to you?

Here are some basics to unleash your inner creative diva and impress your friends and family while making them feel special too!

 The dimensions of a standard homemade greeting card are 4-1/4″ x 5-1/2″ and it fits in an invitation-size envelope.  Stampin’ Up! offers beautiful envelopes  and they are easy to stamp on too!

To create the standard greeting card, cut your 8-1/2″ x 11″ cardstock on the 11″ side at 5-1/2″, then fold it in half.  Half of 8-1/2″ is 4-1/4″ so that will give you a card measuring 4-1/4″ x 5-1/2″.  There are variations on greeting card sizes and cuts but this is the best place to start.

Now start adding.  Here are some ideas.

1. Leave the background clean or stamp a random pattern all over the background similar to what you see in the card below.  (Make sure you stamp off the edges for a natural look.)

2. Stamp your focal point image, cut it out square and layer it by adding cardstock behind it that is slightly bigger.  Add 1/8″, 1/4″ or 1/2″ to the size of the square depending on the size frame you want.  For example, if you want a narrow border and your piece is 2″ x 2″, cut your layer 2-1/8″ x 2-1/8″.

3. Use punches for quick, layered elements. Like this circle inside the scallop circle.  Punches are great for layering and you will see me use them a ton. Betsy's Blossoms sunny birthday card angle

4. Add a greeting by stamping on a separate scrap of cardstock, cutting it out and adhering it, OR by stamping directly on the background cardstock.   On the card above the greeting was added as a banner.  On the card below the sentiment was stamped directly on the background.

5. Use a good adhesive.  I highly recommend SNAIL adhesive.   Add enough adhesive to keep your card together but do not cover the entire surface!  Usually 1/2″ to 1″ (depending on the size of your piece) in each corner is sufficient.  I used inadequate glue one time for my son’s birthday invitations and they fell apart – yikes!  owl occasions birthday wish angle

6. Keep it simple and fun, and your design work will keep expanding.   My first cards were simply folded cardstock with a greeting stamped in the middle.  Seriously!  I’m not kidding.  When my son was born I grabbed some cardstock, quickly cut it, folded it,  stamped a thank you message on the front and that’s what I sent as a thank you card.

This owl card looks involved and complicated, but it really is just starting with the basics –  folded cardstock – and adding layers and embellishments.  Experiment and  most of all have fun!!!

Click Here to Order your Stampin’ Supplies

 Click Here for Fun, Easy Digital Scrapbooking! 

 Enjoy!  Julie

Betsy's Blossoms sunny birthday card angle

Sunny Make a Wish Birthday Card

Betsy's Blossoms sunny birthday card angle

The colors of this a bright, happy birthday card are drawn from the International Bazaar designer series paper:  Rich Razzleberry, Daffodil Delight, Tangerine Tango and Bashful Blue. Designer paper is great inspiration for any project.

Betsy's Blossoms sunny birthday card flat

The 2-3/8″ scallop punch,  1-3/4″ circle punch and 1″ square punch make this card easy work.  This would be a great card to reproduce quickly to always have a stash of birthday cards on hand.

The large Daffodil Delight circle center is embossed with the Perfect Polka Dots Folder and then touched with 2-way glue before  shaking a bit of Dazzling Diamonds glitter over for a little sunny sparkle.  Did you see how I store and use glitter on Facebook?  I like to show storage ideas on facebook.  Look through my fb photo album.

Betsy's Blossoms sunny birthday card glitter blossom

The background was stamped Bashful Blue Ink on Bashful Blue Cardstock with a small flower from the Betsy’s Blossoms stamp set.  The Make a Wish banner was stamped in Rich Razzleberry from the Sweet Essentials stamp set.  And a Tangerine Tango glimmer brad was added for extra bling!  To view a video tutorial on creating a banner, click here.

Order Stampin’ Up! Products Here 24/7

View the Stampin’ Up! Holiday Catalog here

Like us on Facebook

Follow on Twitter

 Enjoy!  Julie

Betsy's Blossoms sunny birthday card Card Recipe:
Stamps:  Sweet Essentials w-#126455 c-#126457, Betsy’s Blossoms w-#126004 c-#126006
Ink: Rich Razzleberry #126950, Bashful Blue #126961
Paper: Bashful Blue #105120, Tangerine Tango #111349, Rich Razzleberry #115316, Daffodil Delight #119683, International Bazaar Designer Series Paper #126920
Extras: Perfect Polka Dots Emboss Folder #117335, Big Shot Die-Cutting Machine #113439, 2-3/8″ scallop punch #118874,  1-3/4″ circle punch #119850, 1″ square punch  #124094