Stampin’ Up! Fun Flower Thank You Card
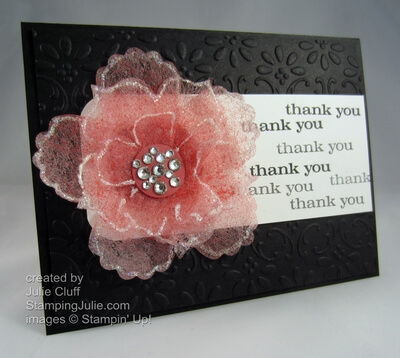
I made this flower with dryer sheets and the Fun Flower Bigz Die. Who knew dryer sheets could be so pretty?! As you might imagine dryer sheets would be hard to cut but if you sandwich the die, then the dryer sheet, and finally card stock you’ll get a clean cut. I only had to clip a couple of hanger-ons.

Once the flower was cut, I spritzed it with color, then outlined it with Dazzling Details Glitter Glue. Of course, then it had to sit and dry. I let it dry completely over night. I set it out on some paper to dry, but I should have set it on wax paper instead since I did have a little trouble with a couple of spots where the glue stuck to the paper.

To assemble the flower, I punched a 1-1/4″ card stock circle from Primrose Petals then stacked the flowers on top, punched the center and adhered them all together with a brad. I punched a 3/4″ card stock circle, adhered the rhinestones and glued that to the top of the brad with a glue dot.

‘Thank you’, from the Just Believe Stamp Set, was stamped in Basic Black full strength and then again without re-inking to get the different varying shades of black and gray.
The Big Shot Die-Cutting Machine makes this all happen – the flower and the beautiful embossed background. The Big Shot has instruction on the multipurpose platform on how to use all the various types of dies, making it super easy to use. Order your Big Shot today and start creating!
 Card Recipe:
Stamp Set: Just Believe wood-#116948 clear-#120453
Ink: Basic Black #126980
Paper: Primrose Petals #126841, Basic Black #121045, Whisper White #100730
Extras: Rhinestones #119246, 1-1/4″ Circle Punch #119861, 3/4″ Circle Punch #119873, Stampin’ Spritzer #126185, Dazzling Detail Glitter Glue #124117, Fun Flower Bigz Die #121812, Embossing Folder #120175, Big Shot Die-Cut Machine #113439, Mini Glue Dots #103683
Card Recipe:
Stamp Set: Just Believe wood-#116948 clear-#120453
Ink: Basic Black #126980
Paper: Primrose Petals #126841, Basic Black #121045, Whisper White #100730
Extras: Rhinestones #119246, 1-1/4″ Circle Punch #119861, 3/4″ Circle Punch #119873, Stampin’ Spritzer #126185, Dazzling Detail Glitter Glue #124117, Fun Flower Bigz Die #121812, Embossing Folder #120175, Big Shot Die-Cut Machine #113439, Mini Glue Dots #103683
Enjoy! Julie
Hello, Julie: I’m in awe at your imagination and creativity!!!!! Who knew that dryer sheets could look so beautiful!! Thank you so much for the inspiration and for sharing your talent. I will give this a try ASAP and I will never look at a dryer sheet the same way again. I absolutely love this card!!!!!
Maria.
Maria, Thanks for your kind reply! I’m so glad you liked it and found it inspiring!! That’s my goal – to inspire others to enjoy this creative outlet and bless their lives.
Julie
how pretty and clever, will have to give it a go.
kaye coats
Thanks, Kaye! Have fun creating!
just wondering…did it take so long to dry because of the spritzing or because of the glue? this would make a great make and take at an event, but i’ll forego the glue if i can spritz the dryer sheets ahead of time. thanks for the clarification in advance!
Hi Jenn! Don’t know why I didn’t see this comment before. The glue definitely took the longest to dry. The dryer sheets are not absorbant and so it took a little while for the spray to dry as well. I hope that helps!
Hi Julie!
I was just wondering what kind/brand of color did you use and was the drier sheet used before you cut it.
Thanks!
Hi Sara, I use Stampin’ Up! colors and brands exclusively. I believe it was a pink spritzer that was available previously. But you can fill the empty spritzer bottles that are available and fill them with alcohol and drops of any reinker to get the color you want. Also, by adding a little shimmer paint to the spray you can get the sparkle too.
The dryer sheet is used before you cut it.
Thanks for stopping by and visiting!!
I love the idea of making a flower out of a dry sheet, I’ll have to give it a try. :O)
Mary, I hope you enjoyed creating your flowers! Thanks for visiting!
Thank you so much for the tutorial on the dryer sheet flowers. I tried it last night and with the card stock, they cut out beautifully. I made my own spritzer out of acrylic paint and water and left them to dry on wax paper as you suggested and they didn’t stick. Thanks!!
Marilyn,
You’re welcome! I’m so glad it worked so well for you. Thanks for letting me know and have fun with your spritzed dryer sheet flowers!!
ma-gni-fi-que ! =^..^=
beautiful work..just found you on pinterest am going to have to try this. tfs
How can I make the cards, can’t get them here in Barbados.
Hi there,I log on to your blog named “Stampin’ Up! Fun Flower Thank You Card” regularly.Your humoristic style is awesome, keep up the good work! And you can look our website about daily proxy.