By Request: Painting With Bleach Video
It seems that many of you are wondering how to paint with bleach – so here’s the video tutorial! And for card details click here.
To view video from email go here http://youtu.be/POYe5nUqQ3Q or here.

It seems that many of you are wondering how to paint with bleach – so here’s the video tutorial! And for card details click here.
To view video from email go here http://youtu.be/POYe5nUqQ3Q or here.
Fantastic holiday Digital Design releases from September 11th. Click on the pictures for more details.
1.Wouldn’t this make the best halloween party invitations?
Sophisticated Spooks Ensemble – #131513
2. Love these frames – so hip!
Fancy Frames – #131330
3. Includes a customizable digital Christmas Card!
More Merry Messages Stamp Brush Set – #131316
4. The words are punches! You can fill them with any color, paper or photo…
Holiday Celebration Punches – #131309
5. Digital Holiday paper – Love!
Holiday Treasures II Designer Series Paper – #131328
6. Includes a holiday Photo Greeting Card – perfect!
Jewish Celebrations Stamp Brush Set – #131318
Now is a great time to download My Digital Studio and start your digital holiday creations!

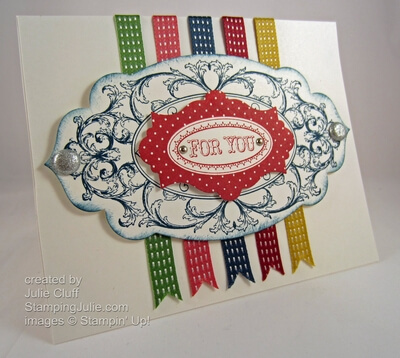
In honor of the In-Color Satin Stitched Ribbon Special (see details at the bottom), I created this ribbon-rich greeting card.
To create the ribbon background, I started with Whisper White card stock cut to 4-1/4″ x 5-1/4″. I cut 6″ strips of each ribbon and flagged the end by folding it and trimming at an angle from the edge to the folded center. I use the grid paper all the time, but some projects demand it’s use and this was one of them. I centered the card stock on the grid paper and secured the first ribbon to the card stock in the center using the grid paper as a guide. Continuing to use the grid paper to guide placement, I adhered the other ribbons using SNAIL adhesive and then attaching the upper ends to the backside.
Once the ribbons were in place, I attached the card front to a Whisper White card base to hide the raw edges of the ribbons on the backside.
The large label from the Layered Label stamp set was stamped with Midnight Muse and cut out with the Apothecary Accents framelit. I used a Stamping Sponge to sponge a little Midnight Muse around the edges so that it would standout from the white background.
The ‘For You’ stamp from the same set was stamped in Raspberry Ripple and trimmed out with the matching framelit. Mini Silver Brads were added to the tag and Silver Glimmer Brads were added to the outside corners of the large label.
The labels were layered and adhered to the ribbon background with Stampin’ Dimensionals.
Invest in a Big Shot Die-Cutting Machine, framelits, embossing folders and dies.
*************************************************************
 It’s a ‘Back To Spool” special! During the month of September get a
free spool of ribbon with a $40 product purchase.
Stampin’ Up! announcement: “While the kids are heading back to school, Stampin’ Up! is going back to ‘spool’! For the month of September, get a FREE package of 3/8″ Stitched Satin Ribbon-an $8.95 value-for every $40 you spend!”
Choose one of the following or place a $200 order and get ALL AND $30 in Stampin’ Rewards.
Enjoy, Julie
Card Recipe: Stamps: Layered Labels w-#127070 c-#127072 Ink: Raspberry Ripple #126859, Midnight Muse #126860 Paper: Whisper White #100730 Extras: Big Shot Die-Cutting Machine #113439, Apothecary Accents Framelits #127003, Mini Silver Brads #122941, Basics Glimmer Brads #121006, Grid Paper #102787, Sponges #101610, SNAIL Adhesive #104332, Stampin’ Dimensionals #104430Today I created a video tutorial to show how I created the framelits panel with “stamping outside the lines.” Leave me a comment and let me know what you think of these videos and what tutorials you would like to see? What do you want to learn?!? I love sharing with you!
If you are reading in email, you can view the video here or http://youtu.be/8Rj4JLBT2SM
Enjoy, Julie
Join the conversation – join us on facebook.
The New Digital Design Downloads – the DDD!!!
Did you know that EVERY Tuesday new digital content is available for My Digital Studio 2? And did you know that the digital content can be downloaded to be used in other programs too? Did you know that there are 31 digital products on sale 31% off until September 14th? And printing products are also on sale 31% off until September 14th?
That’s a lot of great value and an awesome opportunity to get started on digital scrapbooking.
Here are the latest digital products:
Great Black patterned paper for elegant projects AND halloween.
essentials designer series papers #131222
The great sport stamp brush set is perfect for documenting fall sports events.
great sport stamp brush set #131235
And try out this tri fold Christmas greeting card.
ho ho ho trifold card digital template #131472
This Christmas Brush Set will make great custom Christmas gift tags.
joyous celebrations stamp brush set #131236
And this little easel calendar is sure to dress up any desk top. This would make a great holiday gift too.
live the day easel calendar template #130974
The Picture This kits includes 5 stamp brush set, 5 digital embellishments and 1-page designer template.
picture this digital kit #131226
This fun Christmas card template comes in the traditional greeting card size – 4-1/4″ x 5-1/2″.
twinkling joy greeting card template #131471
Enjoy, Julie