Category: Cards

Stampin' Up! summer silhouettes congratulations card

Summer Silhouettes – Clean and Simple

Click here to enter drawing for Blog Candy!

Stampin' Up! summer silhouettes congratulations card

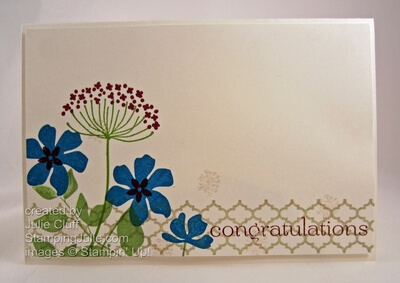
The Summer Silhouettes floral images are FABULOUS!  And I love the lattice stamp – a lovely design.  I worked really hard to keep this simple!!  I had to refrain from doing just-a-little-more.

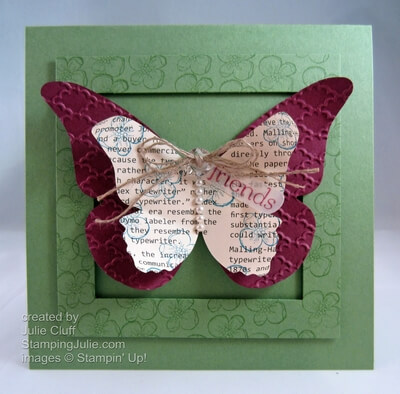
I used the same color scheme as I used on the Butterfly friendship card that is now part of the Blog Candy and yet it is totally different.  The colors are Pacific Point, Rich Razzleberry, Wild Wasabi and Sahara Sand. 

Stampin' Up! summer silhouettes congratulations card detail If you look closely you can see the little extra that I did add.  Can you see the little sparkly splashes?  I stamped the very smallest blossom in a random pattern in versamark and then embossed it with Iridescent Ice Stampin’ Emboss Powder.

summer silhouettes card with envelope

Also, this card measures 3-3/4″ by 5-1/2″.  I trimmed it a little longer and narrower but it’s still perfect for a standard envelope.  I lined this matching envelope with paper from the Summer Smooches Designer Series Paper.

Stampin' Up! summer silhouettes congratulations card angle  Things that make me happy! –

  •  Stampin’ Dimensionals – I used 11, yes you read that right, I used 11 dimensionals on the back of the front panel.  They make me happy.  For heaven’s sake, you get 300 in that little inexpensive pack of dimensionals, why not use them?
  • Bling – I love the Iridescent Ice Stampin’ Emboss Powder.  It adds glittery goodness to any stamped image!

You can become a Stampin’ Up! demonstrator for a $99 investment and you’ll receive $125 worth of product of your choice plus business supplies, & thereafter, you’ll receive all the great benefits of being a demonstrator.

Do what I do!  Check it out today!

Card Recipe:
Stamps:  Summer Silhouettes w-#126445 c-#126447, Sweet Essentials w-#126455 c-#126457
Ink: Wild Wasabi #126959, Rich Razzleberry #126950, Pacific Point #126951, Sahara Sand #126976, Versamark #102283
Paper: Whisper White #100730
Extras:  Stampin’ Dimensionals #104430, Iridescent Ice Stampin’ Emboss Powder #101930

Try your hand at a clean & simple card following some of the elements of this Summer Silhouettes congratulations card.

Enjoy, Julie

Stampin' Up! Aviary CAS Greeting Card

Simple Stampin’ Up! Aviary Greeting Card

Click here to enter drawing for Blog Candy!

Stampin' Up! Aviary CAS Greeting Card

The design for this Stampin’ Up! Aviary greeting card came to me when I woke up this morning!  I went straight to my office and here it is – just for you!!!  I fell in love with this set from the very beginning. I love the interesting cages, and especially the adorable birds!

Obviously, this is a very clean and simple card.  Just a couple of interesting elements make it work.  To create the top to hang the cage, I die-cut the Summer Smooches DSP for the top with ths second largest Label Collection Framelit.

Stampin' Up! Aviary CAS Greeting Card close up The cage was stamped in Basic Black Craft ink, embossed with Black Embossing Powder and trimmed out with my Paper Snips.  The sweet songbird was inked FIRST in Versamark, then in Calypso Coral, stamped and embossed with Clear Embossing Powder.  The order of inking is important.  The Versamark ink keeps the little birdy moist to ‘grab’ the embossing powder and the Calypso Coral ink adds the color, but we don’t want to add color to the Versamark pad!

Stampin' Up! Aviary CAS Greeting Card angle

I punched a hole in the cage ring and in the bottom of the topper. The Linen Thread is then laced through these holes.  I attached the topper with SNAIL adhesive and the cage was adhered with Stampin’ Dimensionals and the coral bird was added with a Glue Dot.

Have a fabulous weekend and I hope you enjoyed this simple aviary greeting card.

(Hyperlinks in ‘card recipe’ link to description of products highlighted.)

Card Recipe: 
Stamps:  Aviary w-#116956 c-#120462
Ink: Calypso Coral #126983, Black Craft #102192, Versamark #102283
Paper: Summer Smooches #125409, Whisper White #100730
Extras: Labels Collection Framelits #125598, Big Shot Die-cutting Machine #113439, Linen Thread #104199, Clear Emboss Powder #109130, Black Emboss Powder #109133, Paper Snips #103579, Dimensionals #104430, Glue Dots #103683, SNAIL Adhesive #104332
 

Enjoy, Julie

Reason to Smile Butterfly Art Card

Reason To Smile Butterfly Art Card & Blog Candy!

Reason to Smile Butterfly Art Card The Beautiful Butterflies Die makes this Reason to Smile friend card extra, extra special.  In fact, I’m planning to make another and put it in this black 5″ x 5″ frame from Amazon.  Classic LINEAR in black by Malden - 5x5 The Christmas card on page 202 of Stampin’ Up! catalog inspired the layout for my card.

This card is so pretty in person, I want to send it to someone, so I’m offering the following blog candy!

butterfly art blog candy july 2012 This blog candy package includes the Reason to Smile Butterfly card, two spools of 10 yards each of 1/8′ ribbon and a package of 12 vintage tags.   To enter the drawing, leave a comment and tell me what you like about this friend card (so I can make sure it goes to a good home LOL).  The blog candy drawing will happen at noon on Tuesday, July 24th, so comment today!

Reason to Smile Butterfly Art Card I cut the Rich Razzleberry and First Edition butterflies with Beautiful Butterflies Bigz Die and the Big Shot Die-cutting Machine.  Because it’s a Bigz die it will cut through multiple layers, chipboard, fabrics, and lots more too!

I stamped the smaller butterfly with the small flower outline in Pacific Point ink.  I love the look of stamped pattern paper and the neutral First Edition Designer Series Paper is perfect for this technique.

After I cut the large Rich Razzleberry butterfly I ran it back through the Big Shot in the Fancy Fan Embossing Folder.   All that texture is fabulous!

Reason to Smile Butterfly Art Card For additional texture a row of pearls were added down the middle.  The vellum ‘Friend’ tag is from the Sweet Essentials stamp set punched with the Word Window Punch and snipped shorter to fit.  The tag was poped up on a tad bit of a dimensional.

The smallest Vintage Faceted Designer Button was used at the head with a double bow of linen thread and adhered to the top of the tag with a glue dot.  Curling the edges of the wings with my bone folder created a 3D butterfly ready for flight.

The raised, stamped Wild Wasabi frame in the background measures 4″ x 4″ with a 3″ x 3″ square cut from the middle popped up with dimensionals.

Reason to Smile Butterfly Art Card angle The Reason to Smile stamp set is only available until July 31st.  Have you checked your wish list lately?  So now is the time to send in that order and purchase this beautiful set for only $5 with a $50 product purchase.

Card Recipe:
Stamps: Reason to Smile w-# 131274 c-# 131275 , Sweet Essentials w-#126455 c-#126457
Ink: Wild Wasabi #126959, Pacific Point #126951, Rich Razzleberry #126950
Paper: First Edition #121878, Wild Wasabi #108641, Rich Razzleberry #115316, Vellum #101856
Extras:  Beautiful Butterflies Die #114507, Big Shot Die-cutting Machine #113439, Basic Pearl Jewels #119247, Vintage Faceted Designer Buttons #127555, Linen Thread #104199, Word Window Punch #119857,  Fancy Fan Embossing Folder #127751, Stampin’ Dimensionals #104430
 

Enjoy, Julie

reason to smile birthday card

Another Easy Reason to Smile Birthday Wish

reason to smile birthday card

This birthday tag card using the Reason to Smile stamp set (that can be purchased this month only for $5 with a $50 product purchase)  was inspired by the very simple note card bundle shown at the top of page 141 in the Stampin’ Up! catalog.  Don’t have a catalog?  Ask for one today!  I used the colors and the layout of the note card to create the tag and attached the tag to a full card.

Technique:  Multi-color stamping –  I used the paint brush end of the Tangerine Tango and the Certainly Celery markers to ink the flower and stem outline.  When you use this technique, don’t forget to huff or breath on the inked rubber before you stamp.  This remoistens the ink for good stamp coverage.  Also, I always ink the rubber with the lightest color first, that way I don’t contaminate my lighter markers with darker inks.

reason to smile birthday card tag detail

When you use an outline stamp and a solid stamp of the same image for layering, it’s called two-step stamping.  Using both creates depth in your stamped art.

After I stamped the two-tone flower outline, I then inked only the top of the matching solid flower and stem with Daffodil Delight.  If I had wanted to ink the solid flower AND the complete stem, I would have definitely used the stamp-a-ma-jig to line up the stem.  Not having the flower and flower outline lined up exactly  is OK and, in fact, adds to the charm.  Not having the stems lined up – not OK.

reason to smile birthday card close up

I just really love the look of the solo flower and the pop of the Marina Mist greeting.  So sweet and simple.

Do you like what you see?  Please share your favorite projects on facebook and like us at #/StampingJulie .

Order your Reason to Smile stamp set today and don’t miss out on this great opportunity to purchase this great set for only $5 with a $50 product purchase.  Click the Order Now, place $50 of your favorite products in your cart, then add #131274  for the wood-mount set or #131275 for the clear-mount set.

reason to smile promotional stamp set

Card Recipe: 
Stamps: Reason to Smile w-#131274 c-#131275, Sweet Essentials w-#126455 c-#126457
Ink:  Brights Stampin’ Write Markers #119702, Daffodil Delight #126944, Marina Mist #126962
Paper:  International Bazaar Designer Series Paper #126920, Whisper White #100730
Extras:  Brights Designer Buttons #119747, Linen Thread #104199, Stampin’ Dimensionals #104430
 

Enjoy, Julie


Color Inspiration for your Paper Crafting

Color inspiration for your paper crafting can come from many different places.  Some of my favorites are the Stampin’ Up! catalogs, designer series paper, and the color coach. These are obvious places to be inspired by Stampin’ Up! colors, but have you looked around you?

Do you have a favorite dress you love to wear or a favorite picture hanging in your home?  Have you noticed the colors used in a magazine article or ad?   How can you use these inspirations to create your next favorite birthday card, party favor or wall decor?

Design Seeds takes color inspiration to a whole new level.  Check out this picture below and notice the colors the designer has pulled from this picture.  Can you convert this great color combination into Stampin’ Up! colors?

 (Picture source:  http://design-seeds.com/index.php/home/entry/ladybug-hues)

Here’s the SU! colors I picked from this: Baja Breeze, Certainly Celery, Wild Wasabi, Basic Black and Tangerine Tango.  Are these the colors you would have chosen?

Inspiration Color Palette Here’s a VERY simple birthday gift card made with this color inspiration.  It took me just a few minutes to make this card because I already had a color palette.  Actually, it took me soooo little time to make this, I wish I had timed myself.  Probably 10-15 from beginning to end.  It took longer to take and edit the picture than to make it!  LOL

summer silhouette birthday gift card angle

This card measures 2-1/2″ x 3-1/2″ I chose to stamp this card on Glossy White.  This glossy paper creates such a great effect.  I wish you could see it in person.  This paper has a similar surface as you would find on a store-bought card but a much nicer, richer-feeling paper weight.  The first time I saw a card stamped on Glossy White I didn’t believe it was hand stamped.  It was a floral card also and it was just beautiful.  The colors are so rich and vibrant stamped on this paper.

summer silhouette birthday gift card close up

Technique:  You’re probably noticing that it looks like I used two different blues.  Not so – all the flowers are stamped in Baha Breeze!  The lighter color is a second-generation stamped image, meaning I stamped off on a scrap piece of paper first before stamping on my card front.  The darker Baha Breeze is full-strength color.  Stamping-off or second-generation stamping is an easy way to get even more variety out of your ink pads.

Card Recipe:
Stamps: Summer Silhouettes w-#126445 c-#126447, Itty Bitty Banners w-#126255 c-#126257
Ink: Certainly Celery #126958, Wild Wasabi #126959, Baja Breeze #126960, Tangerine Tango #126946, Basic Black #126980
Paper: Glossy White #102599, Basic Black #121045
Extras: Bitty Banner Framelits #129267, Big Shot Die-cutting Machine #113439
 

I hope you enjoyed this color inspiration post and the easy birthday gift card!  Order a pack of designer series paper today to inspire your color choices or request your FREE copy of the Stampin’ Up! Catalog today!

Enjoy!  Julie