Tagged: greeting card

oh. hello red pirouette wisteria scallop card

Oh, Hello! Emboss Resist Card(s)

oh. hello red pirouette wisteria scallop card

Today, I have not one but two samples for you from the new Oh, Hello stamp set!!  I was having a lot of fun with the new stamp set and the Ovals Collection framelits and I got a bit carried away and created two cards with the same technique and similar colors.  Which is your favorite?!

oh hello papillon butterfly gate card

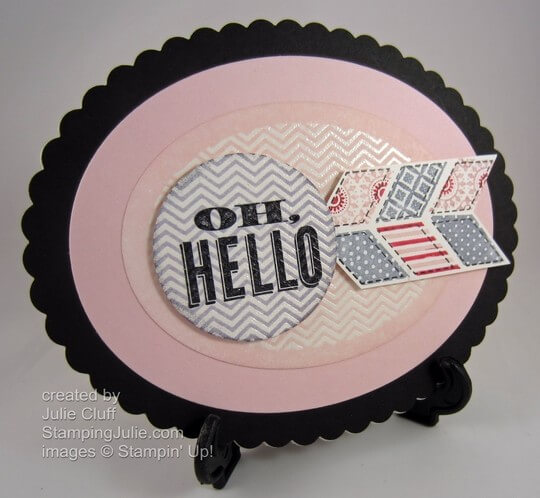
Both cards are created with the emboss resist technique.  On each card, I stamped the oval background on Whisper White cardstock with VersaMark Ink and embossed it with clear embossing powder.

oh. hello red pirouette wisteria card tag

On the Oh, Hello flag card, I stamped “Oh, Hello” with Black Staz On ink before I stamped and embossed the oval over the top. After embossing, I trimmed out the oval with the oval framelit and then punched out “Oh, Hello” with the 1-3/4″ circle punch.  I brayered the oval with Pink Pirouette and the circle with Wisteria Wonder and wiped the embossing clean.

oh. hello red pirouette wisteria card detail

I used the Pink Pirouette, Rose Red and Wisteria Wonder markers to color and stamp the flag, then stamped the outline with the Black StazOn.

oh. hello red pirouette wisteria card overhead

To make the Scallop card base, I folded the 4-1/4″ x 11″ Whisper White card and cut it out with the scallop framelit overlapping the fold so that 5 of the scallops on the end are not cut, creating the scallop card fold.  I cut another black scallop oval and adhered it to the front.

oh hello papillon butterfly card close up For the butterfy gate card, I embossed the oval with clear embossing powder then trimmed out the oval and the inner oval, then punch out the Elegant Butterfly.  The outer rim of the stamped oval I brayered with Basic Gray then inner oval with Pink Pirouette and the butterfly with Rose Red.  The little flower butterfly was stamped from Papillon Potpourri on Wisteria Wonder with VersaMark and embossed with clear embossing powder.

oh hello papillon butterfly card detail 2

To create the gate card, I scored a 4-1/4″ x 11″ piece of Pink Pirouette cardstock and scored from either end at 2-3/4″.   I trimmed out a larger ring of Basic Gray to frame and close the card.

oh hello papillon butterfly card open

Here’s another angle.

oh hello papillon butterfly card open

ONLY 6 MORE DAYS UNTIL SALE-A-BRATION!! Get Excited!!!  Click here for the complete list of SAB products!

Stay tuned for more how-to videos coming next week!

Enjoy!  Julie

Oh, Hello wood-mount bundle

Oh, Hello clear-mount bundle

Oh Hello stamp and framelit bundle

Secret Garden Ciao Baby love card

Secret Garden, Ciao Baby!, Love Card

Secret Garden Ciao Baby love card

I decided on a peek-a-boo card today.  Coordinating framelits make it soooo super-dooper easy to do.  Unlike punches you can place and cut your framelit shape anywhere on the cardstock.  Super handy!  Right?!

Also, I photographed this on the stand because I adhered the pattern paper on the inside of the card and cut the wide scallop edge from the front of  the card, so if I had photographed it open the scallop edge would have been resting on the surface and you wouldn’t be able to see the lovely little flower pattern below.  And that would be a crying shame!

Secret Garden Ciao Baby love card detail

In addition to the little flowers paper below the scallop, I used the Print Poetry Designer Series Paper Pack for the leaves and the flower too.  The leaves were punched from the Bird Builder Punch and the flower was stamped and cut with the Secret Garden  stamp and framelit.

Here’s the easy-peasy way to get your peek-a-boo flower to match up perfectly inside your card.  It isn’t rocket science, I swear. Just place and cut with your framelit where you want your opening in the front cardstock.   Then stamp your flower on cardstock or pattern paper (in this case print pack) and cut it out with the same framelit.  Then place adhesive on the back of your flower, close your card front and adhere the flower through the opening onto the inside of the card.  Simple!

Secret Garden Ciao Baby love card close up

Here’s another angle.  The love tag was simply stamped from the Caio, Baby! stamp set on Pool Party cardstock and punched out with the Petite Curly Label Punch (available FREE with a Sale-a-bration order Jan. 22nd).

Secret Garden Ciao Baby love card inside

And this is what you see when you open the card.  I cut the pattern paper with the scallop framelit also.  And “Oh happy day!” is another sneak peek from a Sale-a-bration stamp set, Bloomin’ Marvelous.

GET EXCITED ABOUT SALE-A-BRATION STARTING JANUARY 22ND!  For every $50 product purchase you recieve a FREE  stamp set or accessory of your choice.  SAB time is a great time to expand your crafting supplies so that you have what you need when you need it.  Click here for the complete list of SAB products!

Enjoy!  Julie

Secret Garden Ciao Baby love card

Card Recipe:
Stamp Set and Framelit Bundle:  Secret Garden* wood-mount #131100 clear-mount #131099
Stamps: Bloomin’ Marvelous**, Ciao Baby!* wood-mount #129645 clear-mount #129648
Ink: Raspberry Ripple #126859, Midnight Muse #126860
Paper: Print Poetry Designer Series Paper Pack* #129312, Pool Party cardstock #122924, Chocolate Chip cardstock #102128, Whisper White cardstock #100730
Extras: Big Shot Die-cutting Machine #113439, Large Scallop Edgelit #127019, Bird Builder Punch #117191, Petite Curly Label Punch**
*Spring Catalog
**Sale-a-bration exclusive product, available FREE on Jan 22nd.
 
 
clockworks one in a million gift card

Clockworks Note Cards Gift Set

clockworks one in a million gift card
Here’s another project from the Stampin’ Up! Regional event in  Chattanooga.  You’ll notice the stamp sets used are the same as were used in the Two Tags Box and Gift Cards project I shared with you last week.

This set of stamped note cards and envelopes are bound together in a lovely vellum pack with loads of playful Calypso Coral Bakers Twine.

clockworks one in a million card pack

This card pack would make a great gift for a friend.  To create the vellum wrap cut a 7-1/4″ square of Vellum cardstock and score the opposite corners with the Simply Scored Scoring Tool and Diagonal Plate at 3-7/8″.  Score the remaining two corners at 2-7/8″.  Cut the notches out created where the score lines intersect and crease the score lines.

clockworks one in a million pack open

Four note cards and matching envelopes nestle securely inside the vellum folder.

clockworks one in a million envelope

Before wrapping it all up stamp the envelopes to match.

Enjoy! Julie

clockworks one in a million card

Card Recipe: 
Stamps:  Clockworks wood-mounted #127290 clear-mount #127292, One in a Million wood-mount #126380 clear-mount #126382
Ink: Calypso Coral #126983, Gumball Green #126861, Pool Party #126982, Basic Gray #126981, More Mustard #126964
Paper:   Note Cards & Envelopes #107311, Vellum cardstock #101856
Extras: Calypso Coral Baker’s Twine #125573, Rhinestone Basic Jewels #119246, 1″ Circle punch #119868, Simply Scored Scoring Tool #122334, Diagonal Plate #125586
Field Flowers happiest card angle

Stampin’ Up! Happiest Field Flowers

Field Flowers happiest card angle

Even during the Christmas season, you’ll need other cards to let your friends know you are thinking about them for their birthday or another special event.  This card is cased from the Field Flowers sample in the Stampin’ Up! 2012 Catalog page  137.

I used the sentiment that comes with the set, but you could easily make this a happy birthday or thank you card by changing the sentiment, or stamping or writing the appropriate message inside.  I just love the Regal Rose, Certainly Celery, Early Espresso colors on this card.  It’s bright and cheery which is much needed during the dreary winter months.

Field Flowers happiest card detail

The flowers and stems are separate stamps so it is easy to use two different colors.  To get the darker and lighter flower, I stamped the darker one first and then stamped the lighter one without reinking the stamp.  To create two different colors on the sentiment stamp, first inked it with Regal Rose and then colored ‘happiest’ with an Early Espresso marker.

Here are a couple of videos that show the markering-your-stamps technique.  This first one features a technique called omitting: Stampin’ Up! Perfect Punches Congratulations Card. And the second shows coloring in the whole stamp: Stampin’ Up! Embellished Events Birthday.

MERRY CHRISTMAS TO YOU!  Are you wondering what to get with your birthday money?   Go shopping at the Stampin’ Up! Clearence Rack today!

Enjoy!  Julie

Card Recipe: 
Stamps: Field Flowers wood-#122760 clear-#122762
Ink: Regal Rose #126947, Certainly Celery #126958, Early Espresso marker #119680
Paper:  Regal Rose cardstock #105130, Certainly Celery cardstock #105125, Early Espresso cardstock #119686, Whisper White cardstock #100730
Extras: Scallop Trim Border Punch #118402, Bakers Twine #124262, Vintage Faceted Designer Button #127555, Glue Dots #103683
 
Perfectly Preserved just for you card

Perfectly Preserved Flower Card

Perfectly Preserved just for you card

I really love this mason jar stamp from the Stampin’ Up! Perfectly Preserved stamp set.  I especially love it stamped in StazOn ink on a Window Sheet.  And to make it even better, using the Cannery framelits to trim it out in a snap with the Big Shot Die-cutting Machine!

I stamped the stem in the jar on Whisper White and layered it under the die-cut window sheet.  Then I stamped another stem and trimmed it out, adding the leaves and the flower.  The flower was created with the Boho Blossoms punch.   I punched out several layers pierced the center with the Paper Piercing Tool and secured it with a mini Silver Brad.  I secured the flower to the card front with mini glue dots.

Perfectly Preserved just for you card flower

The International Bazaar Designer Series Paper creates a vibrant background paper.  Using the little flower from the Itty Bitty Shapes Punch Pack, I created three little blossoms with mini Silver Brad centers.  Daffodil Delight ribbon adds another splash of color and texture.

Perfectly Preserved just for you card detail

I found that using the multipurpose liquid glue was the best choice for adhering the window sheet and whisper white cardstock jar layers.  I quickly cut out the banner greeting  with the a Bitty Banners framelit.  I used a dimensional to pop the banner up.

ONLINE EXTRAVAGANZA STAMPIN’ UP! SUPER SALE happening now.  Click here for details.

Enjoy, Julie

Card Recipe:
Stamps:  Perfectly Preserved w-#126690 c-#126692
Ink: Black StazOn #101406, Wild Wasabi #126959
Paper:  International Bazaar Designer Series Paper #126920, Pacific Point cardstock #111350, Tangerine Tango cardstock #111349, Whisper White  cardstock #100730, Window Sheets #114323
Extras: Daffodil Delight ribbon #126872, Itty Bitty Shapes Punch Pack #118309, Boho Blossom Punch #119858, Mini Brads #122941, Cannery Framelits #127822, Bitty Banners Framelits #129267, Big Shot Die-cutting Machine #113439