Category: Cards

pretty postage wonderful you birthday card

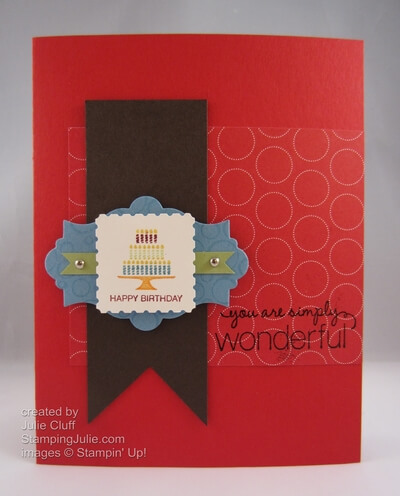
Stampin’ Up! Happy Birthday Wonderful You Card

pretty postage wonderful you birthday card

A little Catalog magic inspired this Pretty Postage birthday card!  The card on the bottom of page 178 was the specific inspiration.  I changed the stamps and the colors slightly and I was excited to use the little silver mini brads for the first time.  Love those little things – so cute!

pretty postage birthday card close up

The circles on the blue tag are stamped Marina Mist ink on Marina Mist card stock, color on color, with a circle stamp from the Circle Circus stamp set.

The birthday cake was colored with Stampin’ Write Markers and then stamped and punched out with the Postage Punch.  When I color a stamp with markers I like to start with the lightest color first to keep the markers clean.  With this card it was easiest to color the candles flames first as they are so tiny and it would have been really hard to color them just right after everything else was colored in.

pretty postage birthday card angle

The flag ends of the large Early Espress banner and the Certainly Celery banner were cut with the corner of a Square Punch.

Do you need a 2012-13 Catalog for inspiration?  Email me now with your U. S. address and I’ll one in the mail to you.

Card Recipe:
Stamps: Pretty Postage w-#123095 c-#123097, Friendly Phrases w-#126149 c-#126151, Circle Circus w-#115778 c-#127784
Ink:  Marina Mist #126962, Early Espresso #126974
Paper: Polka Dot Parade #126902, Whisper White #100730, Early Espresso #119686, Marina Mist #119682, Certainly Celery #105125
Extras:  Subtles Stampin’ Write Markers #119700, Brights Stampin’ Write Markers #119702, Postage Punch #122344, Apothecary Framelits #127003, Square Punch #119877, Big Shot Die-Cutting Machine #113439
 

Enjoy!  Julie

Papillon potpourri you are wonderful card

Crazy Fun Butterfly Card

Papillon potpourri you are wonderful card

I know you are asking yourself, “Where did she get that CRAZY FUN background paper?”   And I would answer, “I made it with shaving cream and reinkers.”  Yep, that’s right.  I spread foam shaving cream on some wax paper, dotted it with reinkers, swished it around and put my paper right on top of the swished inked shaving cream.

This technique will be further explained in my next newsletter.  You can subscribe in the box on the right at the top of the page.

Papillon potpourri you are wonderful card butterflies

After I created the background paper I stamped the lattice print from Summer Silhouettes on the left side as an ‘anchor’ for my butterflies to land on.   The butterflies were punched twice for each one.   The stamped butterfly from the Papillon Potpourri stamp set was punched out and then a shadow butterfly was created by punching from the coordinating card stock.  The Pearl Basic Jewels were added for instant elegance.

And did you notice the sweet scallop edge on the left side.  This was created with the Dotted Scallop Ribbon Border Punch.  This punch creates a double sided scallop ribbon but I love the effect of using it under the edge as a scallop border.

Papillon potpourri you are wonderful card butterfly banner

I stamped a strip of Whisper White card stock in Always Artichoke with the ‘wonderful’ stamp from Friendly Phrases then stamped the mini butterfly in Primrose Petals ink stamped on scrap paper first for a lighter application.

The end of the strip was cut as a banner with the corner of a square punch.  Then the left edge was stamped with the lattice image.  I used the stamp-a-ma-jig to line it up where I wanted it so that it would match up with the card base.  I’m SOOO glad I rediscovered my stamp-a-ma-jig tool.  I’m using it so often now it will need a place in my primary space.  Time to move something to secondary storage to make room!

Papillon potpourri you are wonderful butterfly card

All the colorful swirls add so much movement to this card!

Card Recipe:
Stamps:  Papillon Potpourri w-#123757 c-#123759, Summer Silhouettes w-#126445 c-#126447, Friendly Phrases w-#126149 c-#126151
Ink: Primrose Petals #126858, Always Artichoke #, Raspberry Ripple #126859
Reinkers: Primrose Petals #126851, Always Artichoke #105232, Raspberry Ripple #126842
Paper: Primrose Petals #126841, Always Artichoke #105119, Whisper White #100730
Extras: Elegant Butterfly Punch #127526, 1″ Square Punch #124094, Dotted Scallop Ribbon Border Punch #119275, Stampin’ Dimensionals #104430, SNAIL adhesive #104332, Pearl Basic Jewels #119247 

You can order your supplies today to make this CRAZY FUN butterfly card by clicking the Order Now button at the top of the page!

Enjoy!  Julie

clean & simple just believe thank you card

Stampin’ Up! Clean & Simple Thank You

clean & simple just believe thank you card

I stamped this simple Thank You card with Stampin’ Up!’s Just Believe stamp set.  The secret ingredient to create this shadow card is the Stamp-A-Ma-Jig which allows you to stamp precisely where you want to.

I started by stamping the center circle in Sahara Sand ink, then, using the Stamp-A-Ma-Jig, I lined up the circles on either side.

clean & simple just believe thank you card close up

I stamped the flowers in Sahara Sand ink first.  Then I inked up the stamp again first with Versamark ink and then with Midnight Muse before stamping slightly to the left of the first using the Stamp-A-Ma-Jig to create the shadow.

I use the Versamark ink first so that I can emboss the image with clear embossing powder.  The Versamark ink keeps the ink wet long enough for the embossing powder to stick so it can then be heated for that great classy, embossed look.

just believe thank you card detail

In this picture above you can really see the embossing.  After I embossed the flowers, I used a Blender Pen and a little Midnight Muse ink from the pad to just touch up a couple of tiny spots where my stamped ink didn’t cover fully.  The blender pen and ink provided great, complete coverage.

And did you notice the rhinestones?  <3    Love, love, love!  I hadn’t planned to use rhinestones, but I couldn’t help it.  I’ve been thinking I need to start “Rhinestones Anonymous”.  I want to put them on everything!!  And when I discovered that using the tip of the Piercing Tool to pick the Rhinestones up and place them right where I want them – well, it just fed my addiction!

just believe thank you card angle

Also, head on over to Facebook and let me know what you think of my craft room organization.  While you’re there, don’t forget to ‘Like’ us and follow along for more craft room storage ideas and other tidbits!

Card Recipe:
Stamps: Just Believe w-#116948 c-#120453
Ink: Versamark #102283, Midnight Muse #126860, Sahara Sand #126976
Paper: Whisper White #100730, Sahara Sand #121043
Extras: Stamp-A-Ma-Jig #101049, Stampin’ Dimensionals #104430, Clear Emboss Powder #109130, Rhinestones Basic Jewels  #119246

  Order your versamark pad and clear embossing powder today so you can add that little extra to your projects.  I hope you enjoyed this clean and simple Just Believe thank you card.

Enjoy, Julie

Video: Watercoloring Greeting Cards

In this video, I’ll demonstrate painting with the aquapainter brushes and the ink pads.  (Click here to view video.)  I love watercoloring!  It’s a sure way of feeling like a true artist and making something extra special for someone you love!

for the birds thinking of you card

Here’s the watercolored detailsFor the card recipe visit here.  And stay tune for the video on creating the scallop ‘window.’

for the birds thinking of you card detail

Today is the first day of the Stampin’ Up! Holiday Catalog .  If you don’t have your copy and your in the US, send me an email and I’ll get one to you.

Enjoy, Julie