Tagged: punches

butterfly banner thank you angle

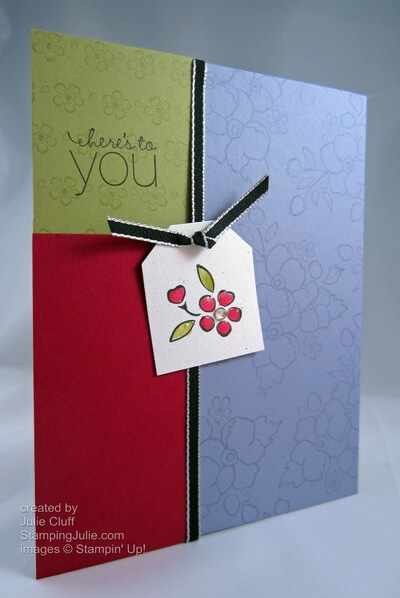
Butterfly Banner Thank You Card

butterfly banner thank you angle

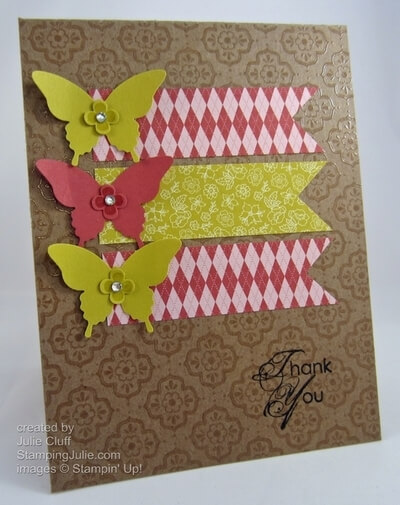
I wish you could touch this card!  The Natural Composition Specialty paper used for the card base is amazing.  Look closely at the embossed texture.  And because of the embossed texture, I used the permanent ink of Black StazOn ink to stamp the sentiment.

butterfly banner thank you details The star of the show on this card are punches: The Itty Bitty Shapes Punch Pack, the Elegant Butterfly Punch and the 1″ Square Punch.  Now it may not be obvious where I used the 1″ Square Punch, but if you watch this tutorial on creating the flag ends on this card, you’ll see how the square punch can be used to make this design easy work.

View the video tutorial here – http://youtu.be/5qDK04QGgpA – or here

butterfly banner thank you sentiment close up

This beautiful scripted ‘Thank You’ is from the Blooming with Kindness stamp set.  The four petal butterfly centers were first stamped with the Itty Bitty Bits stamp set and punched out with the Itty Bitty Shapes Punch.  Once centered on each butterfly, I then added a Rhinestone to each.

Once again a very simple, clean design inspired by a sample in the Stampin’ Up! demonstrator magazine.

And you can join the fun, get creative AND make money doing what you love, and the investment is only $99 to get started.  Click here to learn more. 

have fun get creative make money

 Enjoy!  Julie

Card Recipe:
Stamps: Blooming With Kindness w-#126420 c-#126422, Itty Bitty Bits w-#117056 c-#120060
Ink: Black StazOn #101406, Primrose Petals #126858, Summer Starfruit #126991
Paper: Natural Composite Specialty Paper #126917, Patio Party Designer Series Paper #126916, Primrose Petals #126841, Summer Starfruit #126839
Extras: Elegant Butterfly Punch #127526, Itty Bitty Shapes Punch Pack #118309, 1″ Square Punch #124094, Basic Jewels Rhinestone #119246
Circle Circus sour cream treat box

Halloween Twist Treat Container

Circle Circus sour cream treat box

The Happy Halloween Twist Container is perfect for treating friends without tricks!!  This is such a simple project made with a quarter sheet of paper.  I decided to create a video to show you ‘in person’ how easy this is to make.  A friend even made these as a wedding favor using the couple’s wedding colors.

I’ve recorded a tutorial to demonstrate this project as it is easier to ‘see’ the instructions than to read them.  You can find the video tutorial here or http://youtu.be/EilIudZQsRc.

Start with a 4-1/4″ X 5-1/2″ piece of paper, in this case Whisper White card stock.  Stamp your piece and add sticky strip to the back on three edges: both long edges and one short edge.  Roll it up like a tp roll, then pinch the bottom, add your treats and then pinch the top at the opposite angle, which creates the twist.

Circle Circus sour cream treat box tag

The Happy Halloween sentiment from Teeny Tiny Wishes stamp set was stamped in White Craft ink and embossed with white embossing powder.  The banner tag was cropped out with the Bitty Banner Framelits and a 1/2″ circle was added to attach twine and ribbon from tag to container.

Circle Circus sour cream treat box top

Shop in the online store and order your halloween craft supplies now.

Check out these halloween products on sale while supplies lastPick Your Poison Designer Series Paper, Wicked Fun Designer Series Paper, Bitty Bat Punch, Kooky Spooky Die, Pick Your Poison Quick AccentsSp0oky Treats Rub-Ons, and Tangerine Tango Ribbon.

View the complete listing of the Clearance Rack.

Enjoy, Julie

Project Recipe:
Stamps:  Circle Circus w-#115778 c-#127784, Teeny Tiny Wishes w-#115370 c-#127802
Ink: Elegant Eggplant #126969, Pumpkin Pie #126945, Black StazOn #101406, White Craft Ink #101731
Paper:  Whisper White card stock #100730, Elegant Eggplant #105126, Basic Black #121045
Extras: Bitty Banner Framelits #129267, Big Shot Die-Cutting Machine #113474, White Embossing Powder #109132, White Bakers Twine #124262, Stitched Ribbon #126876,  Sticky Strip #104294, Itty Bitty Shapes Punch Pack #118309

Watercolor For the Birds

for the birds friend card angle Here’s the details on the card I thought I had posted in July, but Oops! I hadn’t.

This For The Birds watercolored tag card was inspired by the card on page 35 in the catalog.  I changed the colors and simplified it a bit.  Most of the work on this card is the watercoloring, which is actually quite simply done with Aqua Painters and Reinkers.

Watch the how to watercolor with reinkers tutorial here.

for the birds friend card detail

Use StazOn ink to keep your stamped outline from smearing when you paint it.  And as you paint don’t be perfect.  Leave some white spots, go over the lines, color some areas darker – this all adds to the charm of watercolor.

 To create the circle reinforcement at the top of the tag, punch the small hole first and then punch out the 1/2″ circle centering the hole.  And to cut the corners on the tag, consider using the diagonal scoring plate to score one corner then turn the tag over and score the other corner.  Use the score lines as a guide to evenly snip off the corners and create the tag.

for the birds friend card I love these cute birds!  And anyone would be thrilled if you created this cute little friendship card just for them!

Enjoy! Julie

for the birds stamp set Card Recipe:
Stamps: For the Birds w-#126405, c-#126407
Ink: Black StazOn  #101406
Paper: Naturals White card stock #102316, Baha Breeze card stock #111352, Patio Party Designer Series Paper #126916
Extras: 1/2″ Circle Punch #119869, Primrose Petals Stitched Satin Ribbon #126844, Linen Thread #104199, Elegant Bouquet Embossing Folder #115964, Big Shot Die-Cutting Machine # 113439
 
Thoughts & Prayers get well soon card

Speedy Recovery Card

Thoughts & Prayers get well soon card A friend had out-patient shoulder surgery this week.  She has been in pain for quite a while, so she was excited to have this surgery in hopes of some relief.  I made this card to cheer her up and give her something pretty to look at while she is resting.

The flowers on this card are made with the flowers punched out with the Boho Blossoms Punch and the technique described in this tutorial below.

paper flowers how to

 Paper Flowers Tutorial PDF

I punched five each of the different-sized blossoms from Regal Rose card stock, spritzed them with water, and layered them to create the three flowers.  I then adhered each to a matching Bravo Burgandy blossom base.

Thoughts & Prayers get well paper flowers

 The leaves were punched out of Summer Starfruit card stock with the Bird Builder Punch, the stems trimmed and  glued behind the flower base.

Thoughts & Prayers get well label

To create the greeting label, I started with a Whisper White card stock, and repeatedly stamped the doily  from the Delicate Doilies stamp set with Regal Rose ink stamped off once for a lighter application.  The greeting is from the Thoughts & Prayers stamp set stamped with a StazOn ink pad.

Thoughts & Prayers get well framelit

After I did all my stamping, I positioned the Labels Collection Framelit to surround the greeting, ‘taped’ it down with post-it notes to keep it in place, and ran it through my Big Shot Die-Cutting Machine.  I also die cut a second label out of Regal Rose card stock of the larger-sized framelit for layering.

Thoughts & Prayers get well card polka dot background

To finish the card I embossed Whisper White card stock with the Perfect Polka Dot embossing folder, layered on Bravo Burgandy card stock, added ribbon and assembled the card.

This card reminds me of my friend’s gentle southern charm!  I hope she likes it.

Enjoy!  Julie

Shop 24/7 in My Online Store!

Card Recipe:
Stamps: Thoughts & Prayers w-#113252 c-#127805, Delicate Doilies w-#122590 c-#122592
Ink: Regal Rose #126947, Black Stazon #101406
Paper: Whisper White #100730, Regal Rose #105130, Bravo Burgundy #105123, Summer Starfruit #126839
Extras: Big Shot #113439, Labels Collection Framelits #125598, Boho Blossoms Punch #119858, Perfect Polka Dots Folder #117355, Organza Ribbon #114319, Brights Brads #119740, Little Leaves Sizzlits #114511


bordering on romance tag card angle

Bordering on Romance Tag Card

bordering on romance tag card angle The tag on this Bordering on Romance card is obviously the star of the show!  And the lively color choice creates a lot of simple interest.

To make this project, start by creating a Whisper White card base.  Cut the Wisteria Wonder, Cherry Cobbler and Lucky Limeade card stock to create the color block background.  Then stamp the flowers with Versamark ink on the Wisteria Wonder and Lucky Limeade pieces to create the watermark.   Stamp ‘Here’s to you’ in black StazOn and assemble card front.

bordering on romance tag card close up

To create the tag, start with a piece of Natural White card stock.  Stamp the flower in StazOn ink.  StazOn ink is a permanent ink that won’t smear when you watercolor the image.    Use an Aqua Painter or blender pen with a bit of Cherry Cobbler and Lucky Limeade reinker to paint the flowers and leaves, and then punch out the tag with the Extra-Large Tag Punch.

bordering on romance tag card detail

After punching out the tag add Crystal Effects to the flower and leaves for shiny dimension.  Crystal Effects is easy to use.  Just gently squeeze out the liquid gloss and direct it where you want it with the tip of the bottle.  After applying, I like to let it dry overnight just to be on the safe side.  I hate messing up a project with my rushing, don’t you?

After the tag dries, add the rhinestone and tie it around the card with the taffeta ribbon.  Send your card to a special friend!

Enjoy, Julie

Order your stamping supplies online 24/7!

bordering on romance tag card

Card Recipe:
Stamps: Bordering on Romance w-#125480 c-#125482, Sweet Essentials w-#126455 c-#126457
Ink: Black StazOn #101406, VersaMark #102283, Cherry Cobbler Reinker #119788, Lucky Limeade Reinker #122930
Paper: Natural White #102316, Wisteria Wonder #122922, Lucky Limeade #122926, Cherry Cobbler #119685, Whisper White #100730
Extras: Extra-Large Tag Punch #119866, Rhinestones #119246, Black 1/8” Taffeta Ribbon #119261, Crystal Effects #101055, Stampin’ Dimensionals #104430
 
Bordering on Romance