Tagged: die cut

Teeny Tiny Wishes happy halloween witch hat card

Punch Art Witch’s Hat Halloween Card

Teeny Tiny Wishes happy halloween witch hat card

Remember the punch art hat tutorial ?  Here’s a new take with a witch’s hat for HalloweenClick here to view video tutorial.

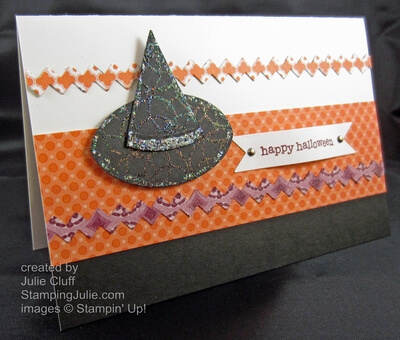
First I created the iridescent textured black card stock by stamping the Circle Circus stamp with VersaMark ink repeatedly on black card stock and then heat embossing it with Iridescent Ice Embossing Powder.

Teeny Tiny Wishes happy halloween witch hat card detail

I used the embossed card stock to create this witch’s hat.  I punched the top of the hat with the Petite Pennants Builder Punch and the brim with the Extra-Large Oval Punch.  After  I punched the oval for the brim, I fed it back into the punch and trimmed off about 1/4″ from the bottom of the oval.  Don’t discard this trimming!  I used the trimmed edge to round the bottom of the pennant punch and finish the top of the hat.

After the hat was assembled, I finished the edges with a line of Dazzling Details glitter glue and added a thick band of glitter glue to the hat band.  The trim of glitter glue really added a lot to the finished hat.  The hat was adhered with Stampin’ Dimensionals for more pop!

Teeny Tiny Wishes happy halloween witch hat card close

I stamped the Happy Halloween greeting from Teeny Tiny Wishes and created the banner with the Bitty Banner Framelit.  Remember you can use post it notes to keep your framelit in place while you run it through the Big Shot Die-Cutting Machine. By curling the tag with the bone folder first I was able to adhere the ends to create dimension.  (Don’t curl the tag if you are mailing.)

The rick rack was cut from the International Bazaar Designer Series Paper with the Tasteful Trim Bigz XL Die.  You can’t tell from the pictures, but I ran the Rich Razzleberry trim across the top of the VersaMark pad and embossed it with Iridescent Ice ep.

Order your Halloween stamping supplies today!

Enjoy!  Julie

Teeny Tiny Wishes happy halloween witch hat card 2

Card Recipe:
Stamps: Circle Circus w-#115778 c-#127784, Teeny Tiny Wishes w-#115370 c-#127802
Ink: Rich Razzleberry #126950, VersaMark #102283
Paper: International Bazaar dsp #126920, Basic Black cs #121045, Whisper White cs# 100730
Extras:  Big Shot Die-Cutting Machine #113439, Bitty Banner Framelits #129267, Tasteful Trim Bigz XL Die #120893, Extra-Large Oval Punch #119859, Petite Pennants Builder Punch #122361, Iridescent Ice Embossing Powder #101930, Dazzling Details Glitter Glue #124117, Mini Brads #122941
Thoughts & Prayers just for you angle

Just For You Anniversary Card

Thoughts & Prayers just for you angle

It was this cute couple’s (my daughter and her husband) anniversary last month, so I created this Just For You card just for them!  Kristin has a blog  where she keeps us up-to-date on there doings and also posts her decorating, sewing, craft and reupolstering  projects.  They like to buy at garage sales, fix things up and resale for a profit.  It’s quite a gig.

kris & joel & siena happy anniversary

The card I created for them was inspired by the Shalom card at the top of page 23 in the Stampin’ Up! Holiday Catalog .  I kept this monochromatic card pretty simple but embossing the tree with Irridescent Ice Embossing Powder added some umph!  Inking up with the VersaMark Pad before inking with the Marina Mist Ink Pad keeps this tree damp long enough to add the embossing power.

Thoughts & Prayers just for you tree

And once again, I used my Big Shot Die-Cutting Machine to make it all happen.  The layered labels were quickly die cut with the Labels Collection Framelits for fast layering.  The white background was embossed with the Stripes Embossing Folder.

Thoughts & Prayers just for you card The Just for You sentiment was stamped on a strip of cardstock vellum and wrapped around and adhered to the striped base.

Enjoy!  Julie

Card Recipe:
Stamps: Thoughts & Prayers w-#113252 c-#127805
Ink: Marina Mist #126962, VersaMark #102283
Paper: Baja Breeze cs #111352, Marina Mist cs #119682, Whisper White  cs #100730, White Vellum cs #101856
Extras:  Big Shot Die-Cutting Machine #113439, Stripes Embossing Folder #123128, Labels Collection Framelits #125598, Irridescent Ice Embossing Powder #101930, Itty Bitty Shapes Punch Pack #118309, Mini Silver Brads #122941, Stampin’ Dimensionals #104430, SNAIL Adhesive #104332
blooming with kindness cc392 thank you card angle

A Grateful Blooming with Kindness

blooming with kindness cc392 thank you card angle This Stampin’ Up! Blooming with Kindness Thank You card is the second installment of my tenure on the color challenge design team at Splitcoaststampers.  This beautiful bloom begs for attention and here it is embossed with Cajun Craze on Pumpkin Pie.  The third color of the color challenge this week is Midnight Muse and the added challenge was Thanks or Thanksgiving.  I chose Thanks.

blooming with kindness cc392 thank you card bloom

After embossing the flower, I painted it with bleach.  I used the Apothecary Accents Framelit to cut out the bloom, then trimmed out another from the Comfort Cafe Designer Series Paper with the same framelit.  To layer these pieces that are the same size the dsp was cut in half to layer behind the top and bottom of the main image.  I snipped out a little piece of dsp to fill in the gap.  With the patterned paper and the crochet trim, the piecing is disguised. Finally, the layered edges were rubbed against the Cajun Craze ink pad.

blooming with kindness cc392 thank you card detail

Similarly, the ‘thank you’ panel was embossed with Midnight Muse, first inked with VersaMark and again trimmed out with the corner of the Apothecary Accents Framelit and layered with the Cajun Craze pattern paper from the Comfort Cafe Designer Series Paper.

blooming with kindness cc392 thank you card close up

The Midnight Muse cardstock base was layered with a piece of matching paper from Comfort Cafe rubbed with Cajun Craze ink for direct-to-paper inking.  The cardstock base was also paper pierced along the edge of the dsp before the main images were adhered.

blooming with kindness cc392 thank you card tag

The two main pieces were tied together with a delicate Victoria Crochet Trim, and a small tag featuring a flower with a pearl center hanging from a Linen Thread tie.

Big Shot die-cutting machine

Once again this project features the Big Shot Die-Cutting Machine .  Now is the time to order this versatile paper crafting tool.  It will transform your crafting!  (View more samples here.)

Enjoy!  Julie

blooming with kindness cc392 thank you card

Card Recipe:
Stamps: Blooming With Kindness w-#126420 c-#126422
Ink: VersaMark #102283, Cajun Craze #126965, Midnight Muse #126860, Pumpkin Pie #126945
Paper: Comfort Cafe dsp #126898, Pumpkin Pie #105115, Midnight Muse #126843
Extras: Big Shot Die-cutting Machine #113439, Apothecary Accents Framelits #127003, Crochet Trim #118481, Linen Thread #104199, Little Labels Punch Pack #126881 

Stampin’ Up! Trick or Treat Bag

Stampin' Up! trick or treat bag This adorable trick or treat bag from Stampin’ Up! is made from many of the great products available in the Holiday Catalog.  Howlstooth and Scaringbone Designer Series Paper, Toxic Treats Stamp Set, and Basic Gray Striped Statin Ribbon are all available for a limited time.

Click here for complete project product list.

Click here to view the Holiday Catalog.

Enjoy!  Julie

Layered Labels For You Friendship Card angle

Ribbon Accented, Layered Labels Greeting Card

Layered Labels For You Friendship Card angle

In honor of the In-Color Satin Stitched Ribbon Special (see details at the bottom), I created this ribbon-rich greeting card.

To create the ribbon background, I started with Whisper White card stock cut to  4-1/4″ x 5-1/4″.  I cut 6″ strips of each ribbon and flagged the end by folding it and trimming at an angle from the edge to the folded center.  I use the grid paper all the time, but some projects demand it’s use and this was one of them.   I centered the card stock on the grid paper and secured the first ribbon to the card stock in the center using the grid paper as a guide.  Continuing to use the grid paper to guide placement, I adhered the other ribbons using SNAIL adhesive and then attaching the upper ends to the backside.

Layered Labels For You Friendship Card top

Once the ribbons were in place, I attached the card front to a Whisper White card base to hide the raw edges of the ribbons on the backside.

Layered Labels For You Friendship Card ribbon

The large label from the Layered Label stamp set was stamped with Midnight Muse and cut out with the Apothecary Accents framelit. I used a Stamping Sponge to sponge a little Midnight Muse around the edges so that it would standout from the white background.

  Layered Labels For You Friendship Card label

The ‘For You’ stamp from the same set was stamped in Raspberry Ripple and trimmed out with the matching framelit.  Mini Silver Brads were added to the tag and Silver Glimmer Brads were added to the outside corners of the large label.

The labels were layered and adhered to the ribbon background with Stampin’ Dimensionals.

Big Shot Die-Cutting Machine

Invest in a Big Shot Die-Cutting Machine, framelits, embossing folders and dies. 

*************************************************************

September 2012 Ribbon Special It’s a ‘Back To Spool” special!  During the month of September get a free spool of ribbon with a $40 product purchase.

Stampin’ Up! announcement:  “While the kids are heading back to school, Stampin’ Up! is going back to ‘spool’! For the month of September, get a FREE package of 3/8″ Stitched Satin Ribbon-an $8.95 value-for every $40 you spend!”

Choose one of the following or place a $200 order and get ALL AND $30 in Stampin’ Rewards.

Enjoy,  Julie

Layered Labels For You Friendship Card

Card Recipe: 
Stamps: Layered Labels w-#127070 c-#127072
Ink: Raspberry Ripple #126859, Midnight Muse #126860
Paper: Whisper White #100730
Extras:  Big Shot Die-Cutting Machine #113439, Apothecary Accents Framelits #127003, Mini Silver Brads #122941, Basics Glimmer Brads #121006, Grid Paper #102787, Sponges #101610, SNAIL Adhesive #104332, Stampin’ Dimensionals #104430