Tagged: card making techniques

Summer Silhouettes Kindness Thank You Card angle

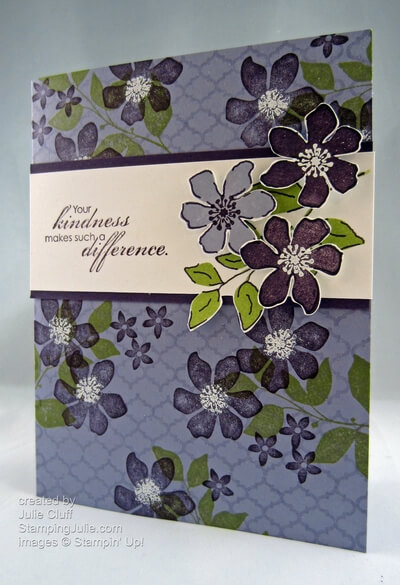
Summer Silhouettes Thank You Card

Summer Silhouettes Kindness Thank You Card angle I enjoyed making this Summer Silhouettes Thank You card using many techniques including embossing, using watermark ink, stamping outside the lines and outlining.

Let me explain each technique.

1. Embossing – I stamped the flower centers on the background and the main flowers with white craft ink and heat embossed with white embossing powder so they would show against the darker flowers.

2. Using Watermark Ink – Versamark ink will give you a watermark affect on any color cardstock.  In this case, I used Versamark ink to stamp the lattice pattern in the background.

Summer Silhouettes Kindness Thank You Card detail

3. Stamping Outside the Lines – I stamped the leaves on a piece of Whisper White cardstock that was 2″ x 4-1/4″.  Then I trimmed it down to 1-1/2″ with a paper trimmer all the way to the edge of the leaves and snipped around the leaves so they hung outside the border of the paper.  It’s a cool effect, which works great for leaves, flowers and trees.

4.  Outlining – The main flowers and leaves are outlined with the fine tip of a Stampin’ Write marker.  If you look closely you’ll see that the outline is free handed and not complete.  I love the look!  What do you thing?

Summer Silhouettes Kindness Thank You Card

Have you tried these techniques before?  Which is your favorite technique or which would you like to try?  Leave a comment below.

Enjoy!  Julie

Card Recipe:
Stamps: Summer Silhouettes w-#126445 c-#126447, Blooming with Kindness w-#126420 c-#126422
Ink: Wisteria Wonder #126985, Lucky Limeade #126984, Elegant Eggplant #126989, Whisper White Craft #101731, Versamark #102283
Paper: Wisteria Wonder #122922, Whisper White #100730, Elegant Eggplant #105126
Extras:  White Emboss Powder #109132, Heat Tool #129053, Paper Snips #103579, Stampin’ Dimensionals #104430, Regals Stampin’ Write Markers #119701
Stampin' Up! Summer Silhouettes Stamp Set
world treasures friendship card angle

Stampin’ Up! World Treasures Friendship

world treasures friendship card angle This World Treasures Friendship Card starts out with an unusual background created by water stamping.  I sponged Primrose Petals and Raspberry Ripple ink on Whisper White card stock covering the whole background.  Then I soaked a paper towel in water on a paper plate and using it as a stamp pad, stamped circles from the Circle Circus stamp set to complete the background.  As the water dries, the ink lightens giving the effect you see here.

world treasures friendship card close up

The main message was stamped in Rich Razzleberry and trimmed out with the framelit from the Apothecary Framelits set.  To keep the framelit in place so that the greeting would stay centered I held it in place with post it notes.

The Rich Razzleberry label was also cut out with an Apothecary Framelit and then edged with paper piercing made super fast and easy with the paper piercing tool, mat and template.  A dynamic trio!

world treasures friendship card details

The ends of the label were punched with the 1/4″ circle punch from the Itty Bitty Shapes Punch Pack.  I first punched the circle from a post it note and placed it where I wanted to punch the circle on the label.  That made it easy to punch the label and get it right where I wanted it!  I demonstrated this idea in the video on creating a scallop frame a couple of weeks ago using a large circle punch.

world treasures friendship card

Each piece was popped up with Stampin’ Dimensionals and then the ribbon was threaded through before the background was adhered to the Whisper White card stock base.  Normally, I use about an inch of SNAIL adhesive in each corner and maybe some in the middle if it’s a large piece, but on this background I SNAIL’d (new word) the entire edge to keep it in place.  The water stamping tends to warp the paper slightly and using extra adhesive helps solve the warping.

Enjoy, Julie

Card Recipe:
Stamps: World Treasures w-#126765 c-#126767, Circle Circus w-#115778 c-#127784
Ink: Primrose Petals #126858, Rich Razzleberry #126950, Raspberry Ripple #126859
Paper: Whisper White #100730, Rich Razzleberry #115316
Extras: Big Shot Die-Cutting Machine #113439, Apothecary Accents Framelits #127003, Stamping Sponges #101610, Paper-Piercing Tool #126189, Stampin’ Pierce Mat #126199, Essentials Paper-Piercing Pack #126187, Whisper White Organza Ribbon #114319, Itty Bitty Shapes Punch Pack #118309, Rhinestone Basic Jewels #119246, Stampin’ Dimensionals #104430, SNAIL adhesive #104332

World Treasure Stamp Set

Papillon potpourri you are wonderful card

Crazy Fun Butterfly Card

Papillon potpourri you are wonderful card

I know you are asking yourself, “Where did she get that CRAZY FUN background paper?”   And I would answer, “I made it with shaving cream and reinkers.”  Yep, that’s right.  I spread foam shaving cream on some wax paper, dotted it with reinkers, swished it around and put my paper right on top of the swished inked shaving cream.

This technique will be further explained in my next newsletter.  You can subscribe in the box on the right at the top of the page.

Papillon potpourri you are wonderful card butterflies

After I created the background paper I stamped the lattice print from Summer Silhouettes on the left side as an ‘anchor’ for my butterflies to land on.   The butterflies were punched twice for each one.   The stamped butterfly from the Papillon Potpourri stamp set was punched out and then a shadow butterfly was created by punching from the coordinating card stock.  The Pearl Basic Jewels were added for instant elegance.

And did you notice the sweet scallop edge on the left side.  This was created with the Dotted Scallop Ribbon Border Punch.  This punch creates a double sided scallop ribbon but I love the effect of using it under the edge as a scallop border.

Papillon potpourri you are wonderful card butterfly banner

I stamped a strip of Whisper White card stock in Always Artichoke with the ‘wonderful’ stamp from Friendly Phrases then stamped the mini butterfly in Primrose Petals ink stamped on scrap paper first for a lighter application.

The end of the strip was cut as a banner with the corner of a square punch.  Then the left edge was stamped with the lattice image.  I used the stamp-a-ma-jig to line it up where I wanted it so that it would match up with the card base.  I’m SOOO glad I rediscovered my stamp-a-ma-jig tool.  I’m using it so often now it will need a place in my primary space.  Time to move something to secondary storage to make room!

Papillon potpourri you are wonderful butterfly card

All the colorful swirls add so much movement to this card!

Card Recipe:
Stamps:  Papillon Potpourri w-#123757 c-#123759, Summer Silhouettes w-#126445 c-#126447, Friendly Phrases w-#126149 c-#126151
Ink: Primrose Petals #126858, Always Artichoke #, Raspberry Ripple #126859
Reinkers: Primrose Petals #126851, Always Artichoke #105232, Raspberry Ripple #126842
Paper: Primrose Petals #126841, Always Artichoke #105119, Whisper White #100730
Extras: Elegant Butterfly Punch #127526, 1″ Square Punch #124094, Dotted Scallop Ribbon Border Punch #119275, Stampin’ Dimensionals #104430, SNAIL adhesive #104332, Pearl Basic Jewels #119247 

You can order your supplies today to make this CRAZY FUN butterfly card by clicking the Order Now button at the top of the page!

Enjoy!  Julie

Video: Watercoloring Greeting Cards

In this video, I’ll demonstrate painting with the aquapainter brushes and the ink pads.  (Click here to view video.)  I love watercoloring!  It’s a sure way of feeling like a true artist and making something extra special for someone you love!

for the birds thinking of you card

Here’s the watercolored detailsFor the card recipe visit here.  And stay tune for the video on creating the scallop ‘window.’

for the birds thinking of you card detail

Today is the first day of the Stampin’ Up! Holiday Catalog .  If you don’t have your copy and your in the US, send me an email and I’ll get one to you.

Enjoy, Julie