Tagged: Big Shot

cross my heart fun flower card 2

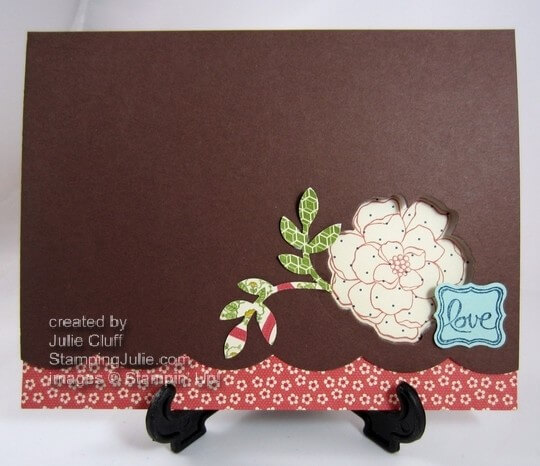
Cross My Heart Fun Flower Card

cross my heart fun flower card 2

If you read my posts in your email, you may have noticed this afternoon that first picture of my For the Birds Thank You card was different than most of the rest.  Well, I don’t know how it happened put I accidently selected the wrong photo when I wrote it up, but it’s been corrected now.  I didn’t want you to lose any sleep over it!  Haha.

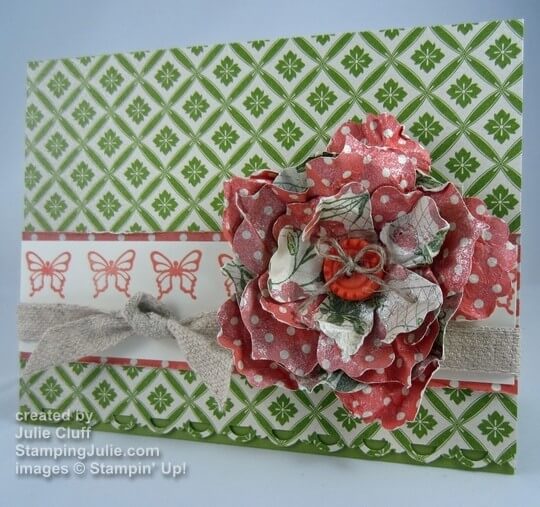
The adorable butterflies in the card above are from the Stampin’ Up! Cross My Heart stamp set from the new Spring catalog.  That little butterfly stamp is the reason I bought that set!  I fell in love.

cross my heart fun flower

The flower is the star of the show here.  I cut two sets of flowers from the Tea for Two Designer Series Paper, Big Shot Die-cutting Machine and the Fun Flower Bigz Die.  I then spritzed them with water, crumbled, stacked and assembled with a brad in the middle to hold it all together.  After putting it all together I sprayed it with Vanilla Shimmer Smooch Spritz.  Can you see the shine?

A little Linen Thread bow through the button and then I glued it to the top of the brad with Crystal Effects.  With all the water and the shimmer, a glue dot was just not going to cut it, but Crystal Effects is like super glue.

cross my heart fun flower card

The button on the flower is from the Sale-A-Bration Sycamore Street ribbon and button pack, which will be available FREE with a qualifying order tomorrow!  The button is actually Tangerine Tango, and the paper and ink are actually Calypso Coral, so they are not the same color, but in person they blend and look great together.  However, in the pictures, not so much.  Darn.

cross my heart fun flower card close up

ONLY 1 MORE DAY UNTIL SALE-A-BRATION!! Get Excited!!!  Click here for the complete list of SAB products!  Choose one free item for every $50 in product purchased!

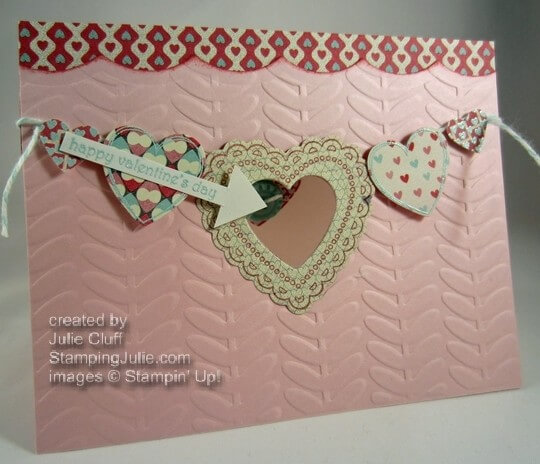
VIEW VALENTINE SPECIALS!   Offers end TODAY! Jan. 21st.

CHECK OUT THE BEAUTIFUL NEW SPRING CATALOG!   I think you’ll love the beautiful colors, images and ideas in the brand new Spring catalog.

Enjoy, Julie

cross my heart fun flower card make a card

Card Recipe:
Stamps: Cross My Heart wood-mount #126580 clear-mount #126582
Ink: Calypso Coral #126983
Paper: Tea for Two Designer Series Paper #129311, Lucky Limeade #122926, Very Vanilla #101650
Extras: Sycamore Street Button & Ribbon Pack #130812 (FREE with SAB order), Big Shot Die-cutting Machine #113439, Fun Flowers Bigz Die #121812, Vanilla Smooch #118772, Scallop Trim Border Punch #118402, Natural Trim Ribbon #129287, Linen Thread #104199
Hearts a Flutter valentines vine card

Hearts a Flutter Peek-a-boo Valentine

Hearts a Flutter valentines vine card

It has been a busy, full, worthwhile day and getting ready for another similar day tomorrow, which means I have lots of pictures of this Hearts a Flutter Peek-a-boo Valentine for you but not a lot of time to right up specifics.  So I’ll give you a few highlights, a link to the stamps and framelits bundle and a request that you please leave a comment if you have any questions about this card!!  And as I promised yesterday, next week I’ll have video tutorials on some of the projects that I’ve featured over the past couple of weeks.

So here’s your pictures:

I embossed the smaller hearts and the sentiment with Pool Party embossing powder.   The arrow was hand trimmed after stamping.  The button is a Sale-A-bration freebie!  (Get Excited! 5 more days!)

Hearts a Flutter valentines vine card detail

Can you see I stamped (and embossed) on the More Amore Designer Series paper?

Hearts a Flutter valentines vine card close up

Here’s the peek-a-boo part!

Hearts a Flutter valentines vine card inside

And the inside – A little heart with plenty of room for writing a love note!

Hearts a Flutter valentines vine card close up

A sneak peek at the new Sale-A-Bration Vine Street embossing folder!

Another close up view.

ONLY 5 MORE DAYS UNTIL SALE-A-BRATION!! Get Excited!!!  Click here for the complete list of SAB products!  Choose one free item for every $50 in product purchased!

VIEW VALENTINE SPECIALS!   Offers end Jan. 21st.

CHECK OUT THE BEAUTIFUL NEW SPRING CATALOG!   I think you’ll love the beautiful colors, images and ideas in the brand new Spring catalog.

Enjoy, Julie

Hearts a Flutter valentines vine card

Hearts a Flutter wood-mount bundle

Hearts a Flutter clear-mount bundle

stampin' up! hearts a flutter bundle

oh. hello red pirouette wisteria scallop card

Oh, Hello! Emboss Resist Card(s)

oh. hello red pirouette wisteria scallop card

Today, I have not one but two samples for you from the new Oh, Hello stamp set!!  I was having a lot of fun with the new stamp set and the Ovals Collection framelits and I got a bit carried away and created two cards with the same technique and similar colors.  Which is your favorite?!

oh hello papillon butterfly gate card

Both cards are created with the emboss resist technique.  On each card, I stamped the oval background on Whisper White cardstock with VersaMark Ink and embossed it with clear embossing powder.

oh. hello red pirouette wisteria card tag

On the Oh, Hello flag card, I stamped “Oh, Hello” with Black Staz On ink before I stamped and embossed the oval over the top. After embossing, I trimmed out the oval with the oval framelit and then punched out “Oh, Hello” with the 1-3/4″ circle punch.  I brayered the oval with Pink Pirouette and the circle with Wisteria Wonder and wiped the embossing clean.

oh. hello red pirouette wisteria card detail

I used the Pink Pirouette, Rose Red and Wisteria Wonder markers to color and stamp the flag, then stamped the outline with the Black StazOn.

oh. hello red pirouette wisteria card overhead

To make the Scallop card base, I folded the 4-1/4″ x 11″ Whisper White card and cut it out with the scallop framelit overlapping the fold so that 5 of the scallops on the end are not cut, creating the scallop card fold.  I cut another black scallop oval and adhered it to the front.

oh hello papillon butterfly card close up For the butterfy gate card, I embossed the oval with clear embossing powder then trimmed out the oval and the inner oval, then punch out the Elegant Butterfly.  The outer rim of the stamped oval I brayered with Basic Gray then inner oval with Pink Pirouette and the butterfly with Rose Red.  The little flower butterfly was stamped from Papillon Potpourri on Wisteria Wonder with VersaMark and embossed with clear embossing powder.

oh hello papillon butterfly card detail 2

To create the gate card, I scored a 4-1/4″ x 11″ piece of Pink Pirouette cardstock and scored from either end at 2-3/4″.   I trimmed out a larger ring of Basic Gray to frame and close the card.

oh hello papillon butterfly card open

Here’s another angle.

oh hello papillon butterfly card open

ONLY 6 MORE DAYS UNTIL SALE-A-BRATION!! Get Excited!!!  Click here for the complete list of SAB products!

Stay tuned for more how-to videos coming next week!

Enjoy!  Julie

Oh, Hello wood-mount bundle

Oh, Hello clear-mount bundle

Oh Hello stamp and framelit bundle

blue ribbon birthday card

Blue Ribbon Birthday Card

blue ribbon birthday card

My son-in-law’s birthday is this week and this is the happy birthday card that is going out to him.  And since I doubt he’s a regular reader of my blog, I’m sharing it with you early!

The Blue Ribbon stamp set does all the work for you!  It’s a large stamp with lots of versatility, and it’s easy to use with all the coordinating punches available.  This stamp set makes a wonderful birthday, graduation or congratulations card.

blue ribbon birthday card detail

To create the ribbon, you’ll stamp three pieces: two of the ribbon in Not Quite Navy and one of the center message in Cherry Cobbler.  You’ll punch the top of one ribbon out with the 2-3/8″ Scallop Circle Punch and you’ll snip the tail of the second ribbon leaving a little extra of the top to use when you adhere ribbon together.  Then attach the Cherry Cobbler “happy birthday” message in the center with a dimensional.

blue ribbon birthday card

To create the card base, you’ll start with Wild Wasabi cardstock.  Then layer Chocolate Chip, Cherry Cobbler and Not Quite Navy cardstock strips across the Tasteful Trims Bigz Die and run them through the Big Shot all at once.   I used strips that were about 3″ x 8″.  You’ll want them longer than the card base so you can place them on the card the way you want them.

Lay the wavy cardstock across the card the way you want it and add Multipurpose Liquid Glue to the back of the first strip, then the next and finally the last.  Adhere a strip of zigzag Wild Wasabi cardstock across the middle.

 Now you’ll have what looks like a mess with all the wavy strips hanging off the sides!  Open up your card and trim off the excess from the back with your Paper Snips.  Place your ribbon on the front with Stampin’ Dimensionals and your done!

VIEW VALENTINE SPECIALS!

CHECK OUT THE BEAUTIFUL NEW SPRING CATALOG!   I think you’ll love the beautiful colors, images and ideas in the brand new Spring catalog.

Click Here to Order your Stampin’ Supplies

Click Here for Fun, Easy Digital Scrapbooking 

 Enjoy!  Julie

blue ribbon birthday card

Card Recipe:
Stamps: Blue Ribbon wood-mount #125979, clear-mount #125981
Ink: Cherry Cobbler #126966, Not Quite Navy #126971
Paper: Not Quite Navy cardstock #101722, Cherry Cobbler cardstock #119685, Chocolate Chip cardstock #102128, Wild Wasabi cardstock #108641,  Whisper White cardstock #100730
Extras: Big Shot Die-cutting Machine #113439, Tasteful Trim Bigz XL Die #120893, 2-3/8″ Scallop Circle Punch #118874, 1-1/4″ Circle Punch #119861, Paper Snips #103579, Multipurpose Liquid Glue #110755
 
Secret Garden Ciao Baby love card

Secret Garden, Ciao Baby!, Love Card

Secret Garden Ciao Baby love card

I decided on a peek-a-boo card today.  Coordinating framelits make it soooo super-dooper easy to do.  Unlike punches you can place and cut your framelit shape anywhere on the cardstock.  Super handy!  Right?!

Also, I photographed this on the stand because I adhered the pattern paper on the inside of the card and cut the wide scallop edge from the front of  the card, so if I had photographed it open the scallop edge would have been resting on the surface and you wouldn’t be able to see the lovely little flower pattern below.  And that would be a crying shame!

Secret Garden Ciao Baby love card detail

In addition to the little flowers paper below the scallop, I used the Print Poetry Designer Series Paper Pack for the leaves and the flower too.  The leaves were punched from the Bird Builder Punch and the flower was stamped and cut with the Secret Garden  stamp and framelit.

Here’s the easy-peasy way to get your peek-a-boo flower to match up perfectly inside your card.  It isn’t rocket science, I swear. Just place and cut with your framelit where you want your opening in the front cardstock.   Then stamp your flower on cardstock or pattern paper (in this case print pack) and cut it out with the same framelit.  Then place adhesive on the back of your flower, close your card front and adhere the flower through the opening onto the inside of the card.  Simple!

Secret Garden Ciao Baby love card close up

Here’s another angle.  The love tag was simply stamped from the Caio, Baby! stamp set on Pool Party cardstock and punched out with the Petite Curly Label Punch (available FREE with a Sale-a-bration order Jan. 22nd).

Secret Garden Ciao Baby love card inside

And this is what you see when you open the card.  I cut the pattern paper with the scallop framelit also.  And “Oh happy day!” is another sneak peek from a Sale-a-bration stamp set, Bloomin’ Marvelous.

GET EXCITED ABOUT SALE-A-BRATION STARTING JANUARY 22ND!  For every $50 product purchase you recieve a FREE  stamp set or accessory of your choice.  SAB time is a great time to expand your crafting supplies so that you have what you need when you need it.  Click here for the complete list of SAB products!

Enjoy!  Julie

Secret Garden Ciao Baby love card

Card Recipe:
Stamp Set and Framelit Bundle:  Secret Garden* wood-mount #131100 clear-mount #131099
Stamps: Bloomin’ Marvelous**, Ciao Baby!* wood-mount #129645 clear-mount #129648
Ink: Raspberry Ripple #126859, Midnight Muse #126860
Paper: Print Poetry Designer Series Paper Pack* #129312, Pool Party cardstock #122924, Chocolate Chip cardstock #102128, Whisper White cardstock #100730
Extras: Big Shot Die-cutting Machine #113439, Large Scallop Edgelit #127019, Bird Builder Punch #117191, Petite Curly Label Punch**
*Spring Catalog
**Sale-a-bration exclusive product, available FREE on Jan 22nd.