Category: Techniques

Video Tutorial: Stamping Outside the Lines

Today I created a video tutorial to show how I created the framelits panel with “stamping outside the lines.”  Leave me a comment and let me know what you think of these videos and what tutorials you would like to see?  What do you want to learn?!?  I love sharing with you!

Summer Silhouettes thinking of you card angle


If you are reading in email, you can view the video here or http://youtu.be/8Rj4JLBT2SM

Enjoy,  Julie

Summer Silhouettes thinking of you card angle

Summer Silhouette: Color Challenge Design Team

Summer Silhouettes thinking of you card angle I’ve been invited to be on the September design team for the Splitcoaststampers color challenges.  I’m so excited to join a team of super talented ladies and share color inspiration.

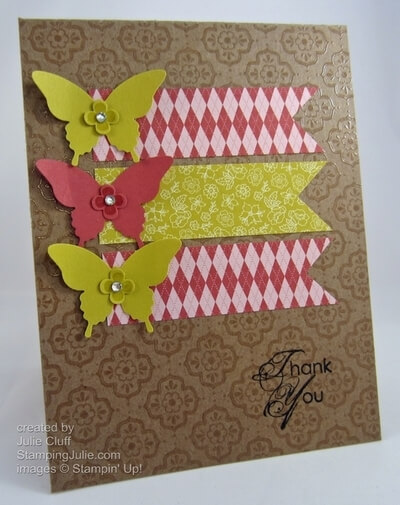
This week’s challenge – A Basic Chocolate Gumball; create a card using Basic Gray, Chocolate Chip and Gumball Green.  The extra challenge – to make your own pattern paper background.

Summer Silhouettes thinking of you card detail

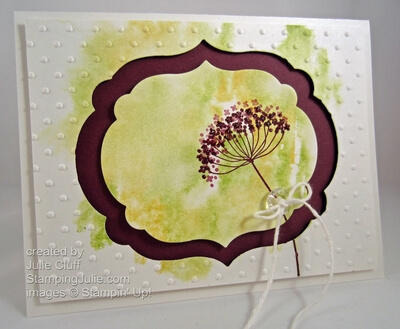
To create this card I started by stamping the leaves from the Stampin’ Up! Summer Silhouette stamp set with versamark and Gumball Green ink, then embossed it with clear embossing powder.

I used the Apothecary Accents Framelits to cut out the leaf panel, but instead of directly die-cutting the label, I die-cut a template.  Then I used a pencil to trace around the template label around the leaves and trimmed it out with Paper Snips, snipping around the leaves that extended beyond the edge.  View the  video tutorial on ‘stamping outside the lines’  here or http://youtu.be/8Rj4JLBT2SM.

Summer Silhouettes thinking of you card flat

I painted the label with a light wash of Basic Gray ink, splattered it with Chocolate Chip ink and, lastly, sponged the bottom right with Basic Gray ink.  I added flower circles punched out with a Itty Bitty Shapes Punch, and Silver Mini Brads to the ends of the lable.

In my sample, I made a pattern paper background for the square accents by first stamping the lattice grid with Chocolate Chip ink and then randomly stamping the small flower burst with stamped-off Basic Gray ink.

Summer Silhouettes thinking of you card butterfly

In addition, I added a Primrose Petals accent with the little butterflies and the Dahlias.  To make the butterflies, I created more pattern paper by closely stamping the small flower burst on Whisper White card stock with Primrose Petals before running it through the Beautiful Wings Embosslit and adding a rhinestone.  Each butterfly was also backed with a Primrose Petals butterfly.

Summer Silhouettes thinking of you card tag

The ‘thinking of you’ tag end was trimmed out by cutting just the end with the side of the a Apothecary Accents Framelit.  The card base is Basic Gray card stock with the corners rounded.

Big Shot Die-Cutting Machine

Want to take your crafting to the next level?  Purchase the Big Shot Die-Cutting Machine.  With the Big Shot, you can add texture and fabulous die-cut accents I use my Big Shot on almost every project and it’s super versatile and easy to use.

Enjoy, Julie

Summer Silhouettes thinking of you card

Card Recipe:
Stamps: Summer Silhouettes w-#126445 c-#126447, Sweet Essentials w-#126455 c-#126457
Ink: Gumball Green #126861, Chocolate Chip #126979, Basic Gray #126981, Primrose Petals #126858, VersaMark #102283
Paper: Gumball Green #126840, Basic Gray #121044, Primrose Petals #126841, Whisper White # 100730
Extras: Big Shot Die-Cutting Machine #113439, Apothecary Accents Framelits #127003, Beautiful Wings Embosslits #118138, Bird Builder Punch #117191, Itty Bitty Shapes Punch Pack #118309, Corner Punch #119871, Mini Silver Brads #122941, In Color Dahlias #127556,  Basic Jewels Rhinestones #119246, Glue Dots #103683, Stampin’ Dimensionals #104430, Sponges #101610
butterfly banner thank you angle

Butterfly Banner Thank You Card

butterfly banner thank you angle

I wish you could touch this card!  The Natural Composition Specialty paper used for the card base is amazing.  Look closely at the embossed texture.  And because of the embossed texture, I used the permanent ink of Black StazOn ink to stamp the sentiment.

butterfly banner thank you details The star of the show on this card are punches: The Itty Bitty Shapes Punch Pack, the Elegant Butterfly Punch and the 1″ Square Punch.  Now it may not be obvious where I used the 1″ Square Punch, but if you watch this tutorial on creating the flag ends on this card, you’ll see how the square punch can be used to make this design easy work.

View the video tutorial here – http://youtu.be/5qDK04QGgpA – or here

butterfly banner thank you sentiment close up

This beautiful scripted ‘Thank You’ is from the Blooming with Kindness stamp set.  The four petal butterfly centers were first stamped with the Itty Bitty Bits stamp set and punched out with the Itty Bitty Shapes Punch.  Once centered on each butterfly, I then added a Rhinestone to each.

Once again a very simple, clean design inspired by a sample in the Stampin’ Up! demonstrator magazine.

And you can join the fun, get creative AND make money doing what you love, and the investment is only $99 to get started.  Click here to learn more. 

have fun get creative make money

 Enjoy!  Julie

Card Recipe:
Stamps: Blooming With Kindness w-#126420 c-#126422, Itty Bitty Bits w-#117056 c-#120060
Ink: Black StazOn #101406, Primrose Petals #126858, Summer Starfruit #126991
Paper: Natural Composite Specialty Paper #126917, Patio Party Designer Series Paper #126916, Primrose Petals #126841, Summer Starfruit #126839
Extras: Elegant Butterfly Punch #127526, Itty Bitty Shapes Punch Pack #118309, 1″ Square Punch #124094, Basic Jewels Rhinestone #119246
Circle Circus sour cream treat box

Halloween Twist Treat Container

Circle Circus sour cream treat box

The Happy Halloween Twist Container is perfect for treating friends without tricks!!  This is such a simple project made with a quarter sheet of paper.  I decided to create a video to show you ‘in person’ how easy this is to make.  A friend even made these as a wedding favor using the couple’s wedding colors.

I’ve recorded a tutorial to demonstrate this project as it is easier to ‘see’ the instructions than to read them.  You can find the video tutorial here or http://youtu.be/EilIudZQsRc.

Start with a 4-1/4″ X 5-1/2″ piece of paper, in this case Whisper White card stock.  Stamp your piece and add sticky strip to the back on three edges: both long edges and one short edge.  Roll it up like a tp roll, then pinch the bottom, add your treats and then pinch the top at the opposite angle, which creates the twist.

Circle Circus sour cream treat box tag

The Happy Halloween sentiment from Teeny Tiny Wishes stamp set was stamped in White Craft ink and embossed with white embossing powder.  The banner tag was cropped out with the Bitty Banner Framelits and a 1/2″ circle was added to attach twine and ribbon from tag to container.

Circle Circus sour cream treat box top

Shop in the online store and order your halloween craft supplies now.

Check out these halloween products on sale while supplies lastPick Your Poison Designer Series Paper, Wicked Fun Designer Series Paper, Bitty Bat Punch, Kooky Spooky Die, Pick Your Poison Quick AccentsSp0oky Treats Rub-Ons, and Tangerine Tango Ribbon.

View the complete listing of the Clearance Rack.

Enjoy, Julie

Project Recipe:
Stamps:  Circle Circus w-#115778 c-#127784, Teeny Tiny Wishes w-#115370 c-#127802
Ink: Elegant Eggplant #126969, Pumpkin Pie #126945, Black StazOn #101406, White Craft Ink #101731
Paper:  Whisper White card stock #100730, Elegant Eggplant #105126, Basic Black #121045
Extras: Bitty Banner Framelits #129267, Big Shot Die-Cutting Machine #113474, White Embossing Powder #109132, White Bakers Twine #124262, Stitched Ribbon #126876,  Sticky Strip #104294, Itty Bitty Shapes Punch Pack #118309
summer silhouettes watercolor greeting card angle

How to Create a Watercolor Mist Background

summer silhouettes watercolor greeting card angle

Usually when I sit down to create a card or other project, I start with an idea  of what it is I’m going to do.  More often than not, as I stamp,  the idea develops into something a little different than what I originally envisioned.  Today’s card is no exception.

summer silhouettes watercolor greeting card close up

I had planned to watercolor mist the background and cut it out with a die cut, but I had not planned to use the rest of the misted card stock until I started working on it.  Using a plain white exterior would have given a totally different look and I’m not sure which I would have liked better but this is what I went with.   I do like the way the stem extends to the bottom of the card.

Here’s a video on how to very simply create this background using the lid of your stamp case, a couple of markers and mist of water.   http://youtu.be/rl7gFC0HRq8

summer silhouettes watercolor greeting card glitter flower

This background uses Lucky Limeade and Daffodil Delight markers, colored on the lid of the stamp case, then misted and applied to the Whisper White card stock.  After creating the watercolored background, I stamped the flower in Rich Razzleberry and added highlights with Dazzling Diamonds glitter glue.

I die cut the center image with the 3rd framelit from Labels Collection and die cut the exterior with the 4th framelit centered in the middle.  Then I adhered both onto Rich Razzleberry card stock with Stampin’ Dimensionals.

summer silhouettes watercolor greeting card

This card is very soothing and pleasant in person.  The pictures give a little different vibe.  I will stamp a ‘praying for you’ sentiment in the interior and send this off to a young woman that my daughters grew up with who was just last week diagnosed with a brain tumor and had surgery this past week.  She’s a very talented young 2nd grade teacher and we pray for her health and a full recovery.

Enjoy,  Julie

Card Recipe:
Stamps: Summer Silhouettes w-#126445 c-#126447
Ink: Rich Razzleberry #126950
Paper: Whisper White #100730, Rich Razzleberry #115316
Extras: Big Shot Die-Cutting Machine #113439, Labels Collections Framelits #125598, Polka Dot Embossing Folder #117335, White Bakers Twine #124262, Vintage Faceted Designer Buttons #127555, Dazzling Details #124117, Dimensionals #104430, Daffodil Delight Marker #119677, 2011-13 In-Color Markers #123002