Tagged: scoring tool

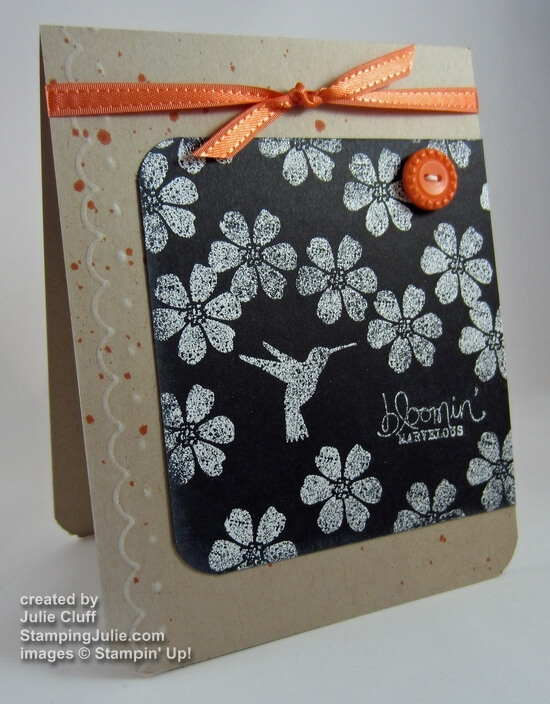
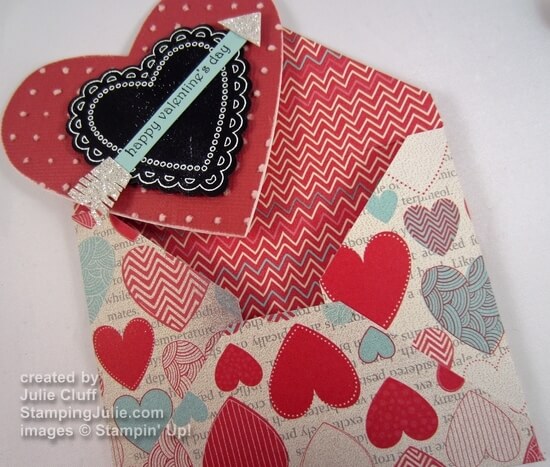
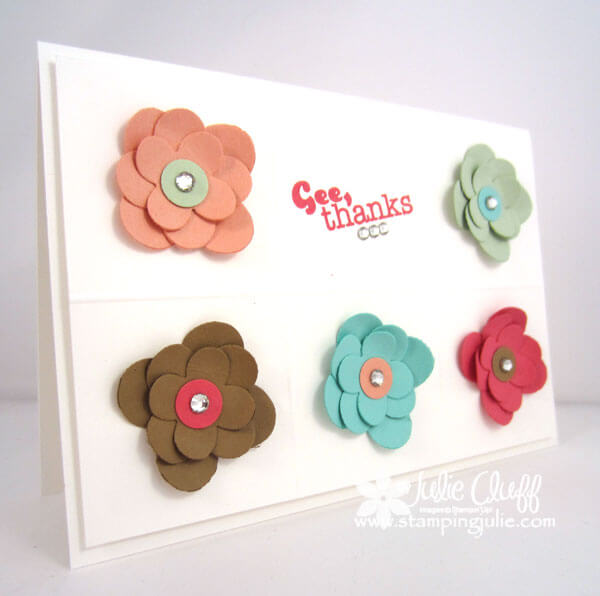
Really Good Greetings Thank You Flowers

really good greetings flower thank you card www.stampingjulie.com
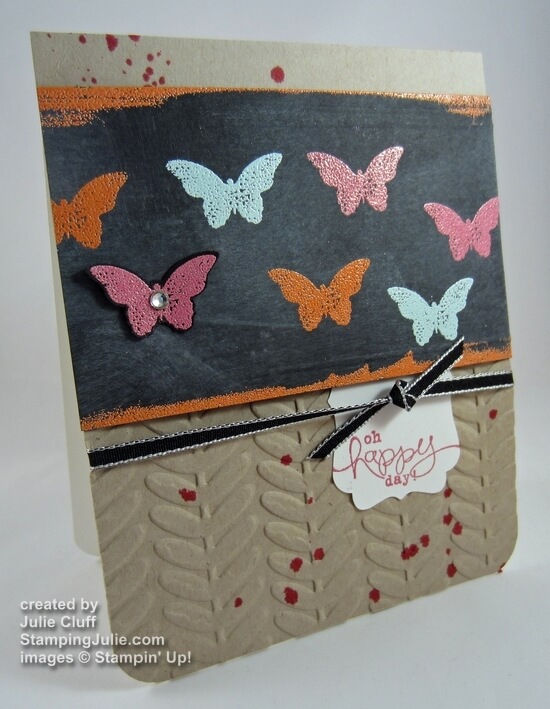
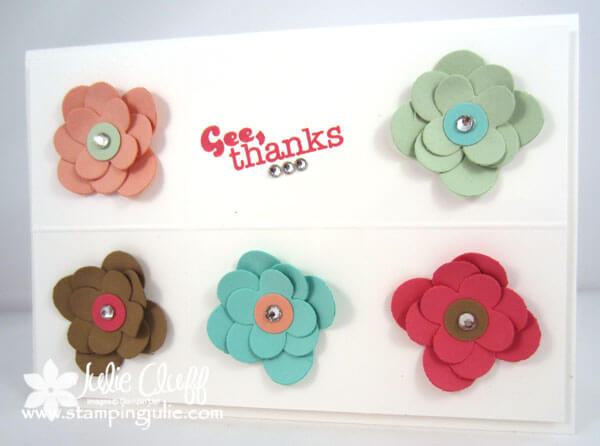
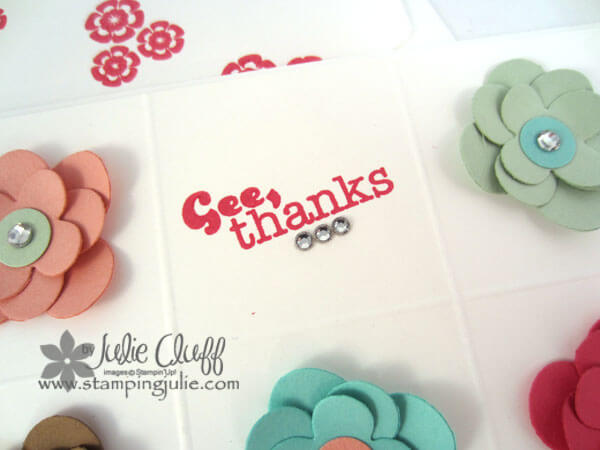
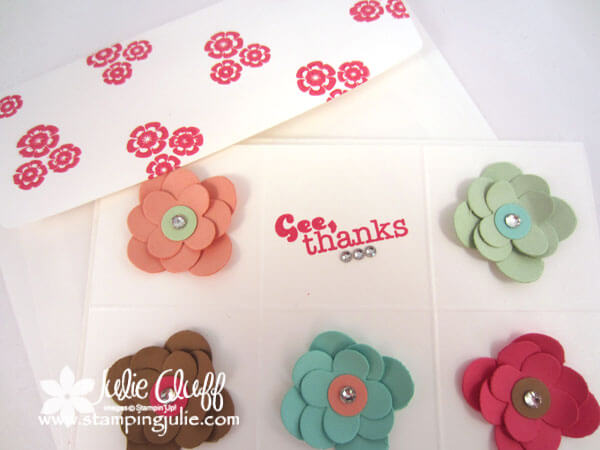
I’ve had the idea for this thank you card swimming around my head since the introduction of the new Stampin’ Up! In Colors – Strawberry Slush, Baked Brown Sugar, Coastal Cabana, Crisp Cantaloupe, and Pistachio Pudding.  If you look closely you’ll see that the front panel is scored into sections, then in each section is a Floral Fusion Sizzlets flower with the ‘gee, thanks’ (from the new Stampin’ Up! Really Good Greetings stamp set) stamped in the top middle section in Strawberry Slush.

really good greetings flower thank you card www.stampingjulie.com

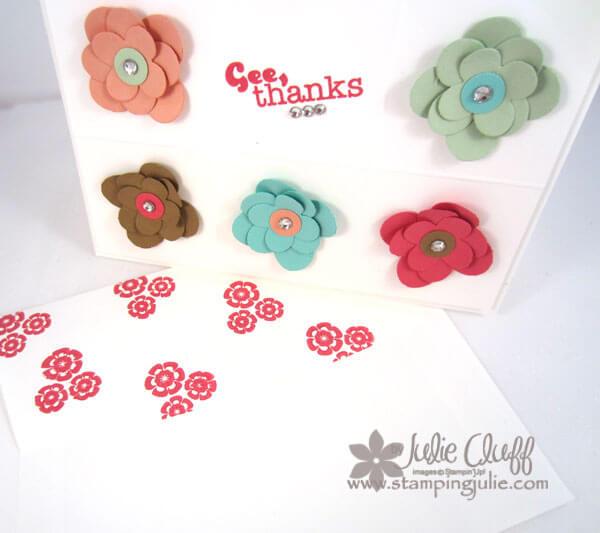
I even made a matching envelope.  The envelope was stamped with the flowers from Betsy’s Blossoms in Strawberry Slush.  I’m making a coordinating envelope with almost every card these days.  It doesn’t take much to do and I think it makes the card extra special.  But if you are like me you are wondering about the dimensions on this card.

really good greetings flower thank you card www.stampingjulie.com

I had to do some real math to get this panel to work out just right.  Here’s my math.  The card base measures 3-3/4″ x 5-1/2″.  The front panel is 3-1/2″ x 5-1/4″.  The front panel is scored across at 1-3/4″ and 3-1/2″ and then turned and scored crosswise at 1-3/4″.  When you are done, each scored section is 1-3/4″ square.  Of course, the Simply Scored Scoring Tool made this a super simple task!

really good greetings flower thank you card www.stampingjulie.com

The new Strawberry Slush In Color is definitely one of my favorites, so I used that to stamp the greeting.  If you stamp your greeting on an angle, you didn’t have to worry about lining it up just right to make it straight.  Plus, I think it adds more whimsy and interest to the card.  What do you think?

Each flower was centered with a circle of contrasting cardstock and topped with a rhinestone.  I just love the self-adhesive rhinestone Basic Jewels.  And I love the fact that they also come with a few rhinestones attached in a line, which was perfect to underline ‘gee, thanks’.

really good greetings flower thank you card www.stampingjulie.com

Here’s the card recipe:
(All supplies are Stampin’ Up! Click on the product link to visit the online store for pictures, details & ordering.)
Stamps:  Really Good Greetings wood-mount #130330 or clear-mount #130333, Betsy’s Blossoms wood-mount #131955 or clear-mount #126006
Ink: Strawberry Slush #131178, Crisp Cantaloupe #131176, Pistachio Pudding #131177, Coastal Cabana #131175, Baked Brown Sugar #131174
Paper: Whisper White #100730
Extras: Big Shot #113439, Sizzlets Floral Fusion #115959,  Simply Scored Scoring Tool #122334, Itty Bitty Shapes Punch Pack #118309, Rhinestones #119246, Dimensionals #104430
 

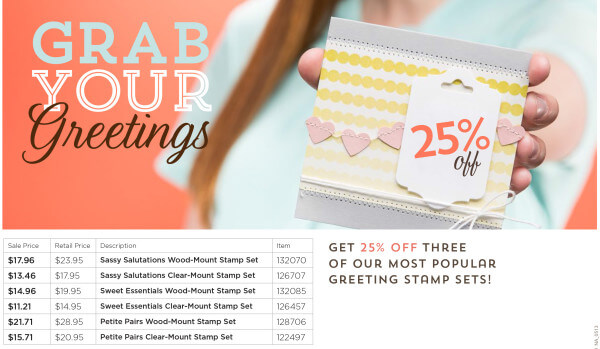
GRAB YOUR GREETINGS AND SAVE!  25% off three popular stamp sets.  Ends June 30th.

grab your greetings stampin' up! stamp sale


Enjoy!  Julie

Easter Egg Basket Favor

hearts a flutter easter basketThis fun little Happy Easter Egg Basket Favor is made quickly from Pretty in Pink cardstock and the small oval punch.  This would be a great little treat to give to friends, family or co-workers.

hearts a flutter easter basket favor

I started with a 5″ x 9-1/2″ piece of cardstock that I scored at 2-1/2″, 4-1/2″, 7″, 9″, then scored 2″ from the bottom, which is easily done with the Simply Scored Scoring Tool.  Fold it up like you would the 2-4-6-8 box.  Before I assembled the box I inserted the 2-1/2″ side into the large oval punch to punch the window.  Then I cut a 2″ x 2-1/2″ piece of window sheet and adhered the window sheet inside the box with glue dots.

hearts a flutter easter basket favor

The handle is punched from the Scallop Ribbon punch and the ends covered with a punched Itty Bitty Shape punch flower.

I stamped the Easter eggs on this Easter Egg Basket Favor box with the designs from the Hearts of Flutter stamp set, punched them out with the small oval punch and adhered them to the front of the box.  I then used a piece of Certainly Celery cardstock randomly snipped to make the grass.  The interior is also filled with thinly sliced cardstock.

hearts a flutter easter basket favor

CHECK OUT THE BEAUTIFUL SPRING CATALOG!  which includes the Hearts of Flutter stamp set.

Click Here to Order your Stampin’ Supplies

Click Here for Fun, Easy Digital Scrapbooking 

Be sure and watch the 2-4-6-8 video tutorial to see out to assemble this box and have fun making these Easter Egg Basket Favor boxes for your friends!

Enjoy!  Julie

bloomin' marvelous chalkboard butterfly card 2

Bloomin’ Marvelous Color Chalk Butterflies

bloomin' marvelous chalkboard butterfly card 2

This little butterfly number features two exclusive Sale-a-bration products the Bloomin’ Marvelous Stamp Set & Vine Street Embossing Folder.  The card base is made with Crumb Cake cardstock, embossed with the Vine Street Embossing Folder and splattered with a little Melon Mambo reinker.

To create the butterfly panel, I started with Basic Black cardstock and rubbed it lightly with the Whisper White Craft Pad.  After heat setting the craft ink, I prepared the panel with the Embossing Buddy and then stamped a couple of butterflies with VersaMark.

bloomin' marvelous chalkboard butterfly card detail

I heat embossed the first set of butterfles with the Melon Mambo embossing powder, then stamped a couple of more butterflies, heat embossed that set with Tangerine Tango embossing powder.  And then finally stamped a couple of more butterflies and heat embossed with the Pool Party embossing powder

One butterfly was stamped on a scrap of basic black, heat embossed, punched out with the Bitty Butterfly punch and blinged up with a little rhinestone.

If you look closely, you’ll see that I scored a couple of lines on the top and bottom edges of the butterfly panel with the Simply Scored Scoring Tool.  I also ran the edges across the versamark pad and heat embossed it with Tangerine Tango embossing powder.

bloomin' marvelous chalkboard butterfly card

 Here’s the card recipe:
(All supplies from Stampin’ Up! Click on the links below for product details & ordering.)
SAB: Bloomin’ Marvelous Stamp Set & Vine Street Embossing Folder

GET EXCITED!!!  STAMPIN’ UP!’S BEST SPECIAL OF THE YEAR, SALE-A-BRATION!  Special ends March 22nd.

Earn a FREE Sale-A-Bration product with every $50 in merchandise you order!

Click here for the complete list of SAB products!

Sale-a-bration FREE product

free stampin up product during sale-a-bration

I hope you enjoyed this take on the chalkboard techinique using colored embossing powders.  I just love the SAB Bloomin’ Marvelous stamp set and all the possibilities with the butterflies.

Enjoy!  Julie

bloomin' marvelous hummingbird flower chalkboard stamping card

Bloomin’ Marvelous with Chalkboard Stamping

bloomin' marvelous hummingbird flower chalkboard stamping card

The chalkboard technique is so easy and fun and gives great results especially with the  Sale-a-bration Bloomin’ Marvelous stamp set!  If you want to learn more about chalkboard stamping, check out this Jar of Hearts valentine post and video.  If you’ve liked my Stamping Julie facebook page, you saw this card a few days ago.

I started with a Crumb Cake cardstock card base.  When I want to add ribbon around a portrait oriented card I cut my cardstock at 4-1/2″ x 11″.  The SAB Sycamore Street Ribbon & Button Pack has three great ribbon colors – Tangerine Tango, Island Indigo & Pool Party – and the set comes with matching buttons in Tangerine Tango and Pool Party.  I decided to use the Tangerine Tango ribbon and buttons for a bold splash of color on an otherwise neutral card.

bloomin' marvelous hummingbird flower chalkboard stamping card close up

To add an additional ‘splash’ of color, I dropped Tangerine Tango color on the background as well.  This is easy to do with reinkers. Just put a couple of drops of ink on the lid of your open stamp pad and add a drop or two of water to dilute it a bit.  Then use a paint brush to pick up the ink and splash it over your card base.

You may want to experiment first on scratch paper first if you’ve never done this before so you get just the look you want.

bloomin' marvelous hummingbird flower chalkboard stamping card

I scored a border down the left side with the Simply Scored Scoring Tool and the Borders Scoring Plate and swiped just a bit of white craft ink over the embossing so that it would stand out a little more.

Here’s the card recipe:
(All supplies from Stampin’ Up! Click on the link to visit my store for product pictures, details & ordering.)
 SAB: Bloomin’ Marvelous stamp set w-#129651 c-#129654, Sycamore Street ribbon & button pack #130812
Ink: Whisper White craft #101731, Tangerine Tango reinker #111841
Paper:  Crumb Cake cardstock#120953, Basic Black cardstock #121045
Extras: Simply Scored Scoring Tool#125586, Borders Scoring Plate #126192, White Embossing Powder #109132, Bakers Twine #124262

bloomin' marvelous hummingbird flower chalkboard stamping card detail

VALENTINES IS NEXT WEEK AND THERE’S STILL TIME TO ORDER: But act quick! Order your valentines supplies today  and when your order reaches $50, you’ll receive a FREE Sale-a-bration bonus item.

Have you tried the chalkboard technique yet?  Try it with the SAB Bloomin’ Marvelous stamp set and let me know what you think.

Enjoy!  Julie

hearts a flutter heart shaped card

How to Make Envelopes

hearts a flutter heart shaped card

Today I’ll show you how to make envelopes.  Yesterday I gave you all the details about this heart-shaped valentine.  Today it’s all about making the envelope that’s perfect for your special card.  NOTE: This envelope is not a standard size.  Please see measurements below.

more amore envelopes

The trick is not only to make the envelope but to make the envelope so that your pattern on your paper is heading the right direction!  For example, if I just cut a square from the papers pictured above and placed my diagonal score lines to create my envelopes, the hearts would be on the diagonal instead of facing up.  Oh, dear.  That won’t do.

more amore envelope back

Of course on the flap the pattern will be necessarily upside down, but that’s ok.  ;)   The front is what matters.  Check out the video tutorial on how to create this custom envelope.

Supplies needed:
(All supplies are Stampin’ Up! Click on the product link to visit my store for pictures, details & ordering.)
 More Amore Designer Series Paper #129309
Simply Scored Scoring Tool #122334
Simply Scored Diagonal Plate #125586
 

BUNDLE BONUS:  When you order the Scoring Tool, Diagonal Plate and any pack of Designer Series Paper together, you’ll receive a FREE Sale-a-bration bonus item.

Envelope measurements:  Cut square 5-1/2″ x 5-1/2″. Score diagonal on opposite corners at 2-1/4″.  Score remaining corners at 3-3/4″.  Your envelope will measure about 3-1/8″ x 3-3/4″.

hearts a flutter heart card in envelope

Now you can get busy making your own valentines now that you know how to make envelopes!

Enjoy, Julie

clockworks one in a million gift card

Clockworks Note Cards Gift Set

clockworks one in a million gift card
Here’s another project from the Stampin’ Up! Regional event in  Chattanooga.  You’ll notice the stamp sets used are the same as were used in the Two Tags Box and Gift Cards project I shared with you last week.

This set of stamped note cards and envelopes are bound together in a lovely vellum pack with loads of playful Calypso Coral Bakers Twine.

clockworks one in a million card pack

This card pack would make a great gift for a friend.  To create the vellum wrap cut a 7-1/4″ square of Vellum cardstock and score the opposite corners with the Simply Scored Scoring Tool and Diagonal Plate at 3-7/8″.  Score the remaining two corners at 2-7/8″.  Cut the notches out created where the score lines intersect and crease the score lines.

clockworks one in a million pack open

Four note cards and matching envelopes nestle securely inside the vellum folder.

clockworks one in a million envelope

Before wrapping it all up stamp the envelopes to match.

Enjoy! Julie

clockworks one in a million card

Card Recipe: 
Stamps:  Clockworks wood-mounted #127290 clear-mount #127292, One in a Million wood-mount #126380 clear-mount #126382
Ink: Calypso Coral #126983, Gumball Green #126861, Pool Party #126982, Basic Gray #126981, More Mustard #126964
Paper:   Note Cards & Envelopes #107311, Vellum cardstock #101856
Extras: Calypso Coral Baker’s Twine #125573, Rhinestone Basic Jewels #119246, 1″ Circle punch #119868, Simply Scored Scoring Tool #122334, Diagonal Plate #125586

The Spring Catalog Goes Live Today!

Stampin' Up! Spring catalog

The Spring Catalog is beautiful!

View the 2013 spring catalog online (Flash)

View the 2013 spring catalog (PDF)

View the 2013 spring catalog project supply list (PDF)

And here’s some Stampin’ Up! videos on some projects and products from the catalog.

1. Simply Scored Borders Scoring Plate

2. Core’dinations Card Stock


 3. Pop ‘n Cuts Dies

THE STAMPIN’ UP! SPRING CATALOG BEGINS TODAY.   If you still need one, click here to send me a quick message with your name, address and phone number, and I’ll get one in the mail to you.   (If you placed an order with me during 2012 you should have already received your 2013 Spring Catalog in the mail.)

Enjoy, Julie

Tricky Treats Halloween 2-4-6-8 box

2-4-6-8 Halloween Treat Box

Tricky Treats Halloween 2-4-6-8 box

This 2-4-6-8 Halloween treat box is so super easy to make and I recorded a video to show you how to make the box and the tag.

If you are reading in email you can view the video tutorial here or here http://www.youtube.com/watch?v=yqzBaSikDNg

This simple box is made with a half a sheet of paper measuring 5-1/2″ x 8-1/2″.  This box was embossed with the Spider Web Embossing Folder.  To emboss the box you’ll need to emboss it twice, running it through the Big Shot once on each side before assembling the box.

Tricky Treats 2-4-6-8 Halloween box top

There are several options for closing up the top; you can use ribbon or a topper.  In this sample the top was folded in and secured with a Glimmer Brad, then the tag was hung from the brad.

Punches make quick work for tag creation!

Tricky Treats 2-4-6-8 Halloween box tag

This cute spider would look adorable with googlie eyes!  And the adhesive backed googlie eyes available in the Holiday Catalog would make that quick to do, but in this case I colored his eyes with a So Saffron marker to add just a tinge of color.

RIBBON SPECIAL!  Don’t forget to order during the month of September and receive FREE ribbon (value $8.95) for every $40 in product ordered.  What does that mean?  For example, if you purchase the Simply Scored Scoring Tool and Diagonal Plate you would earn a Free spool of ribbon.  If you purchase the Big Shot, you’ll receive 2 spools of ribbon.  If your total order is over $150 you would earn 3 spools of ribbon PLUS $25 in Stampin’ Rewards FREE product.  Questions?  Let me know.

View the Stampin’ Up! Holiday Catalog here

Order Stampin’ Up! Products Here 24/7

Enjoy! Julie

Halloween Treat Box Recipe:
Stamps: Tricky Treats wood-#126325 clear-#126327
Ink: Rich Razzleberry #126950, Black StazOn #101406
Paper: Rich Razzleberry #115316, Whisper White #100730
Extras: Big Shot Die-Cutting Machine #113439, Spider Web Embossing Folder #120889, Simply Scored Scoring Tool #122334, Large Tag Punch #119866, 3/4″ Circle Punch #119873, Basics Glimmer Brad #121003, White Bakers Twine #124262
CreativeProj3_DBWS_Sept0112_NA_-pi-_405x391

Stampin’ Up! Trick or Treat Bag

Stampin' Up! trick or treat bagThis adorable trick or treat bag from Stampin’ Up! is made from many of the great products available in the Holiday Catalog.  Howlstooth and Scaringbone Designer Series Paper, Toxic Treats Stamp Set, and Basic Gray Striped Statin Ribbon are all available for a limited time.

Click here for complete project product list.

Click here to view the Holiday Catalog.

Enjoy!  Julie

Layered Labels red congratulations card angle

Stampin’ Up! Layered Labels Congratulations CAS

Layered Labels red congratulations card angleWhat is CAS?  It’s Clean And Simple.  Todays card is a CAS Congratulations card – not too fussy, not too much color or distraction, just cool and calm Baja Breeze and Marina Mist with a pop of vibrant Real Red to get your attention.

The background pattern paper was the starting point for this card so I used the coordinating neutral,  Very Vanilla card stock, cut 11″ x 5-1/2″ as the base (folded to 5-1/2″ x 5-1/2″) to match the Comfort Cafe dsp (designer series paper).  The papers in this dsp pack all have a subtle fabric print, so in keeping with that vibe I used the Square Lattice Embossing Folder after I cropped the Scallop Circle with the Big Shot Die-Cutting Machine.

Layered Labels red congratulations card details

I stamped Congratulations in Marina Mist then die cut it out with the Apothecary Accents Framelits.  (View yesterdays video that demonstrates the Apothecary Accents Framelit.)  I used another Apothecary Accents Framelit to trim out the Real Red Accent.  I cut the die cut in half and layered it behind the top and bottom of the Congratulations label, then attached the label with Stampin’ Dimensionals.

Finally, a Baja Breeze Seam Binding Ribbon bow was added topped using Glue Dots with a Real Red button and clear heart Bitty Button threaded with Linen Thread.

 Layered Labels red congratulations card matching envelope

I also made a matching envelope and with the Diagonal Scoring Plate this takes less than a minute to do.  (To view more information and a video on the diagonal scoring plate click here.) To make this square envelope, cut your paper to 9″ square, score each side diagonally at 4-1/4″, trim out the small triangles where your score lines meet  and fold up.

Layered Labels red congratulations card envelope openYou’ll notice I added button closure to the back with Linen Thread.  This is a fun feature if you are hand delivering your card, but not so practical for mailing.  :) To create this closure, attach the end of the Linen Thread to a Dimensional then to a button.  Adhere the button, thread side down on the envelope.  Then just place the other button on the other side with a Dimensionals.  Now wrap the thread around the buttons to close.

 Enjoy!  Julie

Layered Labels red congratulations card close up

Card Recipe:
Stamps:  Layered Labels w-#127070 c-#127072
Ink: Marina Mist #126962
Paper: Comfort Cafe DSP #126898, Real Red cs #100052, Very Vanilla cs #101650
Extras: Big Shot Die-Cutting Machine #113439, Apothecary Accents Framelits #127003, Scallop Circle Bigz Die #113468, Baja Breeze Seam Binding Ribbon #122331, Linen Thread #104199, Brights Designer Buttons #119747, Bitty Buttons #118761, Dimensionals #104430, Glue Dots #103683, Simply Scored Scoring Tool #122334, Simply Scored Diagonal Plate #125586
Related Posts Plugin for WordPress, Blogger...