Tagged: pattern paper

Carry On Birthday Cupcake Card

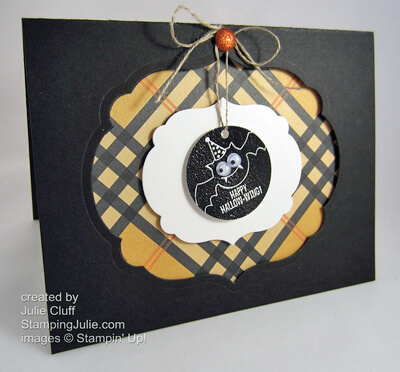
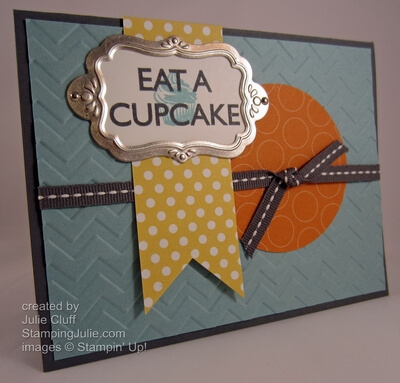
Keep Calm & Eat a Cupcake

Carry On Birthday Cupcake Card I love playful birthday cards!  This card was designed by my sister during our stamping marathon last month.  She used a different stamp set to make hers and I chose this little cupcake from the Stampin’ Up! Carry On stamp set – love it!  And did you know you can get this stamp set FREE as a Stampin’ Reward with a $150 order.

Carry On Birthday Cupcake Card detail Layering stamped images is a great way to increase interest in your designs.  I really love the crisp look of this fun cupcake and the ‘eat a cupcake’ font.  And the Flourish Designer Frame highlights the message with style!

Trendy Chevron embossing and lively polka dots from the Polka Dot Parade Designer Series paper is just perfect for a great birthday wish.  I love using Stampin’ Up! coordinated line of ribbons, ink and papers which makes designing great projects super easy.

Carry On Birthday Cupcake Card above Order Stampin’ Up! Products Here 24/7 (and don’t forget to check out the dozens of new items added to the clearance rack.)

View the Stampin’ Up! Holiday Catalog here

Like us on Facebook

Follow on Twitter

Enjoy! Julie

Carry On Birthday Cupcake Card 2 Card Recipe:
Stamps: Carry On (Stampin’ Rewards) w-# 126645 c-# 126647
Ink:  Basic Gray #126981, Baja Breeze #126960
Paper: Polka Dot Parade Designer Series Paper #126902, Basic Gray #121044, Baja Breeze #111352, Whisper White #100730
Extras: Flourish Designer Frame #127835, Mini Brads #122941, Big Shot Die-cutting Machine #113439, Chevron Emboss Folder #127749, Gray Ribbon #126879
Tricky Treats plaid halloween bat 2

Stampin’ Up! Tricky Treats Happy Halloween

Tricky Treats plaid halloween bat 2

Remember the old song, “What a difference a day makes.  twenty-four little hours…” I found myself humming, “What a difference an eye makes…” today as I created this cute bat tag.

Tricky Treats hallow-wing missing eyes

The finishing touch on this little bat was adding the adhesive-backed googly eyes.  What a difference?  It took it from cute to adorable!  You’re friends will love this cute little guy with his googly eyes, and this little greeting card is quick to create.

To create this card I started with a Basic Black cardstock base. I centered my Labels Collection Framelit on the front, secured it with post it notes and ran it through the Big Shot Die-Cutting Machine.  I backed it with plaid Howlstooth and Scaringbone Designer Series Paper.  I used a smaller label framelit to cut out the center piece.  Everything was adhered with Stampin’ Dimensionals.

Tricky Treats plaid halloween bat details

I stamped the bat tag from the Tricky Treats stamp set with Basic Black Craft ink and embossed it with Black Emboss Powder, after sprinking it with a just a touch of Iridescent Ice Emboss Powder for a hint of glitter.  Be careful not to mix the embossing powders.

The bat tag was punched with a circle punch and was added to the center with a dimensional and then tied to a Tangerine Tango Glimmer at the top with Linen Thread.

Tricky Treats plaid halloween bat

An added bonus when backing the label cut-out on front is the fun pattern that shows on the interior.  A Happy Halloween sentiment from the Seasonal Sayings Stamp Set was stamped in the middle with Tangerine Tango ink.

Tricky Treats plaid halloween bat interior

SIGN UP FOR A LIVE OR VIRTUAL STAMP CAMP TODAY! Check out live events and virtual events  at the tabs above.  These events will help you refine your stamping skills and teach you new techniques and projects as you bring joy to your family and friends through your creations.

Enjoy!  Julie

Tricky Treats plaid halloween bat close up

Card Recipe:
Stamps: Tricky Treats w-#126325 c-#126327,  Seasonal Sayings w-#128006 c-#128009
Ink: Tangerine Tango #111841, Basic Black Craft #102192
Paper: Howlstooth & Scaringbone Designer Series Paper #126906, Basic Black #121045, Whisper White #100730
Extras: Labels Collection Framelits #125598, Big Shot Die-Cutting Machine #113439, 1-3/8″ Circle Punch #119850, Brights Glimmer Brads #121006, Linen Thread #104199, Stampin’ Dimensionals #104430, Black Emboss Powder #109133, Iridescent Ice Emboss Powder #101930, Googlies #127539
Betsy's Blossoms sunny birthday card angle

Sunny Make a Wish Birthday Card

Betsy's Blossoms sunny birthday card angle

The colors of this a bright, happy birthday card are drawn from the International Bazaar designer series paper:  Rich Razzleberry, Daffodil Delight, Tangerine Tango and Bashful Blue. Designer paper is great inspiration for any project.

Betsy's Blossoms sunny birthday card flat

The 2-3/8″ scallop punch,  1-3/4″ circle punch and 1″ square punch make this card easy work.  This would be a great card to reproduce quickly to always have a stash of birthday cards on hand.

The large Daffodil Delight circle center is embossed with the Perfect Polka Dots Folder and then touched with 2-way glue before  shaking a bit of Dazzling Diamonds glitter over for a little sunny sparkle.  Did you see how I store and use glitter on Facebook?  I like to show storage ideas on facebook.  Look through my fb photo album.

Betsy's Blossoms sunny birthday card glitter blossom

The background was stamped Bashful Blue Ink on Bashful Blue Cardstock with a small flower from the Betsy’s Blossoms stamp set.  The Make a Wish banner was stamped in Rich Razzleberry from the Sweet Essentials stamp set.  And a Tangerine Tango glimmer brad was added for extra bling!  To view a video tutorial on creating a banner, click here.

Order Stampin’ Up! Products Here 24/7

View the Stampin’ Up! Holiday Catalog here

Like us on Facebook

Follow on Twitter

 Enjoy!  Julie

Betsy's Blossoms sunny birthday card Card Recipe:
Stamps:  Sweet Essentials w-#126455 c-#126457, Betsy’s Blossoms w-#126004 c-#126006
Ink: Rich Razzleberry #126950, Bashful Blue #126961
Paper: Bashful Blue #105120, Tangerine Tango #111349, Rich Razzleberry #115316, Daffodil Delight #119683, International Bazaar Designer Series Paper #126920
Extras: Perfect Polka Dots Emboss Folder #117335, Big Shot Die-Cutting Machine #113439, 2-3/8″ scallop punch #118874,  1-3/4″ circle punch #119850, 1″ square punch  #124094
witch shoe happy halloween card

A Happy Halloween Witch’s Shoes Card & Video

witch shoe happy halloween card

Don’t you love the skinny, little legs on this witch?!  These little shoes were easy to make using the Top Note Die and the Big Shot Die-Cutting Machine.  I created a video to show you how.

Watch the Video ‘How to Create Witch Shoes’ Here

The tag was created with the Stampin’ Rewards Mixed Medley Stamp Set.  ‘For you’ was stamped in Rich Razzleberry and the spider web stamped in Black StazOn Ink.  I punched these out quickly with Circle punches.  And the tag were layered on a circle Rich Razzleberry cardstock.

witch shoes happy halloween card close up

Click here to order the Christmas special

Order Stampin’ Up! Products Here 24/7

View the Stampin’ Up! Holiday Catalog here

Like us on Facebook

Follow on Twitter

Enjoy!  Julie

Card Recipe:
Stamps: Mixed Medley w-#128054 c-# 128057
Ink: Black StazOn #101406, Rich Razzleberry #126950
Paper: Rich Razzleberry #115316, Lucky Limeade #122926, Basic Black #121045,  Howlstooth & Scaringbone Designer Series Paper #126906, Silver Glimmer #124005
Extras:  Top Note Bigz Die #113463, Big Shot Die-Cutting Machine #113439, 3/4″ Circle Punch #119873, 1-1/4″ Circle Punch #119861, 1-3/8″ Circle Punch #119860, 1″ Square Punch #124094
field flower love card angle

Stampin’ Up! Field Flower Love

field flower love card angle “Navy Pacific Sand” – the Splitcoaststampers Color Challenge!  I used a few interesting techniques on this Field Flowers love card including brayering the embossing folder and creating faux washi tape.

I started by stamping the stems in Sahara Sand, then in Night of Navy which creates a bit of shadow.  The flower outlines were then stamped in Night of Navy with Sahara Sand shading.  I then cut this with the largest framelit from the Apothecary Accents framelits set.

I used Pacific Point to sponge the interior of the flower and the edges of the panel, then a lighter sponge throughout.  Then I used Dazzling Details to add some heavy glitter to the center of the flowers.

field flower love card detail

Before embossing the Sahara Sand card front, I brayered Sahara Sand on the embossing folder so when I ran it through the Big Shot it creates a contrasting shadow.  The Apothecary flower panel was attached to the card front.

The faux washi tape was created with scotch tape and International Bazaar Designer Series Paper.  This is a technique I learned at the Stampin’ Up! Chattanooga Regional event.  I taped a section of pattern paper then ‘washed off’ the back of the pattern paper until it appears clear.

field flower love card washi tape

The Stitched Satin Midnight Muse Ribbon is on special this month and is free with a $40 order.  This ribbon is so great feeling and so easy to work with!  You’ll love it!  This ribbon is available in all the latest In Colors.

Order your Satin Ribbon FREE this month with a $40 product purchase.

Order Stampin’ Up! Products Here 24/7

View the Stampin’ Up! Holiday Catalog here

Like us on Facebook

Follow on Twitter

Enjoy! Julie

field flower love card

Card Recipe: 
Stamps: Field Flowers w-#122760 c-#122762
Ink: Night of Navy #126970, Pacific Point #126951, Sahara Sand #126976
Paper: Whisper White #100730, Sahara Sand #121043, International Bazaar Designer Series Paper #126920
Extras: Big Shot Die-Cutting Machine #113439, Beautiful Wings Embosslit #118138, Apothecary Accents Framelits #127003, Chevron Embossing Folder #127749, Brayer #102395, Rhinestone Basic Jewels #119246, Dazzling Details #124117, Stampin’ Sponges #101610, Midnight Muse Stitched Satin Ribbon #126847