Tagged: cards

artistic etchings eiffel tower amour

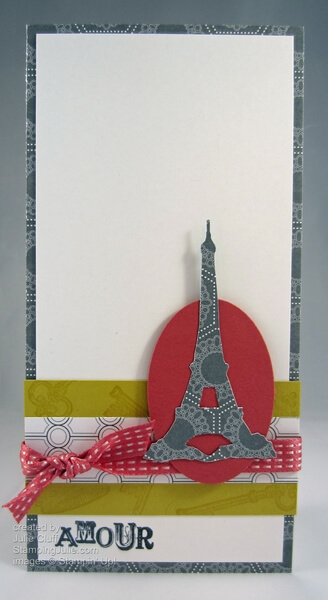
Clean and Simple Eiffel Tower Silhouette

artistic etchings eiffel tower amour

This Eiffel Tower stamp from the Stampin’ Up!’s Artistic Etchings stamp set and the Basic Gray paper from the Twitterpated Designer Series Paper makes a great silhouette.  I stamped the Eiffel Tower on the back of the paper and cut it out carefully with Paper Snips.  Looks intricate, but easy to do with these great scissors.

This is not your traditional card size.  I started with a 6″x6″ square of Whisper White card stock folded in half for the card base for a 3″x6″ card.

artistic etchings eiffel tower amour detail

Can you see the pattern on the Summer Starfruit card stock?  The crown and key images were stamped with VersaMark ink to create that pattern.

artistic etchings amour eiffel tower

I punched the Primrose Petals oval with the Extra-Large Oval Punch to create the background for the silhouette.  I picked the color combination from the Color Coach – a great tool for creative color choices.

  • If you’re interested in joining Stampin’ Up! because you want to start a low-cost business for income or you want it all and would like the prices and specials demonstrators enjoy, click hereJoin in June and receive an additional $48 in product!
  • In June & July, hostesses earn an extra $50 in FREE product with a combined order of $450 or more.
Card Recipe:
Stamps: Artistic Etchings wood -#118517   clear -#120573
Ink: Basic Gray #126981, VersaMark #102283
Paper: Twitterpated Designer Series Paper #125406,  Summer Starfruit #126839, Primrose Petals #126841, Whisper White #100730
Extras: Paper Snips #103579, Stampin’ Dimensionals #104430, 3/8″ Primrose Petals Stitched Satin Ribbon #126844, Extra-Large Oval Punch #119859, Color Coach #120148, 2012-2014 In Color Cards #124886
 

Enjoy!  Julie

stampin' up! artistic etchings stamp set

betsy's blossoms & owl punch

Stampin’ Up! Betsy’s Blossom’s Owl

betsy's blossoms & owl punch I enjoyed creating this playful card featuring the Owl Builder Punch.  I love pattern paper and I love, love, love mixing up the patterns which is super easy with Stampin’ Up!’s coordinated designer series paper packs.

betsy's blossoms & owl punch detail

This card features the Floral District Designer Series Paper and the vibrant colors of Lucky Limeade and Tangerine Tango.

betsy's blossoms & owl punch close up

The large scallop circle is from the Perfect Pennant Bigz Die and is a perfect landing place for our little owl.  Other extras include the rhinestone-accented heart and the scallop edge on the Tangerine Tango floral print.

betsy's blossoms owl

Card Recipe:
Stamps: Betsy’s Blossoms wood-#126004  clear-#126006
Ink: Lucky Limeade #126984
Paper: Floral District Designer Series Paper #126919, Whisper White #100730, Tangerine Tango #111349, Lucky Limeade #122926
Extras: Owl Builder Punch #118074, White Stitched Grosgrain Ribbon #126877, Rhinestone #119246, Scallop Edge Punch #119882, Perfect Pennant Bigz Die #123126, Big Shot Die-Cutting Machine #113439
 

Enjoy!  Julie

just believe fun flower thank you

Stampin’ Up! Fun Flower Thank You Card

just believe fun flower thank you

I made this flower with dryer sheets and the Fun Flower Bigz Die.  Who knew dryer sheets could be so pretty?!  As you might imagine dryer sheets would be hard to cut but if you sandwich the die, then the dryer sheet, and finally card stock you’ll get a clean cut.  I only had to clip a couple of hanger-ons.

just believe fun flower close up

Once the flower was cut, I spritzed it with color, then outlined it with Dazzling Details Glitter Glue.  Of course, then it had to sit and dry.  I let it dry completely over night.  I set it out on some paper to dry, but I should have set it on wax paper instead since I did have a little trouble with a couple of spots where the glue stuck to the paper.

just believe fun bigz die flower

To assemble the flower, I punched a 1-1/4″ card stock circle from Primrose Petals then stacked the flowers on top, punched the center and adhered them all together with a brad.  I punched a  3/4″ card stock circle, adhered the rhinestones and glued that to the top of the brad with a glue dot.

just believe fun flower thank you card

‘Thank you’, from the Just Believe Stamp Set, was stamped in Basic Black full strength and then again without re-inking to get the different varying shades of black and gray.

The Big Shot Die-Cutting Machine makes this all happen – the flower and the beautiful embossed background.  The Big Shot has instruction on the multipurpose platform on how to use all the various types of dies, making it super easy to use.  Order your Big Shot today and start creating!

big shot die-cutting machine Card Recipe:
Stamp Set: Just Believe wood-#116948 clear-#120453
Ink: Basic Black #126980
Paper: Primrose Petals #126841, Basic Black #121045, Whisper White #100730
Extras:  Rhinestones #119246, 1-1/4″ Circle Punch #119861, 3/4″ Circle Punch #119873, Stampin’ Spritzer #126185, Dazzling Detail Glitter Glue #124117, Fun Flower Bigz Die #121812, Embossing Folder #120175, Big Shot Die-Cut Machine #113439, Mini Glue Dots #103683
 

Enjoy!  Julie

layered labels heartfelt

Stampin’ Up! Layered Labels Heartfelt

layered labels heartfelt

This intricate monochrome offering was made with the Layered Labels Stamp Set and the Apothecary Framelits.  This large stamp obviously coordinates with the large framelit, but the smaller framelit is a great complement to layer.

layered labels heartfelt detail

Then I used the Modern Label Punch for the very top layer to accent “heartfelt”.  To get the very crisp white image on the Raspberry Ripple card stock, I stamped with Whisper White Craft Pad then embossed it with White Stampin’ Emboss Powder.  Can I just say, that Stampin’ Up! has the BEST emboss powder!  I was working on a project with a friend and she bought some emboss powder from somewhere else and brought it over.  I was awful!

layered labels heartfelt detail close up For accent I used the Stitched Grosgrain Ribbon and the Vintage Trinkets.  Aren’t those cute little distressed brads perfect?

layered labels heartfelt 2

 Card Recipe: 
Stamps:  Layered Labels wood-#127070  clear-#127072
Ink:  Whisper White Craft #101731, Raspberry Ripple #126859
Paper:  Whisper White #100730, Raspberry Ripple #126842
Extras: Stampin’ White Emboss Powder #109132,  Modern Label Punch #119849, Vintage Trinkets #118764, Raspberry Ripple Stitched Satin Ribbon #126845, Apothecary Accents Framelits #127003, Big Shot Die-Cutting Machine #113439
stampin' up! layered labels stamp set

Enjoy!  Julie

lovely as a tree fathers day

Lovely As A Tree Happy Father’s Day!

lovely as a tree fathers day Celebrating Fathers today with this Lovely As A Tree card.  I really enjoyed creating this card for my good husband who will receive it tomorrow.  Shhhh – don’t spoil the surprise!

I got very creative with this card and used lots of different techniques.  I scored a diagonal plaid design  on the  Gumball Green card base with my Scoring Tool every 1/2″, then sponged it with Gumball Green to emphasize it even more.

lovely as a tree fathers day detail

The trees stamp was inked with versamark and then Gumball Green.  Before I stamped in on the Whisper White card stock, working quickly, I used the paint brush end of the Garden Green marker to add some darker areas in the trees by tapping the stamp and I used the paint brush end of the Early Espresso marker to paint the tree trunks a deep brown. Can you see the color variations in the picture above?

lovely as a tree fathers day close up

The reason I inked up with versamark first was to keep my ink moist long enough to add clear embossing powder to heat emboss.  I wish you could see the raised embossed image.  Because I embossed the trees, the background can now be brayered with ink without damaging the stamped image.

Using torn post it notes to mask the sky line, I brayered the green grass.  Then I brayered the sky after removing the mask.

lovely as a tree fathers day envelope

You can also see the leaf stamped in Gumball Green on the front of the Crumb Cake envelope.

lovely as a tree fathers day 2 By punching a circle out of a large post-it note you can mask the sky to sponge a bright sun in.  Then cover the sun with a circle post-it note before brayering the sky.

Card Recipe:
Stamps:  Lovely As A Tree w-#115026 c-#127793, Teeny Tiny Wishes w-#115370, c-#127802
Ink for Trees:   Gumball Green#126861,  Garden Green marker #119701, Early Espresso marker #119680
Ink for Grass: Wild Wasabi #126959, Always Artichoke #126972, Early Espresso #126974(sentiment)
Ink for Sky: Dafodil Delight #126944 (sun), Baja Breeze #126960, Bashful Blue #126961
Ink for card base: Gumball Green #126861
Paper: Whisper White #100730, Early Espresso #119686, Gumball Green #126840
Extras: Natural Designer Buttons #127554, Linen Thread #104199, Glue Dots #103683, Top Note Die #113463, Big Shot Die-Cutting Machine #113439, Clear Stampin Emboss Powder #109130, Simply Scored Scoring Tool# 122334, Diagonal Scoring Plate #125586, Brayer #102395, Stamping Sponge #101610
 

 Enjoy! Julie