Tagged: 3-d project

clockworks two tag box

Clockworks Two Tags Gift Box

clockworks two tag box 
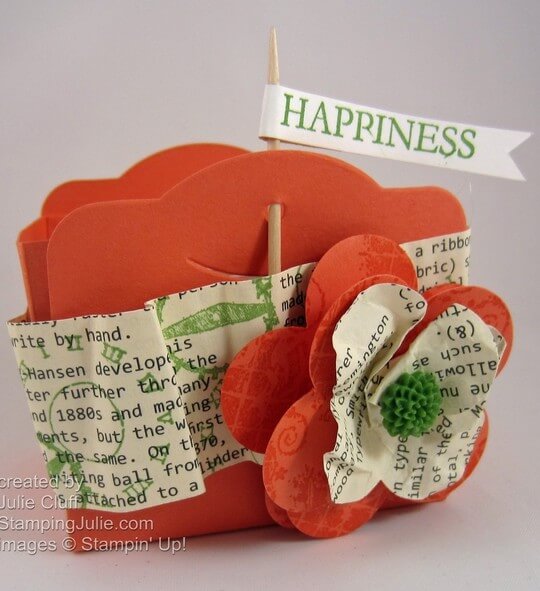
I made this cute Two Tag Die box at the Stampin’ Up! regional event in Chattanooga last fall.  And adorable 2-1/2″ square gift cards fit sweetly into the box.  Of course, you could use it to put other goodies into the box as well.  To make the box, die cut two of the Two Tag dies and fold on the score lines.  The die cuts will create the front and back of the box.

Cut 2-7/8″x 6-3/4″ piece of Calypso Coral cardstock and score horizonally at 2″ and 4-3/4″ and vertically at 1/2″ and 2-3/8″.  Crease the score lines and notch the hinged flaps.  These pieces will create the sides.  You’re ready to assemble your box.

Stamp a 1-1/4″ x 4-1/2″ piece of First Edition Specialty Designer Series Paper with the Clockworks Stamp Set with Gumball Green ink.  Scrunch the paper and adhere to the front of the box.  Stamp ‘Happiness’ from the One in a Million stamp set and create flag on top of toothpick.

The flower is created with the Fancy Flower punch.  Stamp Calypso Coral cardstock and punch two flowers.  Punch another flower from First Edition Specialty dsp.  Curl the petals with the bone folder.  Snip between two petals of the top flower and adhere one petal on top of the other.  Scrunch the dsp flower, adhere the dahlia and adhere to the front of the flower.

clockworks mini cards

These 2-1/2″ square Mini Card is stamped with the Clockworks stamp set in Pool Party, Gumball Green and Calypso Coral.  The message is stamped from the One in a Million stamp set.  And these little mini cards fit neatly into the Two Tags Box.

VIEW VALENTINE SPECIALS!

CHECK OUT THE BEAUTIFUL NEW SPRING CATALOG!   I think you’ll love the beautiful colors, images and ideas in the brand new Spring catalog.

Click Here to Order your Stampin’ Supplies

Click Here for Fun, Easy Digital Scrapbooking 

Enjoy, Julie

Card & Box Recipe:
Stamps:  Clockworks wood-mounted #127290 clear-mount #127292, One in a Million wood-mount #126380 clear-mount #126382
Ink: Calypso Coral #126983, Gumball Green #126861, Pool Party #126982
Paper:  First Edition dsp #121878, Calypso Coral #122925, Whisper White #100730
Extras:  In Color Dahlias #127556, Dimensionals #104430, Mini Glue Dots #103683, Fancy Flower Punch #118073, Big Shot Die-cutting Machine #113439, Two Tags Bigz Die #115954
punch art dancing santa

Stampin’ Up! Rockin’ Santas

punch art dancing santa

While playing with paper and punches, I made a couple of stand-up Rockin’ Santas.  Both were created with the same face that I used for the Santa petite purse .  You can click here to see the supply list and the video tutorial for the Santa purse.  I added bodies to these Santa faces to create the stand-up Santa.

Doesn’t he just look like he is dancing?  What dance would that be?!?  On this Santa I used the Pennant Die and the Big Shot Die-cutting Machine to make the body.  I created the arms with the Curly Label punch and a circle punch.  First I punched the label then I fed the punched label back into the punch and punched the inside of the arm.  I used the circle punch to trim off the points and create the wrist.  I made the hands with the smallest blossom from the Boho Blossom punch, then trimmed off the extra petals.

His Santa suit has pearl buttons colored with a Black Sharpie, with a strip of Basic Black cardstock for his belt and a Mini Label punched belt buckle.  To create the belt buckle, punch the circle from Silver Glimmer Paper with the circle punch from Itty Bitty Shapes Punch Pack, then center the circle in the Mini Label punch and punch it out and attach it to the belt with Multipurpose Liquid Glue.

punch art dancing santa back

The back is layered with the same pieces.  The bent paper clip legs were adhered and sandwiched between the front and the back.  You can use glue dots for quick results, but I used crystal effects for lasting staying power.  His feet were then taped down on to a white scallop circle base.  It would be fun to have a rocking wood block to pin him down to and then he’ll really rock out!

Stampin' Up! punch art rocking santa

This Rockin’ Santa has a Scallop Circle body with a simple Basic Black belt and a small circle buckle punched from the Silver Glimmer paper.  His hands were also trimmed from the smallest blossom from the Boho Blossom punch.

Again the back is layered with a matching scallop circle with the paper clip legs sandwiched and cemented into place with Crystal Effects.  The feet were taped to the back of a Hershey Nugget so he’ll rock.  Gentle rocking is needed though as he will topple if you get too carried away!!

earn free stamp pads

REMEMBER: 2-WAYS TO GET A SET OF STAMP PADS (a$49.95 value) FOR FREE!  1. Place an order or host a workshop of $450 or more. OR 2. Join my team of stamping friends for just $99 and enjoy all the benefits of membership.  (Offer available now until December 16th.)

Holiday Packaging Bundles

HOLIDAY PACKAGING BUNDLES ARE NOW AVAILABLE AT A DISCOUNT.  How about super cute holiday packaging all ready to go?!?!  The only thing you have to worry about is what to put in it!   Order now so you’ll be ready.

Available November 29-January 2.

Trimmings & Tags Bundle #132769 $13.50 (a $16.85 value) Includes

  • Gusseted Cellophane Bags (25 bags; 5″ x 3″ x 11-1/2″)
  • Snow Festival Designer Printed Tags (25 double-sided tags; 4-1/2″ x 3-1/8″)
  • Cherry Cobbler 1/4″ Sweater Trim (10 yards)

Petite Treats Bundle #132770 $13.50 (a $16.85 value) Includes

  • Glassine Bags with die-cut edges (10 bags; 3″ x 5″ x 1-1/2″)
  • Handmade Holidays Stitched Felt (8 pieces)
  • Gumball Green 3/8″ Stitched Satin Ribbon (10 yards)

Click Here to Order your Stamping Supplies!

Enjoy, Julie

Christmas in the Heart Box

christmas in the heart box
This Stampin’ Up! Christmas in the Heart gift box is an “in a snap” project found here.

Hope you all had a fabulous Thanksgiving with family and friends.  We took a last minute trip to Nashville to be with family.  We had planned to stay at home because of work schedules but then schedules opened up and so we jumped in the car to be with aunts and uncles and cousins!  We played games, watched movies and ate LOTS of pie.

ONLINE EXTRAVAGANZA STAMPIN’ UP! SUPER SALE happening now.  Click here for details.

Enjoy, Julie

Gratitude Jar

Sunday Inspiration: Gratitude Jar

Gratitude Jar

This year share what you’re grateful for in a gratitude jar.  This jar is from the archives.  I stamped on designer series paper and wrapped it around a jar then tied ribbon around the lid.

Gratitude Jar tag

During the week have your family write the things they are grateful for and fill the jar.  Small children will enjoy drawing pictures of what they are thankful for and adding them to the jar.  Then on Thanksgiving Day draw out the slips of paper and read them.  Enjoy a discussion with your family of all the things there are to be grateful for. 

Gratitude Jar detail

What are the things you’re thankful for?  How do you share your gratitude in your family?  Do you have a gratitude jar or a similar tradition in your family?

Happy Thanksgiving!

Julie