Tagged: paper storage

More Craft Room Organization

Stampin' up! new color storage I just love the new Stampin’ Up! color collections and I’ve had a box full of new colors, paper, ink, and stamps, and punches, etc., but no time to play. With a high school graduation and four trips out of town this past month, my playground…I mean, my craft room… has been neglected.  🙂

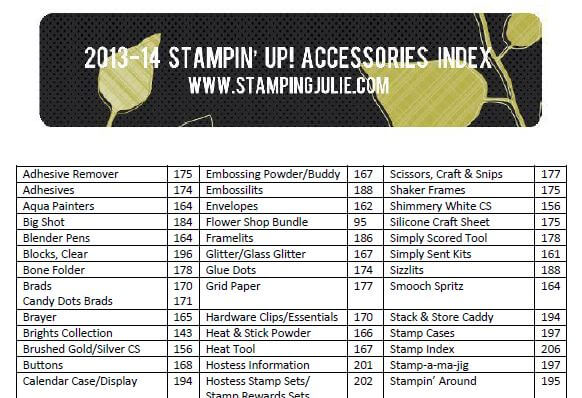
I finally got back in there for some quality get-er-dun time and got busy reorganizing for the new catalog year.  If you saw Friday’s post, then you probably got your new labels, accessories index, and color charts saved and printed.  And if you have been following me on facebook, then you may have seen my occasional post there Friday during the reorganization process.

Stampin' up! new color storage

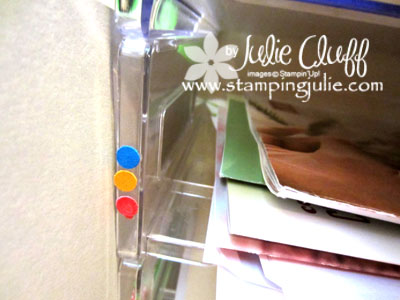
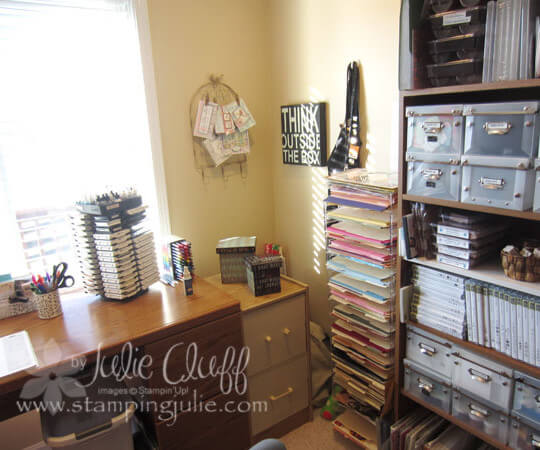
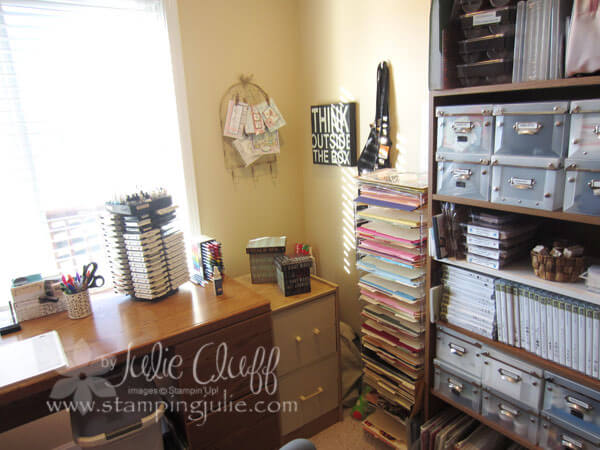
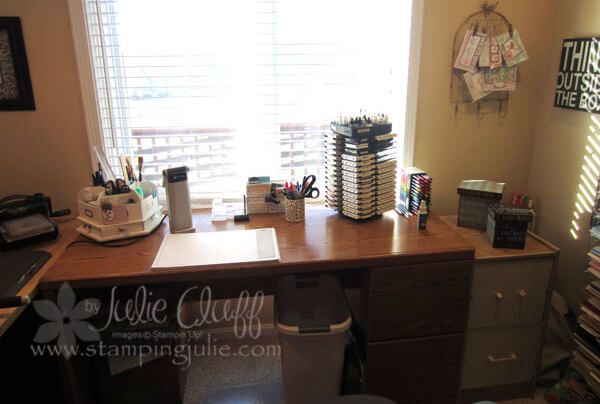
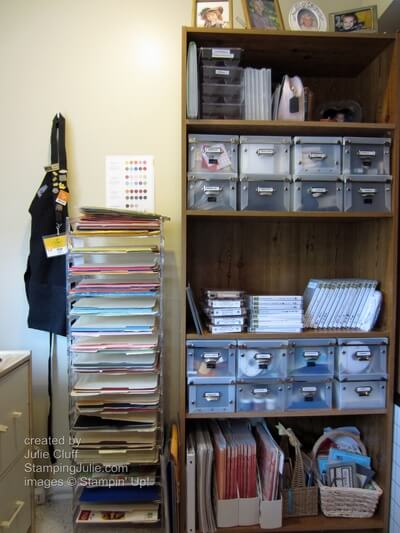
I keep my cardstock in stacking paper trays and I decided I wanted a color swatch on the side of the trays to more quickly find what I’m looking for.  From the picture above you can see that I previously used 1/4″ dots adhered to the side for quick reference, but I decided I wanted something more obvious.

Stampin' up! new color storage 
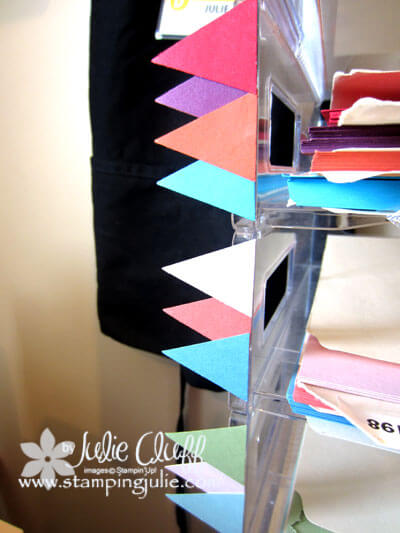
I decided on flags.  I used the Petite Pennant Builder punch and punched out a flag in each color, then adhered them to the side of the tray with SNAIL adhesive.  SNAIL is not intended for gluing paper to plastic trays so we’ll see how long it holds.  I may have to go back and use glue dots or sticky strip, but for now it was a quick solution.

Stampin' up! new color storage

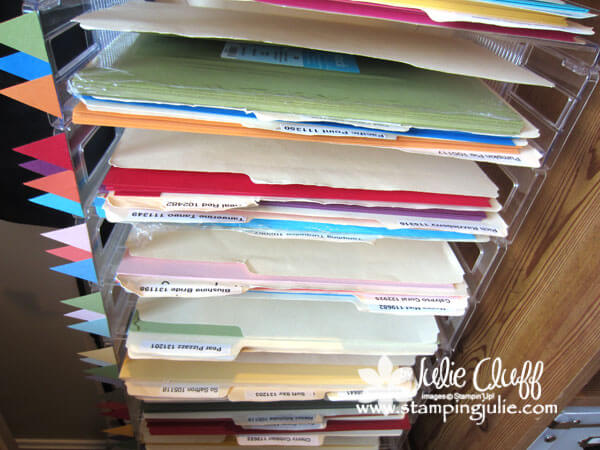
 In Friday’s post I gave you labels that you could use for your cardstock folders, but most of my folders already had labels from my labeler so I opted to continue those with the new colors.  Next time I reorganize my colors and cardstock I’ll invest in some new file folders.  I’ve been using and reusing these for years and they are worn out!

This week I’ll be showing you some thank you and wedding cards I made this weekend.  Also, tomorrow I’ll share my son’s graduation announcement I created in MDS.  Be sure and stop back by.

Do you have some great organizational tips?  Or do you have questions about organizing your crafts?  Please leave a comment and let me know what’s on your mind.

Enjoy!  Julie

New Catalog Tour and Resources You Are Going to Love!

Check out this video and the great tips on features and savings in the new catalog.   And below are some wonderful resources you are going to love!  I promise!

If you’ve seen my craft room tour   you know that I store my cardstock in file folders on stacked paper trays.  On the wall above the stack I keep a chart of the color collections for a reference.  Each color collection is stored in three trays and the colors are alphabetized within the collection.  The chart on the wall helps me to quickly locate the folder I’m looking for.  So the first two resources include a new color chart (with bonus hex and RGB codes) and folder labels.

1.  This new color chart includes the HTML (hex codes) and RGB color codes for the new color collections.  This is the new chart that will go up on my wall above my cardstock storage.

2013-14 Stampin' Up! Color Collection Chart
2013-14 Stampin’ Up! Color Collection Chart
with Hex Codes & RGB Codes

 2013-14 RGB HTML Color Codes Chart pdf file

2.  New 2013-14 color collection labels for the for your cardstock files.

2013-14 Stampin' Up! Cardstock Color Collection Labels
2013-14 Stampin’ Up! Cardstock Color Collection Labels
with Product Codes

2013-14 Stampin’ Up! Cardstock Color Collection Labels pdf file

2013-14 Stampin’ Up! Cardstock Color Collection Labels word doc

3.  Wouldn’t you just love an index of the accessories in the new catalog?!  Here it is!

2013-14 Stampin' Up! Catalog Accessories Index
2013-14 Stampin’ Up! Catalog Accessories Index

 2013-14 Stampin’ Up! Catalog Accessories Index pdf file

One of the advantages of being a part of my Stampin’ Up! family is having access to wonderful resources like these that you can use and share.  Thank you, Gail Emmons, and my SU friends for sharing these fabulous creations with me.  Would you love more ideas, resources, free stamps, and discounts?  You can join the fun for just $99 and receive $125 in products with no shipping fees and gain immediate access to new ideas!

I’m super excited about some new crafting inspiration that I have received from my group that I will be sharing with you in the next couple of weeks.  Some of these new ideas will be exclusive to newsletter subscribers so if you are not already on that list, subscribe now.

I love the new catalog and the new color collections.  I hope these resources above help you get organized and enjoy your Stampin’ Up! crafting adventures even more!

Enjoy!  Julie

craft room tour - organize and craft storage

Organize and Store Your Crafts: A Craft Room Video Tour

craft room tour - organize and craft storage

I did some cleaning and so I decided to let you in for a virtual tour!  You’ll find the video below where I show how I organize and store my crafts supplies.  I’ll show you how I store my paper, punches, dies, glitter, scissors, pens, adhesive, stamp pads and more.  Do you have a specific question?  Leave a comment and I’ll be happy to answer.

I haven’t done too much to the space yet to make it inviting.  You’ll notice color swatches all over the chest of drawers.  I’m trying to decide what color to paint it.  I do love the bird painting that I painted and hung last year.  And I have found some fun odds and ends to liven things up.

craft room tour - organize and craft storage Here’s my work station, with paper, die, adhesive, embossing powders and stamp storage on the right.  On the left is my tool table and my chest of drawers where I store my punches, glitter and other odds and ends.

craft room tour - organize and craft storage I hope you enjoy this tour of my space.

Earn a FREE Sale-A-Bration product with every $50 in merchandise you order!

Click here for the complete list of SAB products!

Wish you could all come over and we could have a party playing in my stamping playground!  I’m loving having my area cleaned up.  You would not believe the mess I had made over the past month!!  Can’t let that happen again, for sure.  🙂

I hope you will find inspiration and ideas to organize and store your crafts and stamping supplies.

Enjoy!  Julie

craft room storage and organization

Craft Room Storage & Organization

craft room storage and organization

When it comes to craft & stamping room organization, I am ALL about having things at my finger tips.  I don’t want to waste time digging around trying to find what I need or filing through complicated systems getting my supplies out for a project.  Keeping things accessible makes it easier to clean up also.  (The picture above is of the right side of my U-shaped crafting area, the center of which is my desk.)

Everyone has a little different philosophy.  Some people need everything out of sight, but I’m in my happy place if my crafty stuff is visible and organized.  On my Stamping Julie facebook page I’ve been posting specific pictures with storage solutions, so I won’t duplicate that here, but I do want to talk about strategies.

stamping office

Last year I moved from my home in Texas with this great office (see all my stamp sets in the cabinets!) to Kentucky.  We have an office in our KY home also, but my husband is using it for his work, so I’ve taken over a room in the basement with a beautiful view of the rolling hills in our neighborhood!

The challenge was to move from having built-in cabinets to setting up a similar storage solution without them.  I decided I would use what I have, shelves, dressers, etc. and eventually I would install some cabinetry in my new space.

So here’s my organization strategy:

  1. Determine what you use all the time:  ink, paper, stamps, adhesive, etc., and place those things on your desk or right next to you in your primary space.
  2. Determine what you use second most often: favorite embellishments and tools, and place those in your secondary space, close, but not as close as your primary space.  Shelves or drawers or containers nearby.
  3. Determine what you use least, other embellishments, extra supplies and tools.  These item can go in less accessible storage areas.  Top or bottom drawers or shelves.
  4. Determine what you don’t use at all and eliminate it!!!  No, seriously, if you haven’t used it in six months give it or sell it to someone who will use it.  Keep only the stuff you need, use or love!!!
  5. Contain everything!  Everything should have a place and be contained in a box, on a shelf, in a drawer, in a container.
  6. Every few months reassess!  Take a good look at the items in your primary and secondary spaces and determine if they still deserve their place.

For many years, I crafted without a dedicated space.   I kept my supplies in covered tubs and when I was ready to create, I transported the crate from my closet to the dining room table.

I wish I had a picture of my 17 yo son’s room.  I’ve tried to teach him space and organization principles to no avail.  He has a game wheel, that he has had for two years and he has NEVER used, that sits on the floor in his otherwise clean room in a box!  I say, “Get rid of it.  You don’t use it, you don’t need it! And it is taking up prime space!  At the very least put it on the very top shelf of the closet.”  Of course, after my little lesson in organization and space planning, the game wheel has been moved to the top of his closet – NOT!

Visit Stamping Julie on Facebook and let me know about your craft spaces and organization problems and solutions.  Here’s to your success with organizing your craft and stamping space!!

Enjoy, Julie

Recycle and Store Your Paper

Don’t you hate cutting into a new piece of cardstock or pattern paper If you’ve been crafting for very long, you’ve probably discovered how to conserve your paper by cutting near the edges and consolidating your cuts in one area to preserve the largest spaces possible for later.

Do you cringe like I do when I child cuts out a shape right in the middle of the page?  Yikes!!  No one likes to be wasteful, but sometimes you just have to let kids be kids so they can express their creativity.

Have you found the best way to store your paper and scraps?  I have used file folders for years.  It works for me because it allows me to pull the colors I want and transport them quickly and easily to my desk, to a craft night, or to another work surface.  And all my scraps for that color are easily contained.  I’ve seen many other options but nothing I like better.


How do you use your partial sheets or scraps?  Don’t throw away your scraps!  The possibilities are endless.  Sometimes a particular scrap can inspire a whole project design!  Scraps are great for creating card layers, punching shapes and adding gemetric designs to your creations.  And here’s a  tip :  if your scrap is too small to hold onto when you’re using a punch, temporarily adhere a strip of paper to it to use as a handle.

How do you store your pattern paper?  I cut a slit across the top of my designer series paper packages and store my paper and paper scraps in their packages.  I love that the designs in a package go together so well and I want to keep them together.  Then I place them in paper holders divided by color group: subtle, brights, regal, and neutral.  For example, Summer Smooches Designer Series Paper shown above would go under brights.

  Have a particular storage issue?  I can help you explore ideas.  Call or write me today.  I hope this has helped you consider the best ways to conserve and store your paper for better crafting and more creativity!