Tagged: clean & simple

Clean and Simple Secret Garden Flower Dies Stamping

bloomin' marvelous secret garden card

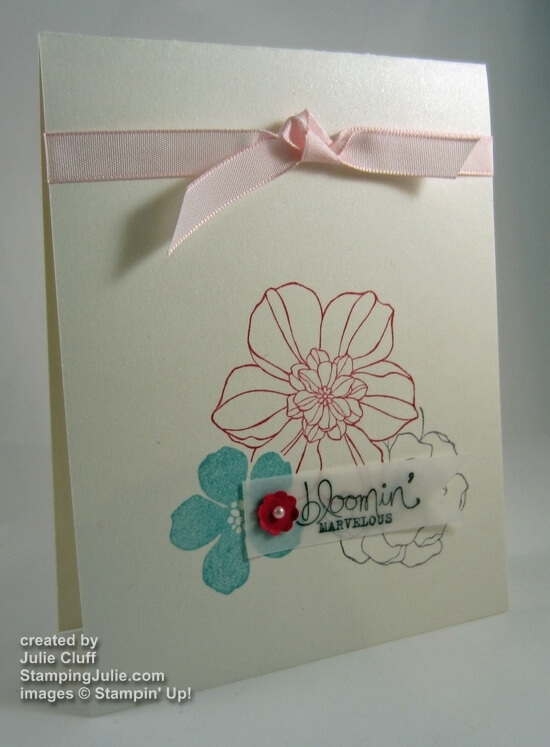
More clean and simple collage stamping in this greeting card created with the Stampin’ Up! Secret Garden stamp and flowers die bundle and the FREE Bloomin’ Marvelous set available during Sale-a-bration with a $50 product purchase.

I stamped this on yummy Shimmery White cardstock.  It’s hard to photograph but if you look closely, you can see the shimmer!  And using the framelit dies made masking and layering these flowers super easy.  (You can watch the video below to see how!)

bloomin' marvelous secret garden card flag

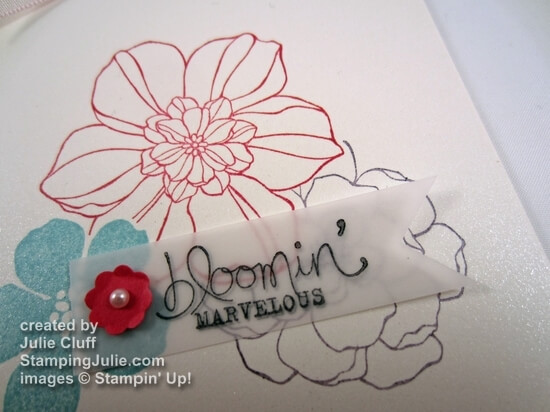
I tried stamping the black sentiment directly over the flowers, but it didn’t show up the way I liked so I stamped it on a piece of vellum to layer over the top.  Using the vellum allowed the thought to stand out more without completely covering the flower design.  A perfect solution!

Here is the Card Recipe:
(All supplies from Stampin’ Up! Click on the link to visit my store for product pictures, details & ordering.)
SAB: Bloomin’ Marvelous wood-mount #129651 clear-mount #129654
Stamps: Secret Garden stamp and framelit die bundle wood-mount #129141 clear-mount #129144,
Ink: Baja Breeze #126960, Elegant Eggplant #126969, Melon Mambo #126948, Black StazOn #101406
Cardstock: Shimmery White #101910, Vellum #101856, Melon Mambo #115320
Extras: Itty Bitty Shapes Punch Pack #118309,  Pearls #119247, Pink Pirouette Taffeta Ribbon #122981, Glue Dots #103683

And here’s the video to show you how to quickly make this card using the flower framelit dies to mask!

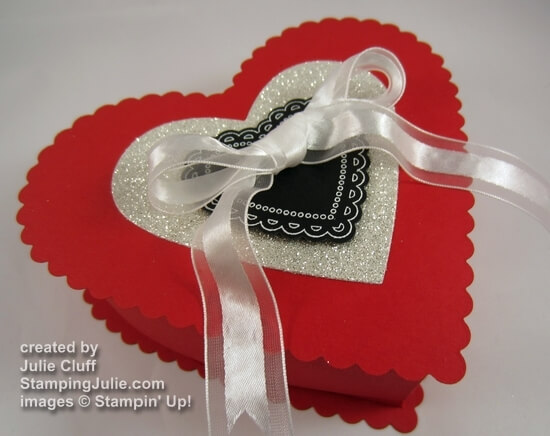
A SPECIAL OFFER FROM JULIE CLUFF @ STAMPINGJULIE.COM:  I’m excited to offer a FREE online class to anyone placing a qualifying Sale-a-bration order in January!  So that means in addition to receiving FREE Sale-a-bration goodies , you’ll also receive this exclusive online Heart Box class.

hearts a flutter heart box

Click here to place your Sale-a-bration order today.

I hope you enjoyed this clean and simple Bloomin’ Marvelous Secret Garden card and tutorial on masking with the flowers die from the Secret Garden bundle.

Enjoy!  Julie

Cross My Heart Valentine Card and Video

cross my heart pink & black card

 I love the crossword puzzle look in the Cross My Heart stamp and was anxious to make a simple valentine card with the I love you puzzle and the adorable little elephants!

Here’s another Valentine card video tutorial!  (If you can’t see the video in your email or feed, just click to the post to view.)  A few years ago our dog chewed up the end of my heat tool, but the darn thing keeps working so I keep using it.  I need it to stop working because I need a good excuse to buy the new heat tool, which is AWESOME.

Using the heart from the More Amore Specialty Designer Series Paper made this project extra special and easy.

cross my heart pink & black card close up

And embossing the I Love You on the Pink Pirouette cardstock gives it a crisp, clean look.

Here is the Card Recipe:
(All supplies from Stampin’ Up! Click on the link to visit my store for product pictures, details & ordering.)
Stamps: Cross My Heart wood-mount #126580 clear-mount #126582
Ink: Pink Pirouette #126956, Basic Black Craft #102192
Paper: Pink Pirouette cardstock #111351, More Amore Designer Series Paper #129309
Extras: Black Embossing Powder #109133, Black Polka Dot Scallop Ribbon #124145

  cross my heart pink & black card detail_resize_wm

SPECIAL OFFER FROM JULIE CLUFF @ STAMPINGJULIE.COM:  I’m excited to offer a FREE online class to anyone placing a qualifying Sale-a-bration order in January!  So that means in addition to receiving FREE Sale-a-bration goodies , you’ll also receive this exclusive online Heart Box class.

hearts a flutter heart box

Click here to place your Sale-a-bration order today.

I hope you enjoyed learning how to make this simple Cross My Heart Valentine Card.

Enjoy, Julie

Hearts a Flutter Valentine Note Card & Video

hearts a flutter seasonal sayings note card

I decided to have a little fun making valentines with the Hearts A Flutter stamps and die bundle and the Stampin’ Up! note cards and envelopes.  This Valentines note card is made  in the collage style with In-Colors Primrose Petals, Summer Starfruit and Pool Party with a little Basic Gray for a hip color palette.

stampin' up! hearts a flutter bundle

The note cards and envelopes come in a pack of 20 which is perfect for making Valentine cards!  And you can simplify the card by just stamping a heart inside of the larger heart instead of die-cutting the embossed More Amore designer series paper heart to add to the middle.  Set out several cards at once and stamp each step for easy mass production.

hearts a flutter seasonal sayings note card with envelope

I’ve created a video tutorial to show you how to make these cards.  (If you are viewing this in email you will have to go to the post to view the video.)  And be sure to read to the bottom for a special Sale-A-Bration offer exclusive to Stamping Julie customers.

And here is the Card Recipe:
(All supplies from Stampin’ Up! Click on the link to visit my store for product pictures, details & ordering.)
Stamps: Hearts a Flutter Stamps & Framelit Dies Bundle wood-mount #131098 clear-mount #131097, Seasonal Sayings wood-mount #128006 clear-mount #128009
Paper: Note Cards & Envelopes #107311, More Amore Designer Series Paper #129309
Ink: Summer Starfruit #126991, Primrose Petals #126858, Pool Party #126982, Basic Gray #126981
Extras: Big Shot Die-cutting Machine #113439, Pool Party Embossing Powder #129398, Rhinestones #119246

SPECIAL OFFER FROM JULIE CLUFF @ STAMPINGJULIE.COM:  I’m excited to offer a FREE online class to anyone placing a qualifying Sale-a-bration order in January!  So that means in addition to receiving FREE Sale-a-bration goodies , you’ll also receive this exclusive online Heart Box class.

hearts a flutter heart box

  Click here to place your Sale-a-bration order today.

Be sure and leave a comment if you enjoyed learning how to make a Valentine note card with the Hearts a Flutter stamps set and framelit dies.

Enjoy, Julie

for the birds marina daffodil thank you card

For the Birds Thank You Card

for the birds marina daffodil thank you card

TOMORROW IS THE BIG DAY!  THE START OF SALE-A-BRATION 2013!

In the meantime, here’s a simple thank you card created with the Stampin’ Up! For the Birds stamp set.  I started with a card base of Natural White cardstock.

for the birds marina daffodil thank you card close up

I stamped the birds with black StazOn in and watercolored them with the aquapainter and various ink refills.  As usual, I didn’t try for perfection which I think is what makes watercoloring so charming!  Can you see the Crystal Effects added to the heart?

The bird tag was punched out with the Decorative Label Punch and lifted off the card with dimensionals.  It’s easy to pierce the paper to perfection with the Essentials Paper-Piercing Pack, Tool and Mat. The thank you is from the Embellished Events stamp set.

for the birds marina daffodil thank you card detail

Paper scoring is super quick and easy with the Simply Scored Scoring Tool. I added the Marina Mist cardstock panel after adding the punched scallop border, the scoring and the paper piercing.

The ribbon is tied from the Daffodil Delight Stitched Grosgrain Ribbon. This months newsletter included tips to tie the perfect bow!  Be sure and subscribe today to get your copy.

for the birds thank you card Originally when I made his card I placed the bow in the middle but I decided later I didn’t like it there.  Because I had created a separate bow and adhered it with a glue dot, I just gently eased if off and moved it where I wanted it.  I’m so much happier with the bow on the left!  What do you think?


GET EXCITED! SALE-A-BRATION BEGINS TOMORROW!  Check back tomorrow for all the particulars!

Enjoy, Julie

for the birds marina daffodil thank you card ribbon

Card Recipe:
Stamps: For the Birds wood-mount #126405 clear-mount #126407, Embellished Events  wood-mount #126495 clear-mount #126497
Ink: Black Staz-On #101406
Paper: Marina Mist cardstock #119682, Natural White cardstock#102316
Extras: Simply Scored Scoring Tool #122334, Essentials Paper Piercing Mat #126187, Decorative Label Punch #120907, Scallop Edge Border Punch #119882, Daffodil Delight Stitched Grosgrain Ribbon #126872, Crystal Effects #101055, Aqua Painter #103954
blue ribbon birthday card

Blue Ribbon Birthday Card

blue ribbon birthday card

My son-in-law’s birthday is this week and this is the happy birthday card that is going out to him.  And since I doubt he’s a regular reader of my blog, I’m sharing it with you early!

The Blue Ribbon stamp set does all the work for you!  It’s a large stamp with lots of versatility, and it’s easy to use with all the coordinating punches available.  This stamp set makes a wonderful birthday, graduation or congratulations card.

blue ribbon birthday card detail

To create the ribbon, you’ll stamp three pieces: two of the ribbon in Not Quite Navy and one of the center message in Cherry Cobbler.  You’ll punch the top of one ribbon out with the 2-3/8″ Scallop Circle Punch and you’ll snip the tail of the second ribbon leaving a little extra of the top to use when you adhere ribbon together.  Then attach the Cherry Cobbler “happy birthday” message in the center with a dimensional.

blue ribbon birthday card

To create the card base, you’ll start with Wild Wasabi cardstock.  Then layer Chocolate Chip, Cherry Cobbler and Not Quite Navy cardstock strips across the Tasteful Trims Bigz Die and run them through the Big Shot all at once.   I used strips that were about 3″ x 8″.  You’ll want them longer than the card base so you can place them on the card the way you want them.

Lay the wavy cardstock across the card the way you want it and add Multipurpose Liquid Glue to the back of the first strip, then the next and finally the last.  Adhere a strip of zigzag Wild Wasabi cardstock across the middle.

 Now you’ll have what looks like a mess with all the wavy strips hanging off the sides!  Open up your card and trim off the excess from the back with your Paper Snips.  Place your ribbon on the front with Stampin’ Dimensionals and your done!

VIEW VALENTINE SPECIALS!

CHECK OUT THE BEAUTIFUL NEW SPRING CATALOG!   I think you’ll love the beautiful colors, images and ideas in the brand new Spring catalog.

Click Here to Order your Stampin’ Supplies

Click Here for Fun, Easy Digital Scrapbooking 

 Enjoy!  Julie

blue ribbon birthday card

Card Recipe:
Stamps: Blue Ribbon wood-mount #125979, clear-mount #125981
Ink: Cherry Cobbler #126966, Not Quite Navy #126971
Paper: Not Quite Navy cardstock #101722, Cherry Cobbler cardstock #119685, Chocolate Chip cardstock #102128, Wild Wasabi cardstock #108641,  Whisper White cardstock #100730
Extras: Big Shot Die-cutting Machine #113439, Tasteful Trim Bigz XL Die #120893, 2-3/8″ Scallop Circle Punch #118874, 1-1/4″ Circle Punch #119861, Paper Snips #103579, Multipurpose Liquid Glue #110755