Tagged: masculine card

summer silhouettes congratulations graduation card

Congratulations on Your Graduation!

summer silhouettes congratulations graduation card

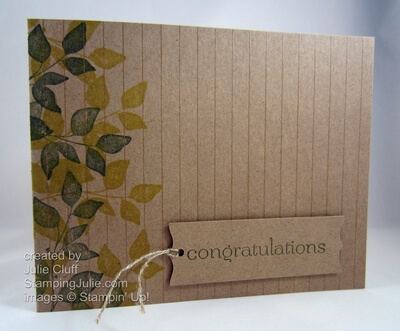
My son-in-law Chris recently graduated from college!  A fantastic accomplishment, and we are so happy for him and his family!  This is the card that I created to acknowledge this great achievement.  I kept it masculine with earthy colors and images.

To create this masculine congratulations card, I started with a card base of Natural Composition Specialty paper cut 4-1/4″ x 11″ and scored at 5-1/2″.  The Natural Composition dsp has a cardstock weight so it’s perfect for a card base.  I paid special attention to the orientation of the embossed lines of this paper before I trimmed the card base out.

summer silhouettes congratulations graduation card leaves

The leaves stamp is from the Summer Silhouettes stamp set and I stamped the left side first in Summer Starfruit and then in Always Artichoke.

summer silhouettes congratulations graduation card tag

I used the strip of paper left over from cutting out the card base to create this tag.  I stamped “congratulations” from  the Sweet Sentiments stamp set on the backside of the embossed paper and then punched the ends of the tag with the Curly Label punch.  I added a bit of Linen Thread to the tag before adhering it to the card base with dimensionals.

summer silhouettes congratulations graduation card above

CHECK OUT THE BEAUTIFUL NEW SPRING CATALOG!   I think you’ll love the beautiful colors, images and ideas in the brand new Spring catalog. 

Click Here to Order your Stampin’ Supplies

Click Here for Fun, Easy Digital Scrapbooking 

Enjoy,  Julie

summer silhouettes congratulations graduation card
Card Recipe:
Stamps: Summer Silhouettes wood-mount #126445 clear-mount #125447
Ink: Summer Starfruit #126991, Always Artichoke #126972
Paper: Natural Composition Specialty dsp #126917
Extras: Linen Thread #104199, Curly Label Punch #119851, Stampin’ Dimensionals #104430
 
summer silhouettes stamp set
 
Wacky Wishes Birthday

A Wacky Wishes Happy Birthday

Wacky Wishes Birthday Yesterday we celebrated our son Dallin’s birthday.  I created this one-layer, clean & simple collage card with Stampin’ Up! stamps from Circle Circus  and Wacky Wishes to wish him a happy, happy birthday!  We celebrated at P F Chang’s, his birthday dinner choice.  (Pictures will be added to facebook later today.)

So how did I create this one-layer card?  First I tore a piece of paper to act as a mask.  I placed the torn mask to cover the bottom third of the card and sponged the top third with Baja Breeze ink.  Then, leaving the mask in place, I stamped various circles from in Baja Breeze, Lucky Limeade, More Mustard, and Island Indigo.  The creative color palette came from the Color Coach!

Wacky Wishes Birthday detail Finally I lifted the mask and stamped ‘Happy Birthday’ from the Wacky Wishes stamp set in Island Indigo.   Then I wrapped Island Indigo Bakers Twine around the card three times and tied it in a knot.  I really wanted to tie it in a bow but decided the knot would be more masculine.

THE WACKY WISHES STAMP SET IS A STAMPIN’ REWARD SET. What does that mean?  When you host a party you can receive hostess benefits including exclusive hostess sets that are specially priced.  BUT you don’t have to host a conventional party to receive these rewards.  Any time your order reaches $150 or more in product you can select at least $25 worth of FREE product including exclusive hostess sets.  Click here to view Stampin’ Rewards.

Wacky Wishes Birthday with envelope

I like to make the envelope extra special so the recipient can anticipate what’s inside.  By slipping a piece of scrap paper under the flap I was able to stamp this circle in Lucky Limeade to imitate the design on the card.  I find that stamping on the flap is always an easy envelope solution.

Being a 21-year-old young man, he ripped into the envelope like TNT and all the pretty decorating was demolished, but it’s the thought that counts, right?

personal stamp mom On the back of his card I stamped my personalized stamp with Lucky Limeade and then added some mom personlization with a Lucky Limeade marker.

DIGITAL DOWNLOADS 50% OFF AND FREE DOWNLOADS AVAILABLE NOW UNTIL NOV. 5TH.  Click here to order.

Click Here to Order your Stampin’ Supplies!

Click Here for Fun, Easy Digital Scrapbooking! 

Like us on Facebook

Follow on Twitter

Enjoy,  Julie

Wacky Wishes Birthday close up with envy

Card Recipe: 
Stamps:  Circle Circus w-#115778 c-#127784, Wacky Wishes (stampin’ reward) w-#126410 c-#126412
Ink: Baja Breeze #126960, Lucky Limeade #126984, More Mustard #126964, Island Indigo #126986
Paper:   Whisper White #100730
Extras: Stampin’ Sponges #101610, Island Indigo Bakers Twine #125575
lovely as a tree fathers day

Lovely As A Tree Happy Father’s Day!

lovely as a tree fathers day Celebrating Fathers today with this Lovely As A Tree card.  I really enjoyed creating this card for my good husband who will receive it tomorrow.  Shhhh – don’t spoil the surprise!

I got very creative with this card and used lots of different techniques.  I scored a diagonal plaid design  on the  Gumball Green card base with my Scoring Tool every 1/2″, then sponged it with Gumball Green to emphasize it even more.

lovely as a tree fathers day detail

The trees stamp was inked with versamark and then Gumball Green.  Before I stamped in on the Whisper White card stock, working quickly, I used the paint brush end of the Garden Green marker to add some darker areas in the trees by tapping the stamp and I used the paint brush end of the Early Espresso marker to paint the tree trunks a deep brown. Can you see the color variations in the picture above?

lovely as a tree fathers day close up

The reason I inked up with versamark first was to keep my ink moist long enough to add clear embossing powder to heat emboss.  I wish you could see the raised embossed image.  Because I embossed the trees, the background can now be brayered with ink without damaging the stamped image.

Using torn post it notes to mask the sky line, I brayered the green grass.  Then I brayered the sky after removing the mask.

lovely as a tree fathers day envelope

You can also see the leaf stamped in Gumball Green on the front of the Crumb Cake envelope.

lovely as a tree fathers day 2 By punching a circle out of a large post-it note you can mask the sky to sponge a bright sun in.  Then cover the sun with a circle post-it note before brayering the sky.

Card Recipe:
Stamps:  Lovely As A Tree w-#115026 c-#127793, Teeny Tiny Wishes w-#115370, c-#127802
Ink for Trees:   Gumball Green#126861,  Garden Green marker #119701, Early Espresso marker #119680
Ink for Grass: Wild Wasabi #126959, Always Artichoke #126972, Early Espresso #126974(sentiment)
Ink for Sky: Dafodil Delight #126944 (sun), Baja Breeze #126960, Bashful Blue #126961
Ink for card base: Gumball Green #126861
Paper: Whisper White #100730, Early Espresso #119686, Gumball Green #126840
Extras: Natural Designer Buttons #127554, Linen Thread #104199, Glue Dots #103683, Top Note Die #113463, Big Shot Die-Cutting Machine #113439, Clear Stampin Emboss Powder #109130, Simply Scored Scoring Tool# 122334, Diagonal Scoring Plate #125586, Brayer #102395, Stamping Sponge #101610
 

 Enjoy! Julie


Stampin’ Up! Sale-a-bration Congratulations

I created this masculine congratulations card with the Sale-a-bration set Sprinkled Expressions.  This color combo and layout were inspired by samples in the Stampin’ Up! Idea Book and Catalog.

I like the color on color here with the stars stamped in Not Quite Navy ink on Not Quite Navy card stock and then layered on a larger square of the same color.  Dimensionals to elevate the stamped cardstock makes this layering work!  (Dimensionals are double-sided adhesive foam dots.)  Also, “You did it!” is used for the background and the focal point.

When punching out the focal point, remember to stamp first and then turn your punch over so you can see the placement of your stamping in the punch ‘window’.  This makes for accurate stamping every time.  And Paper Snips, Stampin’ Up!’s thin-bladed scissors, make it really easy to cut out the highlighted words.

Card Recipe:
Stamps:  Sale-a-bration Sprinkled Expressions
Paper:  Old Olive cs, Not Quite Navy cs, Baja Breeze cs
Ink:  Old Olive, Not Quite Navy
Accessories:  Dimensionals, Old Olive Ribbon, Neutrals Brads
Tools:  Curly Label Punch, Paper Snips

This Sale-a-bration Sprinkled Expressions masculine card was inspired by the Stampin’ Up! Idea Book and Catalog, and you may be looking for inspiration too, so contact me today for your copy.

Enjoy!
Julie