Tagged: punches

Scallop Ruffle Christmas Tree Card

Pennant Ruffle Christmas Tree Card

Scallop Ruffle Christmas Tree Card

This Ruffle tree card is really a lot easier to do than it appears.  I started with a Whisper White pennant cut from the Perfect Pennant Bigz Die with the Big Shot Die-cutting Machine.  Then I cut 12” strips of Be of Good Cheer Designer Series Paper and punched the strips with the Scallop Edge Border Punch.

I started adhering the strips to the bottom of the tree with the first scallop ruffle hanging over the edge.  I roughly clipped the strip and layered the next ruffle, alternating between the different patterns.   When the entire pennant was covered I turned it over and using the pennant as a guide, I used the Paper Snips to trim the edges creating the tree shape.

Scallop Ruffle Christmas Tree Card ruffle

I popped the tree up on dimensionals and added a trunk with a bit of the same paper.  The star was punched from Silver Glimmer Paper, but I thought the silver didn’t really match as well as I’d like so I colored the star with a So Saffron marker to add a little antiquing which matched the Very Vanilla color scheme better.    I find that using Multipurpose Liquid Glue is very effective in securing the Glimmer Paper.

A little touch of Crochet Trim and Vintage Trinket brad finishes the design.

Click Here to Order your Stampin’ Supplies

Click Here for Fun, Easy Digital Scrapbooking 

Enjoy, Julie

Scallop Ruffle Christmas Tree Card close up

Card Recipe:
Paper:  Be of Good Cheer Designer Series Paper #126896, Cherry Cobbler cardstock #119685, Silver Glimmer paper #124005, Whisper White cardstock #100730
Extras: Perfect Pennant Bigz Die #123126, Big Shot Die-cutting Machine #113439, Crochet Trim #118481, Vintage Trinkets #118764, Merry Minis Punch Pack #126882
punch art dancing santa

Stampin’ Up! Rockin’ Santas

punch art dancing santa

While playing with paper and punches, I made a couple of stand-up Rockin’ Santas.  Both were created with the same face that I used for the
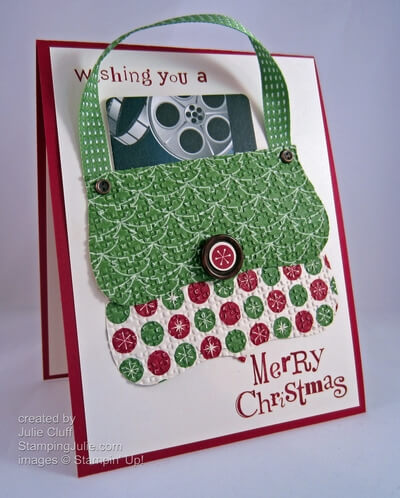
 Santa petite purse .  You can click here to see the supply list and the video tutorial for the Santa purse.  I added bodies to these Santa faces to create the stand-up Santa.

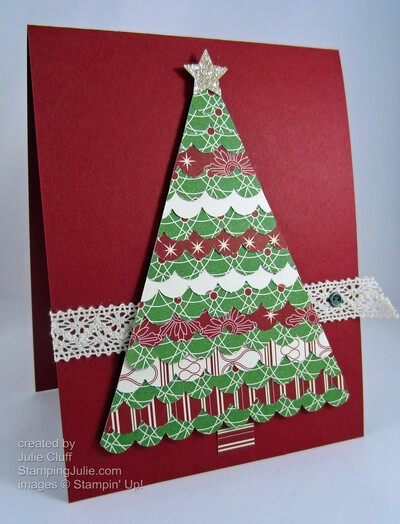
Doesn’t he just look like he is dancing?  What dance would that be?!?  On this Santa I used the Pennant Die and the Big Shot Die-cutting Machine to make the body.  I created the arms with the Curly Label punch and a circle punch.  First I punched the label then I fed the punched label back into the punch and punched the inside of the arm.  I used the circle punch to trim off the points and create the wrist.  I made the hands with the smallest blossom from the Boho Blossom punch, then trimmed off the extra petals.

His Santa suit has pearl buttons colored with a Black Sharpie, with a strip of Basic Black cardstock for his belt and a Mini Label punched belt buckle.  To create the belt buckle, punch the circle from Silver Glimmer Paper with the circle punch from Itty Bitty Shapes Punch Pack, then center the circle in the Mini Label punch and punch it out and attach it to the belt with Multipurpose Liquid Glue.

punch art dancing santa back

The back is layered with the same pieces.  The bent paper clip legs were adhered and sandwiched between the front and the back.  You can use glue dots for quick results, but I used crystal effects for lasting staying power.  His feet were then taped down on to a white scallop circle base.  It would be fun to have a rocking wood block to pin him down to and then he’ll really rock out!

Stampin' Up! punch art rocking santa

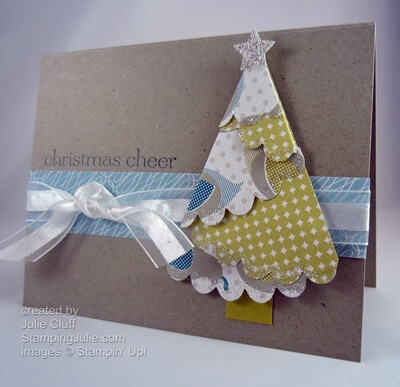
This Rockin’ Santa has a Scallop Circle body with a simple Basic Black belt and a small circle buckle punched from the Silver Glimmer paper.  His hands were also trimmed from the smallest blossom from the Boho Blossom punch.

Again the back is layered with a matching scallop circle with the paper clip legs sandwiched and cemented into place with Crystal Effects.  The feet were taped to the back of a Hershey Nugget so he’ll rock.  Gentle rocking is needed though as he will topple if you get too carried away!!

earn free stamp pads

REMEMBER: 2-WAYS TO GET A SET OF STAMP PADS (a$49.95 value) FOR FREE!  1. Place an order or host a workshop of $450 or more. OR 2. Join my team of stamping friends for just $99 and enjoy all the benefits of membership.  (Offer available now until December 16th.)

Holiday Packaging Bundles

HOLIDAY PACKAGING BUNDLES ARE NOW AVAILABLE AT A DISCOUNT.  How about super cute holiday packaging all ready to go?!?!  The only thing you have to worry about is what to put in it!   Order now so you’ll be ready.

Available November 29-January 2.

Trimmings & Tags Bundle #132769 $13.50 (a $16.85 value) Includes

  • Gusseted Cellophane Bags (25 bags; 5″ x 3″ x 11-1/2″)
  • Snow Festival Designer Printed Tags (25 double-sided tags; 4-1/2″ x 3-1/8″)
  • Cherry Cobbler 1/4″ Sweater Trim (10 yards)

Petite Treats Bundle #132770 $13.50 (a $16.85 value) Includes

  • Glassine Bags with die-cut edges (10 bags; 3″ x 5″ x 1-1/2″)
  • Handmade Holidays Stitched Felt (8 pieces)
  • Gumball Green 3/8″ Stitched Satin Ribbon (10 yards)

Click Here to Order your Stamping Supplies!

Enjoy, Julie

Sweet Essentials Folded Christmas Tree Card

Folded Christmas Tree Card

Sweet Essentials Folded Christmas Tree Card

I made this folded Christmas tree card with non-Christmas paper in non-traditional colors.  🙂  It’s a very simple card.  The folded tree is made the same way as the folded Christmas tree gift card I showed you last month.  This tree was made with a larger, scallop circle and I added a bit to make it symmetrical.

Here’s a video on folding the Christmas tree and creating the folded scallop tree.  Click here or here http://youtu.be/OG-cZTbYXC4 to view it.

I started with the Scallop Circle Bigz Die and the Big Shot Die-cutting Machine to create the large circle out of Birds of a Feather Designer Series Paper.   Stampin’ Up!’s double-sided paper is perfect for this folded tree.  A bit of glitter was added to the scallops with 2-way Glue and Dazzling Diamonds glitter.  Grab some paper and just follow the directions on the video to make your trees!

(The links to the picture and description of the products I used on this card are at the bottom of this post.)

Sweet Essentials Folded Christmas Tree Card detail

The card base is Crumb Cake cardstock and the sentiment from the Sweet Essentials stamp set was stamped in matching Island Indigo ink.  I tied a knot of satin ribbon around the middle, added the tree with dimensionals behind it, adhered the Silver Glimmer star and a bit of matching Summer Starfruit cardstock for the tree base.

Click here to check out the latest Stampin’ Up! products.

Let's Be Jolly Christmas frameable digital download template

Click here for new digital downloads including this Let’s Be Jolly Frameable and Christmas postcard digital template.

Click Here to Order your Stampin’ Supplies

Click Here for Fun, Easy Digital Scrapbooking 

Enjoy!  Julie

Sweet Essentials Folded Christmas Tree Card close up

 Card Recipe:
Stamps: Sweet Essentials w-#126455 c-#126457
Ink: Island Indigo #126986
Paper: Birds of a Feather Designer Series Paper #126899, Crumb Cake cardstock #120953, Summer Starfruit cardstock #126839, Silver Glimmer Paper #124005
Extras: Scallop Circle Bigz Die #113468,  Big Shot Die-cutting Machine #113439, Merry Minis Punch Pack #126882, 2-way Glue #100425, Dazzling Diamonds #124117, Organza Ribbon #114319
Embellished Events Elf Shoes Card

A Top Note Elf Shoes Christmas Card

Embellished Events Elf Shoes Card Top Note elf shoes Christmas card – love it!!!  Once again I was inspired by a post on an upline business blog.  And I created a video tutorial to show you how to create your own elf shoes Christmas card.  Or create these whimsical shoes and put them upside down on sticks to place in a center piece or candy jar.

The complete supply list is at the end of this post with links to the product descriptions and pictures.  I started with Gumball Green cardstock that I die-cut with the Top Note  Bigz Die and the Big Shot Die-cutting Machine.  The die is then cut in half from point to point and then each half is cut in half again at the point.

Embellished Events Elf Shoes Card detail

I used the 1-3/8″ and 1″ circle punches to create the shoe.  And the 1-1/4″ scallop and 1″ circle punches to create the cuff.  The balls on the toes are 3/4″ circles and the striped stocking legs measure 3/4″ x 3-1/2″.    Just follow along with the video to learn how to use these tools to create this card.

Click here to view the video. 

Click Here to Order your Stamping Supplies!

Enjoy!  Julie

Embellished Events Elf Shoes Card close up

Card Recipe:
Stamps: Embellished Events w-#126495 c-#126497
Ink: Real Red #126949
Paper: Be of Good Cheer Designer Series Paper #126896, Gumball Green cardstock #126840, Whisper White cardstock #100730, Real Red cardstock #102482, Red Glimmer Paper #121790
Punches: 3/4″ Circle #119873, 1″ Circle #119868, 1-3/8″ Circle #119860, 1-1/4″ Scallop Circle #127811, Word Window #119857, Modern Label #119849
Extras: Top Note Bigz Die #113463, Big Shot Die-cutting Machine #113439, Square Lattice Embossing Folder #119976, Petals-a-Plenty Embossing Folder #116824, White Bakers Twine #124262

Shared with The Shabby Nest

Top Note Gift Card Purse with card

Stampin’ Up! Top Note Gift Card Purse

Top Note Gift Card Purse with card

I love Stampin’ Up! Big Shot dies!  And the Top Note Bigz Die is so versatile.  I used it here to create this adorable purse and tucked a gift card in the top.  Using dies allows me to make complicated-looking projects in a snap.  I created the purse by die-cutting Be of Good Cheer holiday paper in my Big Shot Die-cutting Machine with the Top Note die and then folding it down the top.  With a couple of quick snips the purse was complete.  Stay tuned this week for a video tutorial on making this cute purse.

Here it is without the gift card:

Top Note Gift Card Purse

One of the many advantages of being a Stampin’ Up! demonstrator is having access to exclusive ideas provided by my upline which is where I got this cute purse idea.  Now is a great time to become a demonstrator – whether it’s just to enjoy the discount and exclusive content or  to start your own business – and receive a full set of stamp pads (10!) absolutely FREE.  And you create your own starter kit too!

earn free stamp pads

REMEMBER: 2-WAYS TO GET A SET OF STAMP PADS (a$49.95 value) FOR FREE!  1. Place an order or host a workshop of $450 or more. OR 2. Join my team of stamping friends for just $99 and enjoy all the benefits of membership.  (Offer available now until December 16th.)

Enjoy!  Julie

Top Note Gift Card Purse detail

Card Recipe:
Stamps: Wacky Wishes (hostess set) w-#126410, c-#126412
Ink: Cherry Cobbler #126966
Paper:  Be of Good Cheer #126896, Cherry Cobbler cardstock #119685, Very Vanilla cardstock #101650
Extras: Top Note Bigz Die #113463, Big Shot Die-cutting Machine #113439, Naturals Buttons #127554, Vintage Trinkets #118764,  Gumball Green Stitched Satin Ribbon #126848
(click on links for full product description and picture)