Tagged: heat embossing

happy memorial day!

Happy Memorial Day!

happy memorial day!

We give thanks today in the USA for the many veterans who sacrificed to make our country free!

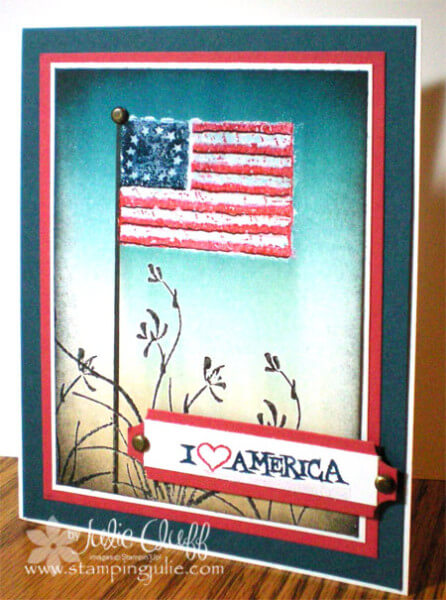
I made this patriotic greeting card four years ago to celebrate Independence Day, but I thought of it this morning when I woke up and thought it would be a fun one to share again.

I created this card with retired stamp sets Asian Artistry and Star-Spangled Banner and retired colors Not Quite Navy and Ruby Red.  Here’s what I wrote in 2009 about making this card.  Maybe it will inspire your own patriotic creations:

“The Asian Artistry ‘grasses’ were stamped in black craft ink and embossed with clear ep. Then I used Ruby Red and Not Quite Navy markers to color this flag from Star-Spangled Banner (retired SU) and stamped it on the whisper white card stock above the grasses.”I used a black pen to underline the red stripes on the flag and added a little white highlights with my white gel pen to add depth. I then colored the whole image with a VersaMarker and embossed with clear ep. I used a black pen and ruler to add the flag poll.

“I brayered starting from the top of the card with Baja Breeze down 3/4 of the card. Then I used Not Quite Navy to brayer the top. From the bottom I brayered Creamy Carmel. The edges were sponged with black stazon. It was then layered on white, Ruby Red and Not Quite Navy cardstock.

“A brad was added to the top of the flag pole. The tag label was made with the tag corner punch with brads added to each end and then the label was attached with dimensionals.”

Enjoy your Memorial Day and remember those who came before us and those who currently serve to protect our liberties!   Julie

Bloomin’ Marvelous CAS Sketch Challenge

bloomin marvelous mixed bunch clean and simple

I love the simple layout of this card created with the Bloomin’ Marvelous and Mixed Bunch stamp set.  I love it so much that I’m excited to have you play along!  Announcing the FIRST EVER StampingJulie CAS challenge linky party (SJCAS001)!  To enter go to the bottom of this post for details and linking instruction.  And have fun!!

StampingJulie CAS sketch challenge linky party

Here’s the sketch.  I purposely did not give you dimensions because I’d prefer you customize your dimensions and have fun with it.  I love sketches because it makes creating soooo much easier if you already have a design in mind.  It’s kind of the ‘complete pancake mix’ of crafting! Instead of ‘just add water’, ‘just add paper’!!  Sometimes I like to just pick up a scrap on my craft table and make it work.  I think some of my best work has started that way.

bloomin marvelous mixed bunch clean and simple

Here’s a close up.  I stamped the background flowers from Bloomin’ Marvelous with versamark on the Basic Gray cardstock and then stamped the sentiment in Black StazOn over that.  To finish the button, because I don’t like buttons without a finish, I added a rhinestone to the top.  A super easy solution to naked buttons!!

bloomin marvelous mixed bunch clean and simple

And here’s another variation.  I used the same More Amore Specialty Designer Series Paper (not just for Valentine’s Day) and the same Primrose Petals stamped and punched flower, then changed up the background paper, the ribbon and used butterflies.

bloomin marvelous mixed bunch clean and simple Can you see that I heat embossed the butterflies on the background?  I also stamped and punched a scallop circle to layer under the button.

Here’s the card recipe:
FREE exclusive Sale-a-bration items with qualifying order: Bloomin’ Marvelous stamp set & Sycamore Street Designer Series Paper (SAB supplies are free with a $50 product purchase.  All supplies are from Stampin’ Up! Click on the links below for product details & ordering.)
 
Mixed Bunch Bundle: Order the Mixed Bunch clear-mount stamp set, Acrylic Block ‘D’, Blossom Punch, Dimensionals AND choose 1 FREE Sale-a-bration item.  (Substitutions can be made. Order must total $50 or more in product to qualify for free SAB item.)

SALE-A-BRATION IS THE PERFECT TIME TO STOCK UP ON YOUR CRAFT SUPPLIES!   Earn free SAB product with every $50 in products you order.  Click here for the complete list of SAB products!   Click here to shop. 

Bloomin' Marvelous stamp set The StampingJulie CAS Sketch challenge is open all week.  (If you don’t have a blog and want to participate, send me your picture and I’ll post it for you. 🙂  And you do not have to use Stampin’ Up! supplies only.)  So feel free to enter more than once.  My goal is to give you inspiration so you can enjoy your time in your craft room: the stress-free zone!

Have fun!  Julie


InLinkz

clean & simple just believe thank you card

Stampin’ Up! Clean & Simple Thank You

clean & simple just believe thank you card

I stamped this simple Thank You card with Stampin’ Up!’s Just Believe stamp set.  The secret ingredient to create this shadow card is the Stamp-A-Ma-Jig which allows you to stamp precisely where you want to.

I started by stamping the center circle in Sahara Sand ink, then, using the Stamp-A-Ma-Jig, I lined up the circles on either side.

clean & simple just believe thank you card close up

I stamped the flowers in Sahara Sand ink first.  Then I inked up the stamp again first with Versamark ink and then with Midnight Muse before stamping slightly to the left of the first using the Stamp-A-Ma-Jig to create the shadow.

I use the Versamark ink first so that I can emboss the image with clear embossing powder.  The Versamark ink keeps the ink wet long enough for the embossing powder to stick so it can then be heated for that great classy, embossed look.

just believe thank you card detail

In this picture above you can really see the embossing.  After I embossed the flowers, I used a Blender Pen and a little Midnight Muse ink from the pad to just touch up a couple of tiny spots where my stamped ink didn’t cover fully.  The blender pen and ink provided great, complete coverage.

And did you notice the rhinestones?  <3    Love, love, love!  I hadn’t planned to use rhinestones, but I couldn’t help it.  I’ve been thinking I need to start “Rhinestones Anonymous”.  I want to put them on everything!!  And when I discovered that using the tip of the Piercing Tool to pick the Rhinestones up and place them right where I want them – well, it just fed my addiction!

just believe thank you card angle

Also, head on over to Facebook and let me know what you think of my craft room organization.  While you’re there, don’t forget to ‘Like’ us and follow along for more craft room storage ideas and other tidbits!

Card Recipe:
Stamps: Just Believe w-#116948 c-#120453
Ink: Versamark #102283, Midnight Muse #126860, Sahara Sand #126976
Paper: Whisper White #100730, Sahara Sand #121043
Extras: Stamp-A-Ma-Jig #101049, Stampin’ Dimensionals #104430, Clear Emboss Powder #109130, Rhinestones Basic Jewels  #119246

  Order your versamark pad and clear embossing powder today so you can add that little extra to your projects.  I hope you enjoyed this clean and simple Just Believe thank you card.

Enjoy, Julie